Stop the Buffering and Get Back to Browsing with These Practical Tips for Optimizing Your Home Network
Key Takeaways
- Run a wired speed test first to diagnose whether the severe slowdown is caused by your outdated home equipment or a genuine issue with your internet service provider.
- Optimize your hardware placement by moving the router to a central, elevated location far away from heavy physical obstructions and appliance interference.
- Update software and secure your network to fix internal routing errors before spending large amounts of money on faster service plans or brand-new equipment.
Few things are more frustrating than settling in for a movie night only to watch a loading circle spin endlessly or dropping out of an important remote work call because your connection decided to take an unexpected break. While it is incredibly tempting to immediately blame your provider or rush to the store to buy a premium router, learning how to fix slow internet is often much simpler and completely free. We have compiled a comprehensive troubleshooting guide to help you quickly identify what causes slow internet, completely optimize your existing home setup, and determine exactly when you actually need to spend money on equipment upgrades.
Is Your Internet Slow on One Device or All Devices?
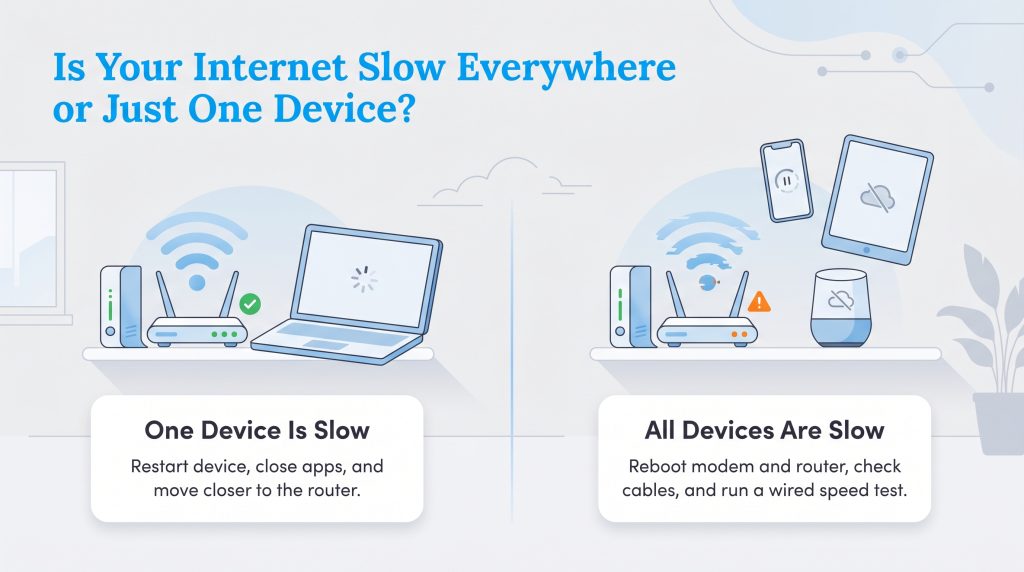
Before you start crawling under desks to unplug messy wires, you must triage the problem to identify its true scope. Diagnosing whether the slowdown affects your entire household network or just a single piece of hardware will dictate your immediate next steps and save you hours of unnecessary frustration. By observing exactly where the lag happens, you can pinpoint the bottleneck.
- If your internet is slow on just one device: Your smartphone streams high-definition video flawlessly, but your work laptop struggles to load simple emails and buffers constantly. In this scenario, your home network is perfectly fine; the specific device is the problem. You should immediately restart the affected machine, check for massive background software updates, clear your web browser’s cache, or physically move the device closer to the router to improve the wireless signal.
- If your internet is slow on all devices: Every single smartphone, desktop computer, and smart home gadget in the house is lagging, dropping connections, or displaying offline statuses. In this situation, the problem is absolutely occurring at the network level. You must proceed to power cycle your primary modem and router, inspect your main data cables, and execute a hardwired diagnostic speed test to isolate the failure point.
1. Run an Internet Speed Test
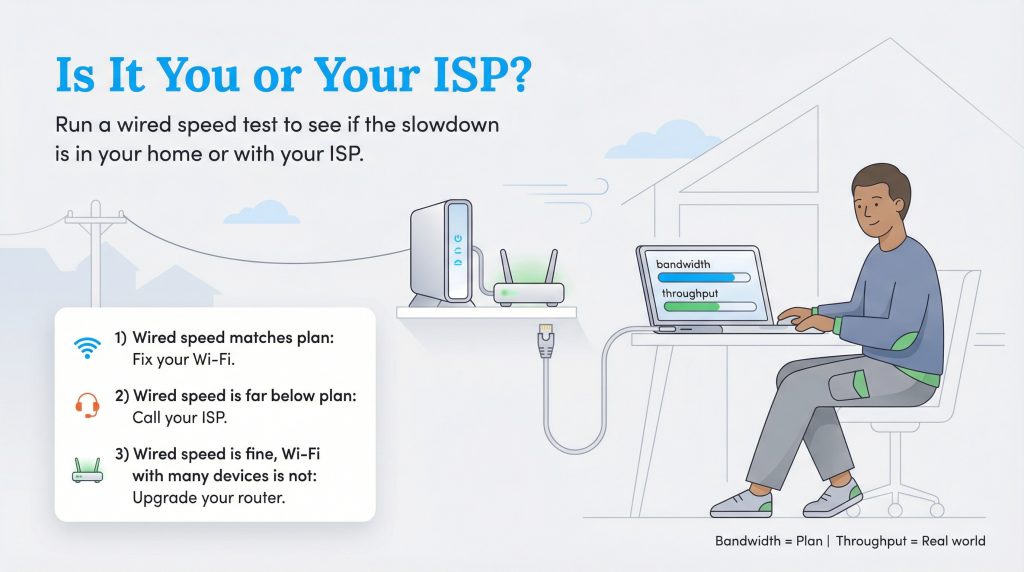
To establish an accurate baseline of your network’s actual performance, you must perform an internet speed test. While Wi-Fi is wonderfully convenient for everyday browsing, it is notoriously unreliable for testing raw incoming speeds because distance, furniture, and walls naturally degrade the wireless signal. If you have a laptop or desktop computer with an Ethernet port, use a cable to connect it directly to your modem. This establishes a hardwired connection that entirely bypasses your router’s wireless broadcast, revealing the true speed entering your home from the street. When you test internet speed hardwired, you strip away environmental variables and get raw data.
Once physically connected, run a diagnostic test using a reliable tool like Ookla’s Speedtest.net or Google’s built-in speed test tool. You should deliberately run these speed tests during both off-peak morning hours and peak evening hours (typically between 7:00 p.m. and 11:00 p.m.). Testing during peak hours helps you map potential internet service provider (ISP) node congestion in your specific neighborhood. Compare your download and upload numbers directly to your most recent billing statement to see if you are getting what you pay for. For helpful context on what numbers you realistically need for different household activities, read our guide on what is a good internet speed, or check the FCC’s Broadband Speed Guide. To quickly decide your next move, follow this simple diagnostic path:
- If your wired speed test matches your plan but Wi-Fi is slow: Focus your efforts entirely on router placement, Wi-Fi settings, and removing physical obstructions in your home.
- If your wired speed test is far below your plan: The problem is likely outside your house. Contact your internet service provider to request a physical line check.
- If your wired speeds are fine but your router struggles with multiple devices: Your aging hardware is overwhelmed by the sheer volume of connections, and you should consider upgrading to a mesh system.
2. Power Cycle Your Modem and Router
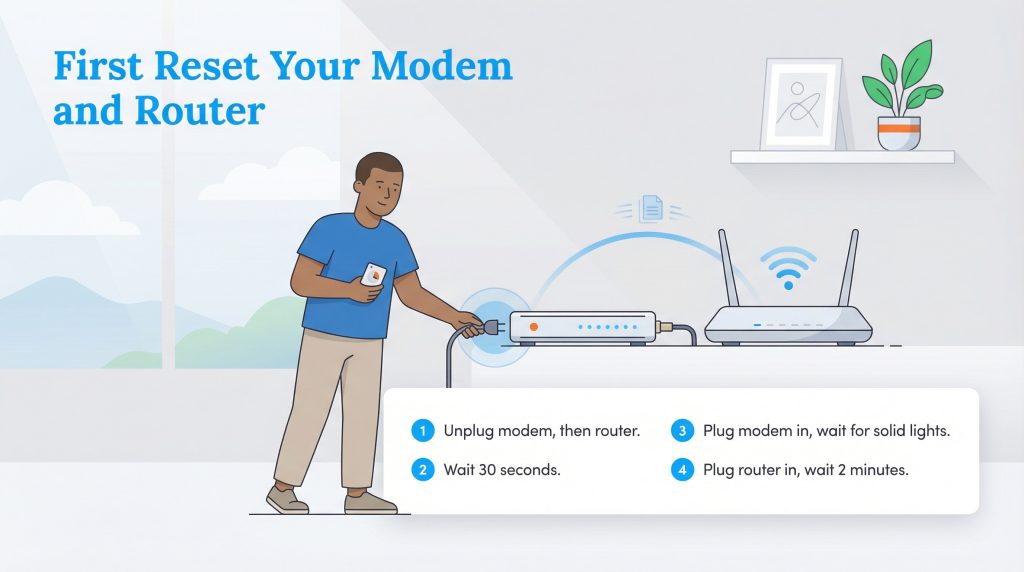
It remains the ultimate tech support cliché for a very good reason. “Have you tried turning it off and on again?” This essential step, formally known as power cycling, is the single most effective fix for unexpected network glitches. Modems and routers are essentially tiny computers running complex internal software. Over time, their internal memory fills up with temporary data, and they inevitably encounter logic errors that slow down data processing. A hard restart clears this short-term cache, cools the internal processors, and forces your equipment to establish a fresh, uncorrupted connection with your ISP.
To execute this correctly, you cannot just unplug everything simultaneously and hastily jam the cords back into the wall. There is a precise order of operations that ensures each piece of equipment reboots and handshakes properly with your provider:
- Unplug the power cord from your modem: This is the primary device connected directly to your wall outlet via a coaxial or fiber optic cable.
- Unplug the power cord from your router: This is the secondary device broadcasting your Wi-Fi signal. If you lease a combined gateway unit from your provider, simply unplug that single machine.
- Wait a full 30 to 60 seconds: This pause is non-negotiable. It allows the internal electrical capacitors to discharge completely, ensuring the device memory fully wipes before restarting.
- Plug the modem back in first: Wait for approximately 60 seconds or until the indicator lights on the front panel display a stable connection (usually solid green or white).
- Plug the router back in last: Wait another two minutes for the device to boot up entirely and begin broadcasting your wireless network again.
3. Check Ethernet Cables and Remove Coaxial Splitters
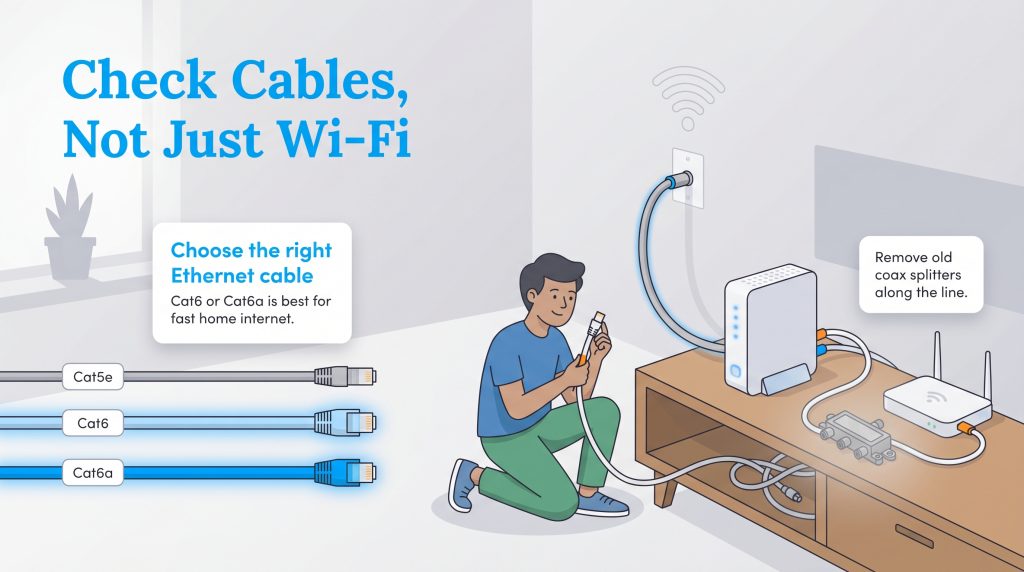
People frequently blame their wireless settings when the true culprit is advanced physical hardware degradation. The cables connecting your modem to your router — and your router to your desktop computer — act as the physical highways carrying all your internet traffic. If those vital highways are damaged or utilizing outdated technology, your speeds will suffer immensely regardless of how much you pay your provider each month. Start by visually inspecting the tangled cords running behind your media desk. Look closely for severe external fraying, extreme bending near the connector clips, or subtle chew marks from household pets.
Next, check the side of your primary Ethernet cable for printed text indicating its specific category. If you are using an older cable, you might be strictly capping your maximum speeds.
| Ethernet Cable Category | Maximum Speed Supported | Bandwidth Frequency | Best Use Case |
|---|---|---|---|
| Cat5e | 1,000 Mbps (1 Gbps) | 100 MHz | Basic home networks and light everyday browsing. |
| Cat6 | 10,000 Mbps (10 Gbps) at short distances | 250 MHz | Standard for modern home streaming, gaming, and remote work. |
| Cat6a | 10,000 Mbps (10 Gbps) at longer distances | 500 MHz | Future-proofing your home and running wires through walls. |
In addition to upgrading outdated Ethernet cables, cable internet customers must hunt down and remove coaxial splitters. If you live in an older home that previously utilized traditional cable television, your physical lines are likely split multiple times to feed different rooms. Every single time a coaxial cable passes through a splitter, the primary data signal degrades by roughly half. To fix this common hardware bottleneck, trace the thick, round coaxial cable from your wall directly to your modem. Unscrew and remove any unnecessary metal splitters along that path, and connect a single, continuous coaxial cable straight from the primary wall jack into your modem. This instantly eliminates physical interference and strengthens your incoming signal.
4. Optimize Your Router Placement
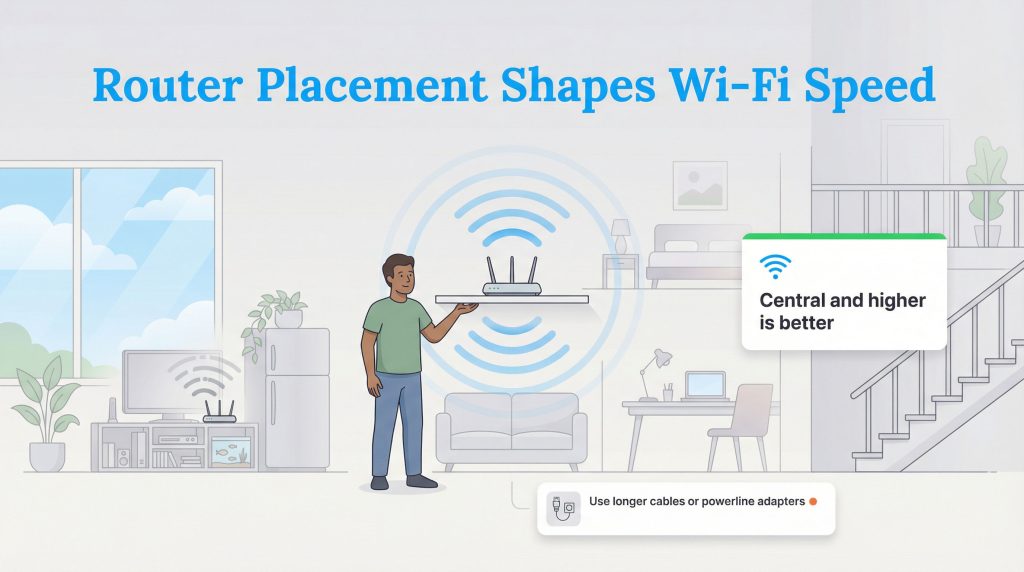
If you want to troubleshoot network interference, you must first understand that your router’s physical location largely dictates the overall quality and reach of your wireless network. Many homeowners mistakenly hide their networking equipment inside media cabinets, behind heavy wooden bookshelves, or tucked away in the deepest corner of the basement to keep the flashing indicator lights out of sight. Unfortunately, Wi-Fi signals are simply radio waves that drastically lose strength when forced to penetrate dense materials.
To optimize router placement and maximize coverage, elevate your equipment on a high, central shelf so the signal easily broadcasts outward and downward without obstruction. Furthermore, you must aggressively keep your router far away from materials and appliances that scramble wireless frequencies. A fast slow wifi connection fix is to simply move your router away from the following household items:
- Microwaves: These appliances operate on the exact same 2.4 GHz frequency as standard Wi-Fi, causing massive signal interference whenever they are turned on.
- Mirrors and large metal surfaces: Reflective surfaces literally bounce the radio signal back toward the router, creating frustrating dead zones in adjacent rooms.
- Fish tanks: Water absorbs radio waves exceptionally well, making large home aquariums completely impenetrable barriers for your network.
- HVAC ducts and thick masonry: Dense concrete, brick walls, and metal ventilation shafts stop wireless broadcasts dead in their tracks, requiring direct lines of sight instead.
If you are looking to boost your signal without spending money, simply moving your primary workstation or gaming console into the same room as the router can make a massive difference. For further details on setting up your infrastructure correctly, visit our internet service setup hub.
Renter-Friendly Ways to Improve Slow Internet
If you are currently renting an apartment and cannot drill holes or rewire the property, focus solely on non-invasive adjustments. Pull the router out of enclosed cabinets and place it prominently on an open bookshelf. You can also utilize extra-long, flat Ethernet cables tucked neatly under your baseboards to directly connect your primary computer without causing permanent property damage. If running long wires is out of the question, powerline networking adapters or Multimedia over Coax Alliance (MoCA) adapters are excellent alternatives. These handy devices plug directly into standard electrical outlets or existing coaxial jacks to transmit data through your apartment’s internal wiring, offering a highly stable connection in distant rooms without requiring a single power drill.
5. Switch Wi-Fi Frequency Bands and Channels
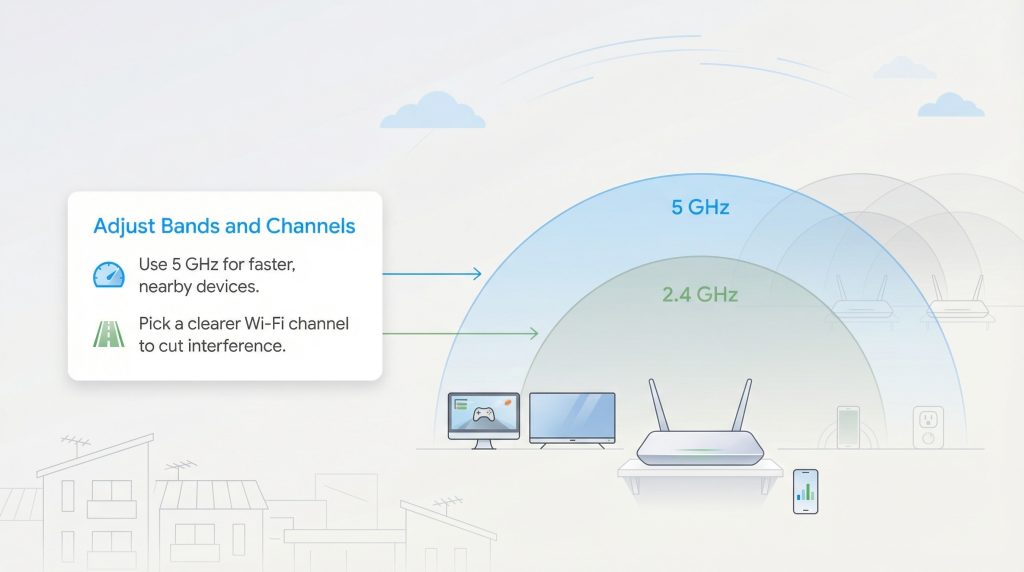
Modern dual-band routers generally broadcast on multiple frequency bands simultaneously — most commonly 2.4 GHz and 5 GHz, with premium newer models also supporting an ultra-fast 6 GHz band. Understanding the critical difference between these channels will help you aggressively manage traffic and clear out network congestion, especially if you live in a highly dense apartment complex.
The 2.4 GHz band is your steady workhorse for distance. It penetrates walls effortlessly but suffers from significantly slower top speeds and extreme crowding. Conversely, the 5 GHz and 6 GHz bands deliver blazing-fast throughput but struggle greatly to pass through solid obstacles. To maximize your home network efficiency, explicitly assign your close-range, high-bandwidth devices — like gaming consoles, 4K smart TVs, and primary laptops — exclusively to the 5 GHz or 6 GHz bands. Then, delegate all your low-bandwidth smart home tech, such as automated plugs, security cameras, and smart thermostats, to the 2.4 GHz band. This strategic separation prevents background devices from clogging up the digital lanes you desperately need for heavy lifting.
You should also adjust your specific broadcast channel. The 2.4 GHz band is notoriously crowded because most routers default to overlapping channels. You absolutely must switch your router to channel 1, 6, or 11, as these are the only three channels that do not overlap with one another. If you and all your immediate neighbors are using the exact same default router channel, your overlapping signals will clash and cause severe packet loss. To fix this, download a free Wi-Fi Analyzer mobile app to your smartphone. This tool scans the airwaves and rapidly identifies which channels are heavily congested in your neighborhood. Once you locate an empty lane, log into your router’s admin settings via a standard web browser and manually switch your broadcast channel to that clear path.
6. Adjust Quality of Service (QoS) Settings to Prioritize Traffic
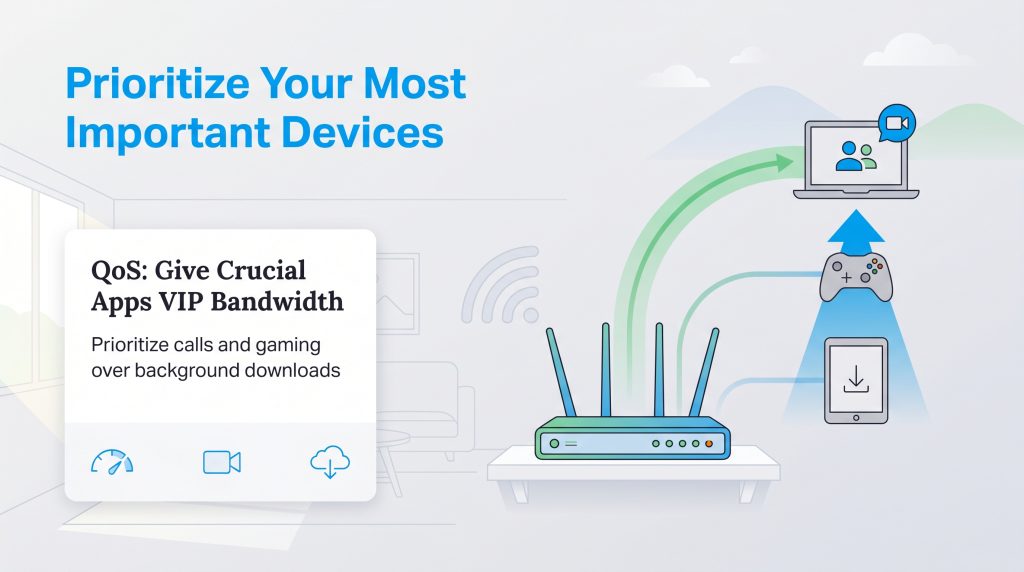
If you live in a busy household where multiple people are streaming video, playing competitive online games, and downloading massive files simultaneously, your router can easily become overwhelmed trying to serve everyone equally. To speed up internet connection speeds for your most vital devices, you should configure your Quality of Service (QoS) router settings. QoS is a powerful internal software tool that allows you to instruct your router which specific devices or internet activities should receive priority bandwidth.
To adjust your Quality of Service (QoS) router settings, you will need to access your router’s backend administrative dashboard. Follow these steps to prioritize your crucial traffic:
- Find your default gateway IP: On Windows, open the Command Prompt and type ipconfig to locate your “Default Gateway” (usually a number like 192.168.1.1 or 10.0.0.1). On a Mac, navigate to System Settings > Network > Wi-Fi > Details to find your router IP.
- Log into your router: Open your preferred web browser, type that exact IP address into the top URL bar, and press enter. You will be prompted for an admin username and password. These are typically printed on a sticker on the back or bottom of your physical router.
- Locate the QoS tab: Depending on your router brand (Netgear, ASUS, TP-Link), this setting might be found under “Advanced,” “Traffic Monitor,” or “Network Settings.”
- Assign high priority: Turn on the QoS feature. You can typically prioritize traffic by specific MAC addresses (giving your work computer permanent VIP status) or by application type (prioritizing video conferencing and gaming over background file downloads).
- Save and restart: Apply the settings and allow your router to reboot so the new traffic rules take effect immediately.
7. Change Your DNS Servers for Faster Routing
Every time you type a website name into your browser, your computer uses the Domain Name System (DNS) to translate that human-readable address into a numerical IP address. Think of DNS as the digital phonebook of the internet. By default, your internet service provider forces you to use their private DNS servers. Unfortunately, ISP servers are notoriously slow, poorly maintained, and heavily congested, which causes a noticeable delay before a web page even attempts to load.
One of the most effective, totally free ways to change DNS settings for faster internet is to switch away from your provider’s sluggish servers and use a high-speed public alternative. Tech giants like Google and Cloudflare operate massive, globally distributed DNS networks that translate addresses in milliseconds. Changing this setting takes less than two minutes and bypasses poor ISP routing completely.
To change your DNS on Windows:
- Open Settings and click on Network & internet.
- Select Wi-Fi or Ethernet (depending on your connection) and select your network properties.
- Scroll down to DNS server assignment and click Edit.
- Change the setting from Automatic (DHCP) to Manual and toggle IPv4 on.
- Enter Google’s DNS (Primary: 8.8.8.8, Alternate: 8.8.4.4) or Cloudflare’s DNS (Primary: 1.1.1.1, Alternate: 1.0.0.1).
- Click Save to instantly route your traffic through the faster servers.
To change your DNS on a Mac:
- Open System Settings and click on Network.
- Select your active connection (Wi-Fi or Ethernet) and click Details.
- Navigate to the DNS tab in the sidebar.
- Click the + (Plus) button under DNS Servers and type 8.8.8.8 or 1.1.1.1.
- Click OK to apply your new ultra-fast routing preferences.
8. Disconnect Bandwidth Hogs and Background Apps

Sometimes the disruption is coming entirely from inside the house. If your internet is suddenly crawling at a snail’s pace, you might have hidden background applications secretly draining your bandwidth. Cloud backup services like iCloud, Google Drive, or Dropbox are notorious for syncing massive video files in the background without prompting you. Furthermore, gaming clients routinely initiate 50-gigabyte auto-updates right in the middle of your workday, completely starving your Zoom calls of necessary data.
If you are actively experiencing slow internet on one device while the rest of the household hums along smoothly, check for these hidden processes. Here is how to quickly identify the worst bandwidth hogs:
- On Windows: Press Ctrl + Shift + Esc to open the Task Manager. Click on the “Network” column header to securely sort all active applications by their current data usage. If you spot an unessential program pulling heavy data, right-click it and select “End task.”
- On Mac: Open the Activity Monitor from your primary Utilities folder. Click over to the “Network” tab and closely review the “Received Bytes” and “Sent Bytes” columns. Highlight any unrecognized or unnecessary program consuming large amounts of data and click the “X” icon at the top to force quit.
Run a comprehensive malware scan as well. Malicious software often hijacks your connection to quietly transmit stolen data back to remote servers, slowing everything else down in the process. Finally, verify that your wireless network is actually secure. If you still use an open network or a weak default password, neighbors might be piggybacking on your connection to stream free movies. Change your Wi-Fi password to a complex phrase to instantly kick out any unauthorized users.
9. Optimize Browser and Device Network Settings
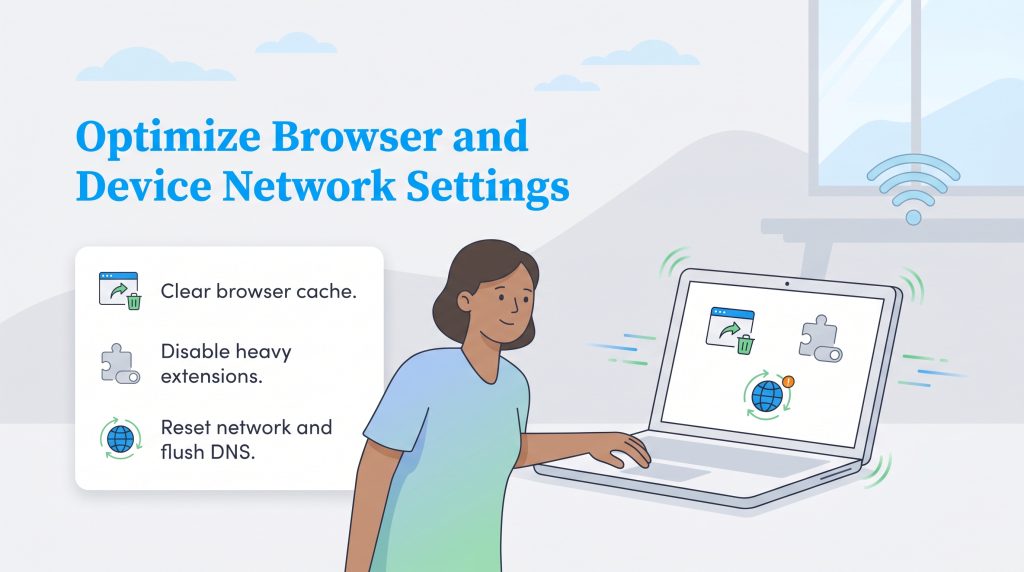
If your physical cables are pristine and your router is perfectly placed, the persistent slowdown might stem directly from software issues on your laptop or smartphone. Overloaded browsers and corrupted system files can easily mimic the exact symptoms of a bad internet connection. To ensure your device is running optimally and capturing the speeds you pay for, perform the following software-level adjustments:
- Clear your browser cache: Web browsers intentionally store temporary files and images to load familiar sites much faster. However, when this internal cache grows too large or becomes corrupted over time, it drastically slows down page loading. Go into your browser settings and regularly clear your cached images and files.
- Disable heavy browser extensions: Ad blockers, grammar checkers, and automated coupon finders run continuous background scripts. Turn off any extensions you do not use daily to free up critical processing power.
- Execute a Network Reset: Sometimes, deeply buried software settings become misconfigured, requiring a total reset. To fix slow internet on Windows 11, navigate to Settings > Network & internet > Advanced network settings > Network reset, and click “Reset now.” This reinstalls all your network adapters and returns components to their original factory settings. To perform a similar reset on macOS, go to System Settings > Network, delete your current Wi-Fi connection using the minus button, and add it back fresh.
- Flush your DNS cache: As a slightly advanced fix, flushing your local DNS cache clears out outdated IP addresses that might be redirecting your traffic inefficiently. On Windows, open the Command Prompt and type ipconfig /flushdns. On Mac, open Terminal and enter sudo dscacheutil -flushcache.
10. Upgrade to a Mesh System or Wi-Fi 6 Router
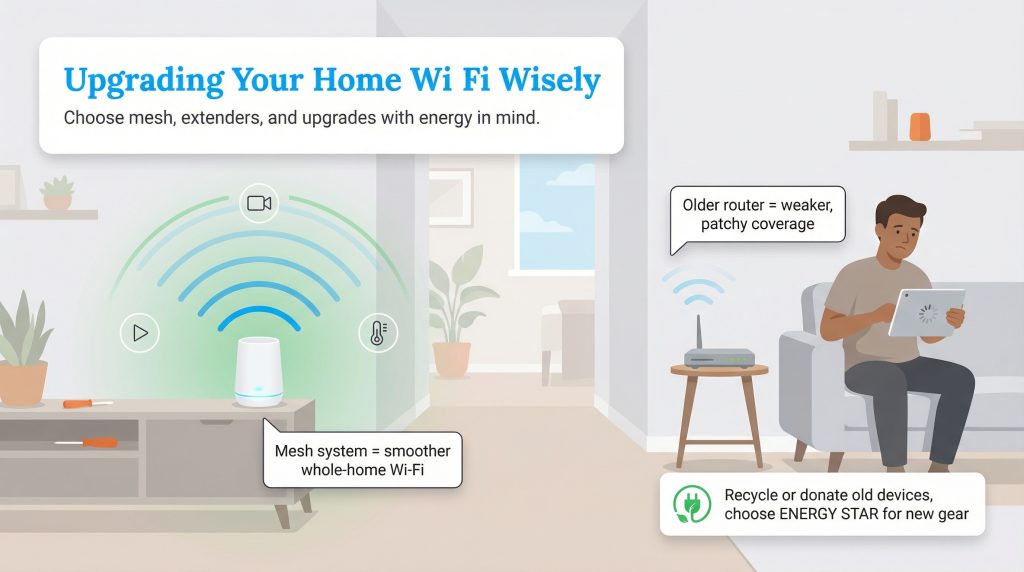
If you have diligently worked through all the troubleshooting steps and your connection remains sluggish, your aging hardware is highly likely the ultimate bottleneck. As a hard rule, you should strongly consider completely replacing your router if it is more than five years old or no longer supported by modern firmware updates from the original manufacturer. Outdated routers simply lack the processing power, modern internal protocols, and multiple internal antennas necessary to handle the high-definition streaming, remote video conferencing, and dozen-plus smart devices common in modern households.
When investing in an upgrade to permanently extend coverage, you generally choose between Wi-Fi extenders or Mesh Wi-Fi systems. Extenders are budget-friendly plug-in devices that capture and re-broadcast your signal into stubborn dead zones. However, they typically halve your effective speed during the rebroadcast process and force you to manually switch networks as you walk around the house. Our standard wifi extender setup guide suggests placing the unit halfway between your router and the problematic room.
For mid-sized and large homes, upgrading to a Wi-Fi 6 Mesh system provides a far superior daily experience. Mesh networking relies on multiple interconnected nodes placed strategically throughout your floor plan. These smart nodes communicate flawlessly to create a single, unified blanket of high-speed coverage, seamlessly handing off your connection from box to box as you move from room to room. Modern Wi-Fi 6 routers also utilize advanced technologies to handle dozens of devices simultaneously without dropping speeds, making them the ultimate fix for crowded households.
If an upgrade is truly inevitable, look for ENERGY STAR certified networking gear that actively reduces power consumption when idle. Finally, ensure you dispose of your obsolete electronics responsibly. You can quickly find local donation and e-waste recycling locations through the EPA Electronics Donation and Recycling page.
11. Call Your ISP to Check for Throttling or Outages
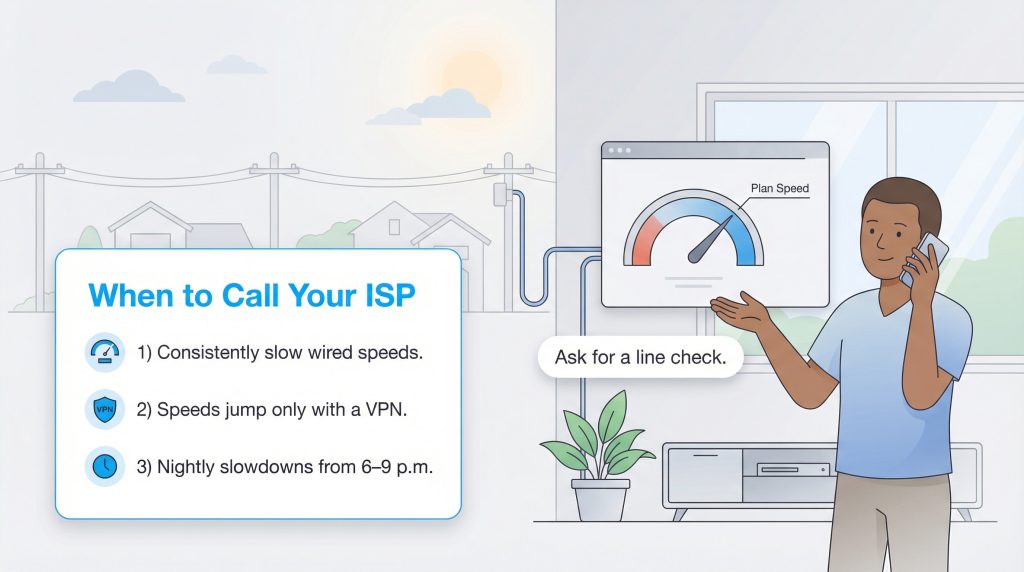
At a certain point, no amount of careful tweaking or router repositioning will solve your problem because the catastrophic failure is happening miles away from your house. If your hardwired speed test results consistently fall drastically short of your paid plan, or if your connection drops completely during minor rainstorms, you must hold your service provider accountable. You likely have a degraded physical cable coming from the street to your house or a major fault at the local distribution node.
One major concern to aggressively investigate is intentional ISP throttling. This frustrating practice occurs when providers deliberately slow down your bandwidth because you exceeded an invisible monthly data cap or engaged in incredibly heavy streaming. If you strongly suspect this is happening, try running a speed test while connected to a Virtual Private Network (VPN). If your speeds dramatically increase while the VPN securely hides your traffic, your provider is absolutely throttling your connection.
When you eventually call customer support, you want to bypass the basic Tier 1 support script quickly. Use this exact bulleted script to communicate clearly with the representative:
- “I am experiencing severe network lag, and I have already power-cycled my modem, bypassed my router, and run a hardwired speed test.”
- “My current hardwired download speed is [insert speed], which is significantly below the [insert speed] I am paying for.”
- “Can you please check the line attenuation and packet loss history on my specific account?”
- “Can you also verify if there is known neighborhood node congestion on my street or if my modem has been provisioned correctly?”
If your provider refuses to fix the failing infrastructure, it is clearly time to negotiate a better rate or transition to a competitor. For additional strategies on managing your monthly costs, read our comprehensive guide on how to save on internet.
Preparing Your Home Network for High-Speed Streaming

Fixing slow internet speed is fundamentally a strict process of elimination. While dealing with endless buffering is incredibly frustrating, systematically checking your physical hardware, optimizing your router placement, prioritizing network traffic, and cleaning up your device settings will almost always resolve the issue without requiring you to spend a dime. By moving step-by-step from simple hardware resets to advanced DNS configurations, you ensure no stone is left unturned. To ensure your connection remains lightning-fast and ready for 4K streaming month after month, adopt this simple three-point maintenance checklist:
- Reboot monthly: Proactively power cycle your modem and router once a month to clear digital clutter and refresh the vital connection to your ISP.
- Audit your connections: Regularly log into your router’s companion app to review connected devices and permanently boot unfamiliar or unused technology stealing your bandwidth.
- Inspect hardware physically: Dust off your router to prevent severe overheating and verify that your Ethernet cables remain completely free of crimps and pet damage.
By treating your home network exactly like any other essential household utility that requires minor upkeep, you can entirely stop the lag, dramatically optimize your speeds, and enjoy a perfectly seamless browsing experience for years to come.
Frequently Asked Questions About Fixing Slow Internet
Why is my internet so slow all of a sudden?
How do I fix slow internet on my Windows 11 computer?
How do I fix slow internet on just one device?
Does using a VPN slow down my internet speed?
Will clearing my browser cache speed up my internet?
Why is my internet so slow at night?
Does a Wi-Fi booster actually work?
Can weather affect my internet speed?
How do I know if my internet cable is bad?
Is 100 Mbps fast enough for a family?
About the Author

David has been an integral part of some of the biggest utility sites on the internet, including InMyArea.com, HighSpeedInternet.com, BroadbandNow.com, and U.S. News. He brings over 15 years of experience writing about, compiling and analyzing utility data.