Ensure a Warm Welcome by Scheduling Your Natural Gas Connection Before Moving Day
Key Takeaways
- Start the process at least three weeks before you move to avoid service gaps or rush fees.
- Gather necessary documents like your lease, ID, and Social Security Number before calling providers.
- Check if you live in a deregulated energy market to potentially save money by choosing your own gas supplier.
Moving is stressful enough without taking your first shower in freezing water. You will learn exactly when to call, what documents you need, and what to expect on move-in day when navigating gas service setup for new homeowners. Use this step-by-step checklist to establish your connection seamlessly, coordinate with your utility, and ensure your property is safe and warm from day one.
1. How to Find Your Natural Gas Provider
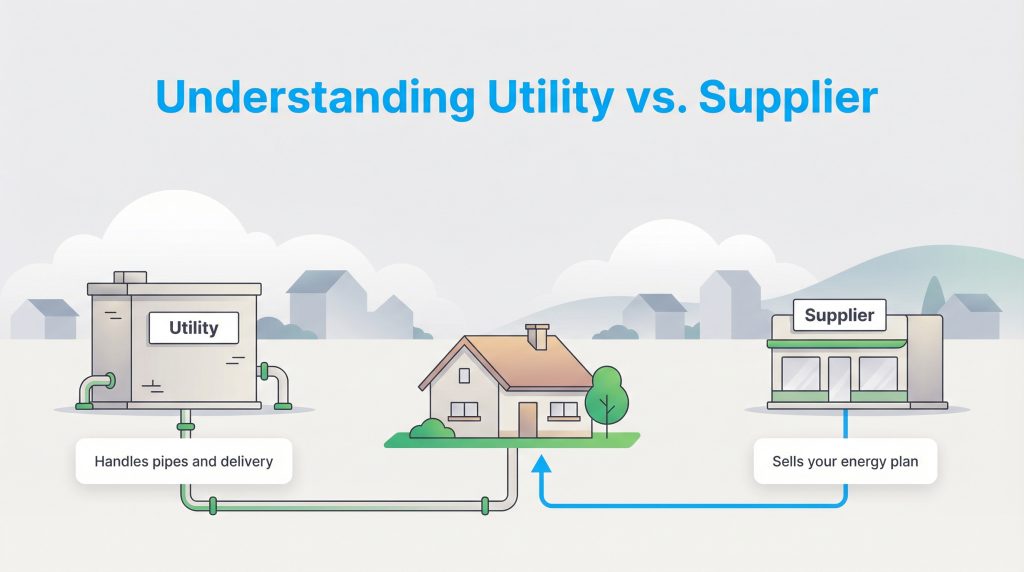
Before making any phone calls, you need to understand the specific rules of your local energy market. Depending on where your new home is located, you might have more choices than you realize. Setting up utilities for the first time starts with identifying whether you live in a regulated or deregulated energy market.
In a fully regulated market, a single municipal or investor-owned company handles everything. They buy the natural gas, maintain the underground infrastructure, and send you the monthly bill. If you live in a deregulated market — such as Pennsylvania, Texas, Georgia, or New York — the industry is split. The utility company still owns the pipes and delivers the gas safely, but you can shop around for a separate supplier to get the best rate. Understanding a deregulated natural gas market setup empowers you to read our tips for choosing a natural gas plan and lock in a highly competitive price.
If you aren’t sure who is servicing your address, check these reliable sources to find out who your natural gas provider is:
- Local municipality website: Many city or county websites list the designated utility providers for different neighborhoods.
- Previous homeowner or landlord: The easiest way to find out is to directly ask the person who currently pays the bill.
- Real estate agent: Experienced agents keep a roster of local utility contacts to pass along to their clients at closing.
- Homeowners Association (HOA): If you are moving into a managed community, the HOA can provide a definitive list of approved service providers.
2. Transferring Service vs. New Meter Installation
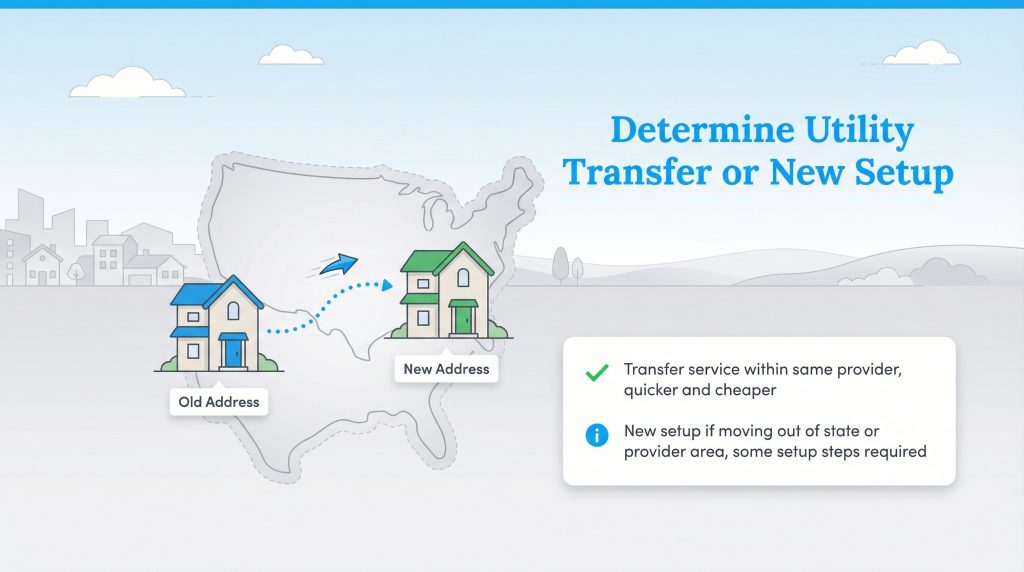
There is a massive difference between setting up utilities for a pre-owned home and establishing a gas connection for a new build. If you are buying an existing home, the underground pipes and the meter are already in place. Figuring out how to transfer gas service to a new owner simply involves flipping the account into your name and having the company read the gas meter to ensure you aren’t charged for previous usage.
Conversely, a new construction gas line installation requires significant coordination between your general contractor, local municipal inspectors, and the utility company. This process involves trenching a physical path from the main line at the street up to your foundation. Review the comparison below to understand the key differences between these two scenarios.
| Feature | Transferring Existing Service | New Meter Installation |
|---|---|---|
| Time Required | 3 to 5 business days | 4 to 8 weeks (depending on local permits) |
| Average Cost | $20 to $50 connection fee | Hundreds to thousands (for trenching/lines) |
| Physical Requirements | Meter is already attached to the house | Requires digging, pipe laying, and strict pressure tests |
| Who Coordinates? | Homeowner and customer service agent | Homeowner, builder, and utility engineers |
3. The Gas Service Setup Timeline
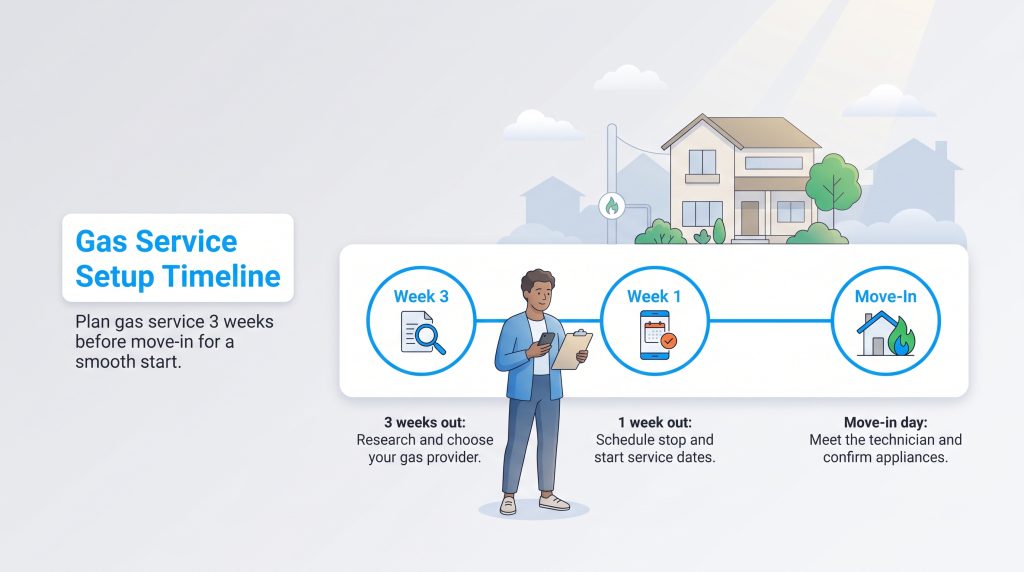
Timing is everything when coordinating home utilities. Calling too late can leave you without central heating, while calling too early might mean paying for energy you aren’t actively using. Follow this chronological checklist to stay completely on track during your move.
3 Weeks Out: Research and Compare
At the three-week mark, your goal is pure information gathering. Start by verifying if you live in a deregulated market and comparing supplier rates. Decide whether you need to transfer your existing service or start a completely new account. This is also the perfect time to begin rounding up your necessary setup documents.
1 Week Out: Schedule the Activation
Seven days before your move, it is time to make things official. Call your chosen provider or go online to schedule your service activation. Request a “Stop Service” order for your current home for the day after you move out and a “Start Service” order for your new home for the day before you arrive. Ask the representative if a technician needs to physically enter the property, as turning on gas in a vacant house frequently requires a scheduled appointment window.
Move-In Day: Safety and Verification
On the day you arrive, be prepared to meet the utility technician if your service requires an in-person unlock. Keep your phone handy, ensure an adult is present, and be ready to ask any questions about your specific appliances during the walk-through.
4. What You Need to Open a New Gas Account
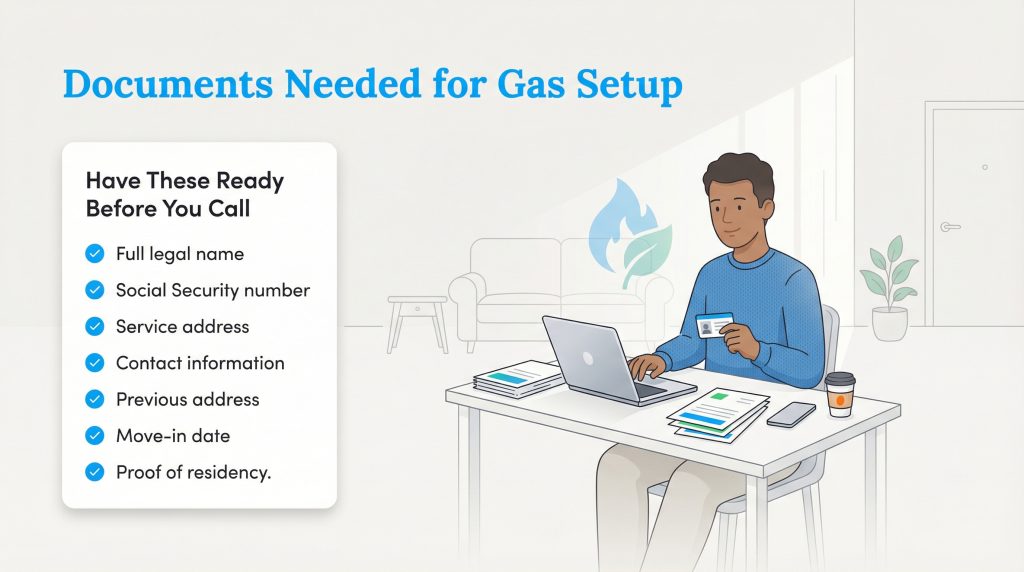
Preparation is your best friend when tackling your utility setup checklist. Calling a provider without the proper paperwork nearby will only result in delays and frustration. Customer service agents are legally required to verify your identity and assess your creditworthiness before activating a potentially hazardous utility in your name. Gather the following items before you pick up the phone:
- Government-issued ID: Have your full legal name ready exactly as it appears on your driver’s license or passport.
- Social Security Number (SSN) or Tax ID: Utilities use this to run a soft credit check and determine if a deposit is necessary.
- Exact service address: Note the full address of your new home, including any specific unit, apartment, or lot numbers.
- Lease or closing documents: Keep a copy of your signed agreement handy to formally prove you are legally authorized to start service at that address.
- Preferred start date: Know the specific day you officially take possession of the property so you can schedule the activation accurately.
5. Understanding Deposits and Setup Fees
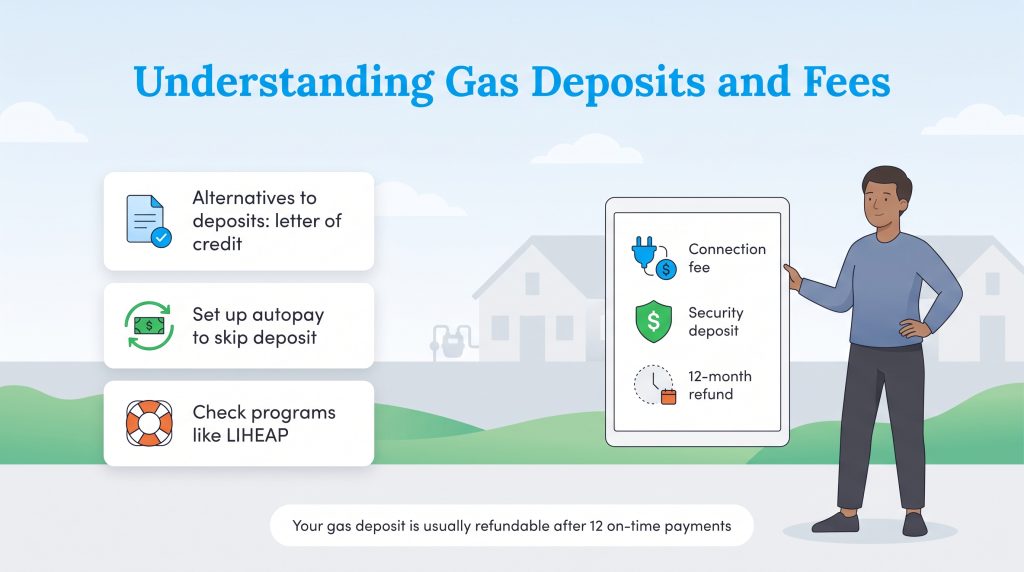
During your initial phone call, you will also handle the upfront costs of establishing your connection. Most providers charge a standard connection fee ranging from $20 to $50 to cover basic administrative processing. Depending on your soft credit check, you might also face a gas utility deposit for new customers.
Utility companies use this deposit as insurance against missed payments. It typically ranges from $50 to $250. Fortunately, you don’t always have to pay it out of pocket. Here are a few reliable alternatives to paying a security deposit:
- Submit a Letter of Credit: If you have a flawless 12-month payment history with your previous utility, ask them to send a formal letter to your new provider.
- Set up autopay: Some companies waive the deposit completely if you enroll in automatic bank drafts.
- Provide a guarantor: Have a close friend or family member with an established account in good standing co-sign for your service.
If finances are exceptionally tight during the move, check if you qualify for state programs like LIHEAP (Low Income Home Energy Assistance Program). This program can occasionally assist with bills and deposits or reconnection fees.
6. The Move-In Day Safety Inspection
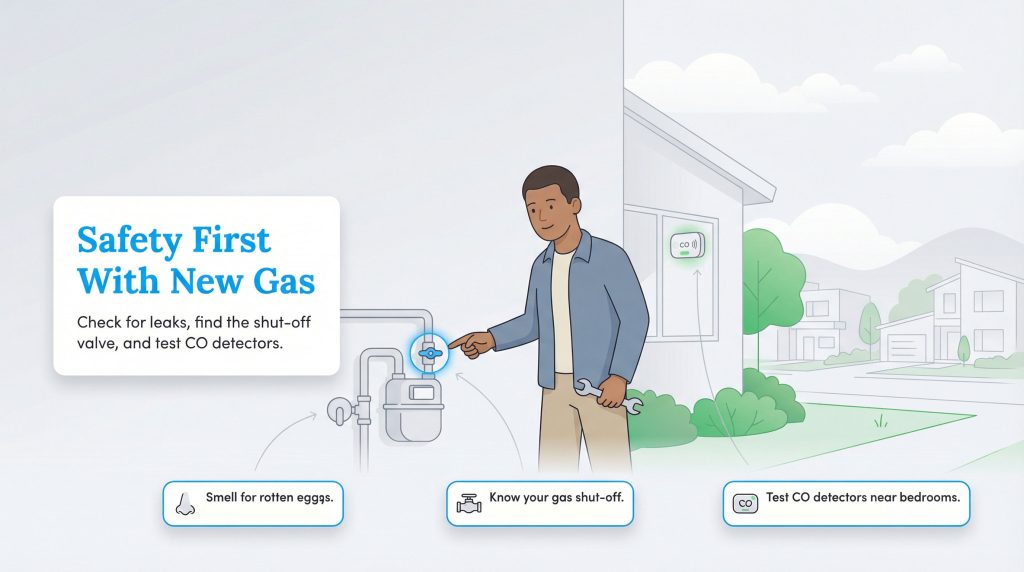
Once your move-in day arrives, a natural gas safety inspection is crucial, especially when restoring energy to a new home. If the gas meter is located inside a basement, or if the service has been physically locked at the street by the city, an adult who is at least 18 years old must be present to grant access. The gas company will never turn on the service if the property is completely empty.
During the appointment, the certified technician plays a vital role in protecting your home. They will perform a pressure test on the lines to ensure there are no active leaks hiding behind your drywall. Once the system is verified as safe, the technician will walk through the house and manually light the pilot lights on older water heaters and furnaces. Never attempt to light a lingering standing pilot yourself unless you are highly experienced.
You can also handle some basic safety checks on your own. Natural gas is naturally odorless, but utilities add a harmless chemical called mercaptan that smells strongly of rotten eggs to alert you to danger. If you ever smell gas, do not use electrical switches, cell phones, or lighters inside. Leave the house immediately and call 911. Finally, ensure you install fresh batteries in all Carbon Monoxide (CO) detectors before spending your first night in the house.
7. Securing Your New Home’s Energy
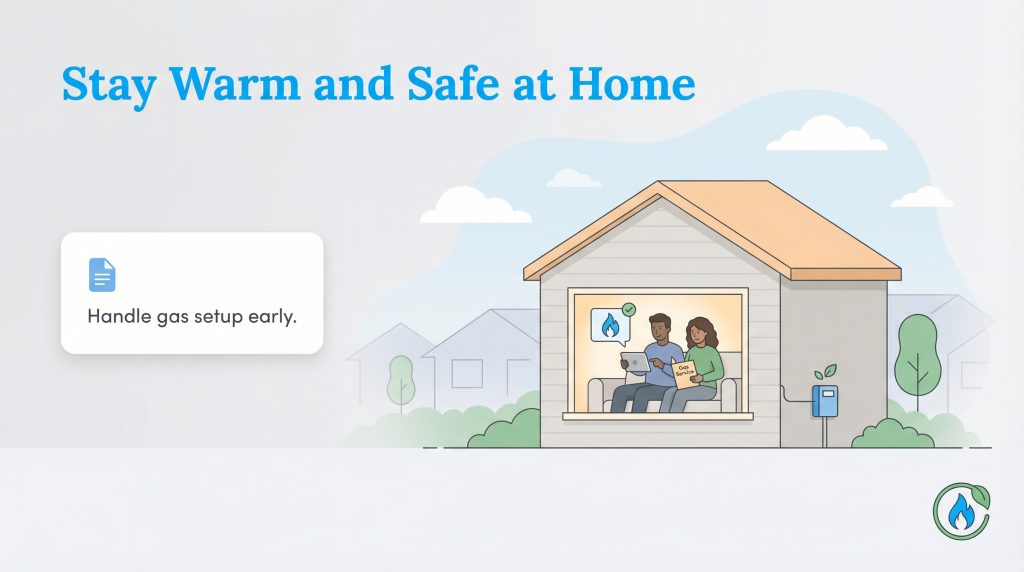
Setting up your utility accounts is arguably one of the most critical steps in turning a cold, empty house into a welcoming home. By handling your paperwork early, understanding the upfront deposit costs, and prioritizing move-in day safety checks, you guarantee that your first week in the new place is memorable for all the right reasons. Keep your new account documents filed in a safe location, establish an online payment profile to avoid late fees, and relax knowing your home is warm, functional, and secure.
Establishing service is just the beginning. Make an environmentally mindful choice by eventually upgrading to highly efficient certified heating appliances, sealing drafty windows, and reading up on how to save on your gas bill. With a bit of strategic foresight, you will stay incredibly comfortable while being perfectly positioned to keep your energy usage firmly in check.
Frequently Asked Questions About Gas Service Setup
How long does it take to turn on gas service?
Generally, you should allow three to five business days for a standard connection. However, during peak moving seasons like summer and early fall, appointment slots fill up rapidly. We recommend calling at least three weeks in advance. While some utilities can accommodate same-day or next-day start service, you will typically be required to pay an expedited rush fee.
Do I have to be home when the gas company turns on service?
If the gas is currently shut off at the meter, yes. A technician generally requires an adult who is 18 or older to be present inside the home. They must inspect the indoor appliances, ensure there are no active leaks, and safely light the pilot lights before leaving the system active.
Can I turn on the natural gas meter myself?
No, you should never attempt to turn on a locked natural gas meter yourself. Tampering with utility equipment is illegal and highly dangerous. If the service is disconnected, you must schedule an appointment with a certified technician to perform a pressure test and properly unlock the valve.
Will I have to pay a deposit for my new gas utility account?
Depending on your credit history and your specific state regulations, utility deposits usually range from $50 to $250. This deposit acts as insurance for the utility company, but it is highly likely to be refunded to your account after 12 consecutive months of on-time payments. You may also avoid it by providing a letter of credit from a previous provider.
Can I transfer my gas service to another person?
Yes, you can often transfer gas service to a new owner or a roommate, but policies vary heavily by company. In many situations, such as a divorce or roommates parting ways, the utility will mandate that the old account be closed and a completely new one opened to clearly establish ongoing financial liability.
What if my new home has gas appliances but no service is active?
If the service has been disconnected for an extended period — typically more than six to 12 months — the main line may be capped or locked. You will likely need to hire a professional to perform a safety inspection and a pressure test on the lines before the utility agrees to unlock the meter and restore the flow of gas.
About the Author

Claudio is a sustainability-focused writer with a background in Anthropology and Psychology from NC State University. He has spent over 15 years working in writing, interpretation, and translation, driven by a deep interest in how human culture shapes the environment. Today, he shares his curiosity with readers by writing about sustainable living solutions and the connection between everyday choices and environmental impact.