Save money and reduce plastic waste with this simple DIY project for homeowners and renters.
Key Takeaways
- Identify your cold water line under the sink before starting to ensure you attach the adapter to the correct pipe.
- Choose a method that fits your home by deciding between drilling a new hole for a faucet or utilizing an existing soap dispenser opening.
- Flush the system for several minutes after installation to remove loose carbon particles and ensure the water is clear and safe to drink.
Plumbing projects often feel intimidating, but learning how to install an under sink water filter is one of the most manageable and rewarding upgrades you can make in your kitchen. Whether you own your home or rent an apartment, adding a dedicated under sink water filtration system is a straightforward way to improve your daily hydration while significantly cutting down on single-use plastic bottles. This step-by-step DIY under sink water filter installation guide walks you through the entire process, covering essential plumbing best practices, permanent mounting methods, and clever renter-friendly hacks so you can enjoy crisp, clean water directly from your tap without the stress.
Types of Under Sink Filters: Reverse Osmosis Versus Inline
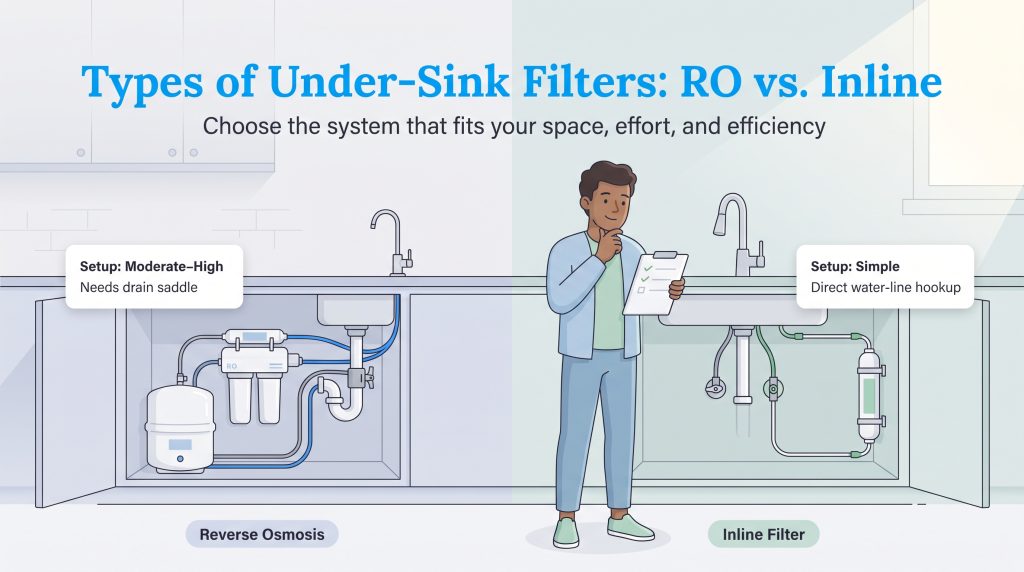
Before you dive into the installation process, it is important to understand the specific type of system you are working with. The complexity of your DIY project will vary depending on whether you are tackling a reverse osmosis system installation or a simpler inline water filter setup. Both provide excellent water purification, but they interact with your plumbing in completely different ways.
Reverse osmosis (RO) systems offer the highest level of contaminant removal by forcing water through a semi-permeable membrane. However, because this process generates wastewater, an RO setup requires extra steps — specifically, installing a drain saddle on your sink’s PVC drain pipe and accommodating a bulky water storage tank. Conversely, an inline system connects directly to your existing plumbing, filtering the water instantly as it passes through the carbon or sediment cartridges without generating any wastewater.
| Feature | Reverse Osmosis System | Inline Filter System |
|---|---|---|
| Setup Complexity | Moderate to High (requires drain hookup) | Low (direct connection to cold water line) |
| Space Requirement | Large (requires space for a storage tank) | Minimal (mounts easily to cabinet wall) |
| Wastewater Generation | Yes (typically 3 to 4 gallons per 1 gallon purified) | No (100% of water is filtered and dispensed) |
| Faucet Requirement | Always requires a dedicated secondary faucet | Can use a dedicated faucet or connect to the main tap |
Tools and Materials You Will Need
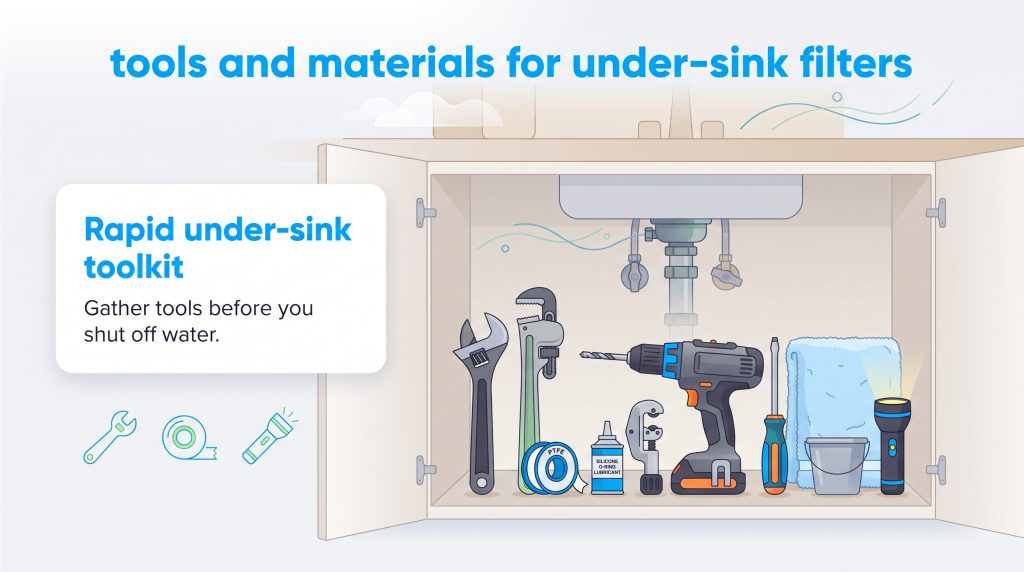
Even if you purchase the best under sink water filtration system on the market, you will still need a few standard household tools to secure the plumbing properly. Gathering everything beforehand ensures you will not have to stop halfway through the process with your water shut off. Most kits include the necessary tubing and a feed adapter, but here is the standard, rapid-fire toolkit you will need to complete the job:
- Adjustable wrench: Essential for loosening and tightening compression nuts safely.
- Basin wrench: Optional, but helps reach tight spaces behind the sink basin.
- PTFE tape (Teflon tape): Crucial for wrapping threaded metal connections to stop leaks.
- Silicone-based O-ring lubricant: Prevents rubber seals from pinching or drying out.
- Dedicated tube cutters: Ensures perfectly square cuts on plastic tubing.
- Drill and drill bits: Required only if you drill a hole for a water filter faucet.
- Screwdrivers: For securing mounting brackets to the cabinet.
- Towel and bucket: Catches residual water when disconnecting pipes.
- Flashlight: Provides essential visibility under the dark cabinet.
Pre-Installation: Inspect Pipes and Clear the Cabinet
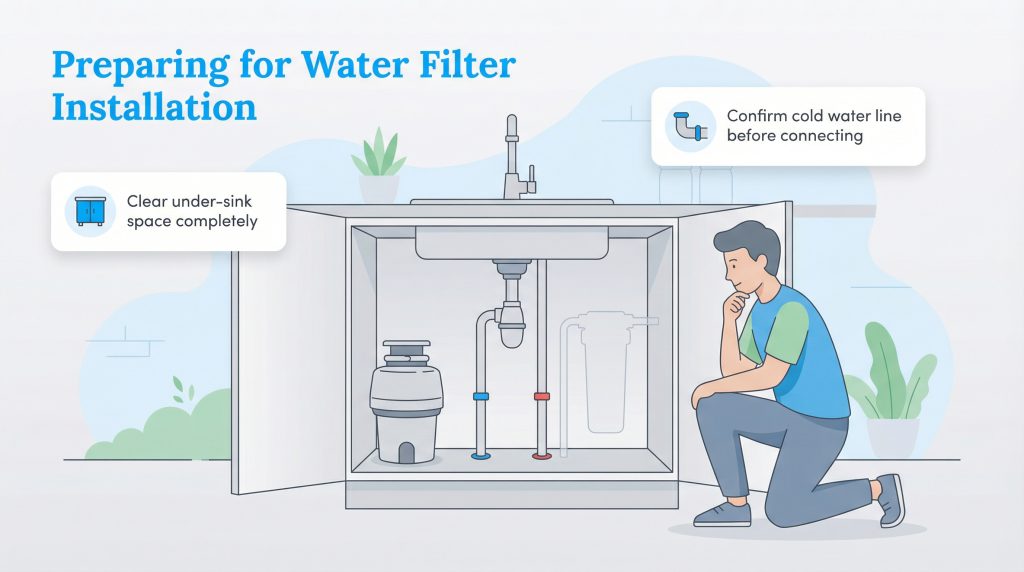
A little prep up front prevents major headaches when it comes to home improvement tasks. Before you gather your tools, you need to clear out the area under your sink entirely to ensure ample room to maneuver. WARNING: Before beginning, verify there are no active leaks, structural pipe rot, or exposed GFCI electrical outlets near your plumbing fixtures. Addressing these hazards first is non-negotiable for your safety.
Next, carefully inspect your cold water supply line. In most standard plumbing setups, the cold water line is on the right side. Verify this by turning on the hot water at the sink and feeling the pipes; the pipe that remains cool is your target. If the shut-off valve shows heavy corrosion or fails to stop the water flow entirely, call a plumber to replace it before you begin your home water filtration setup.
1. Shut Off the Cold Water Line and Relieve Pressure
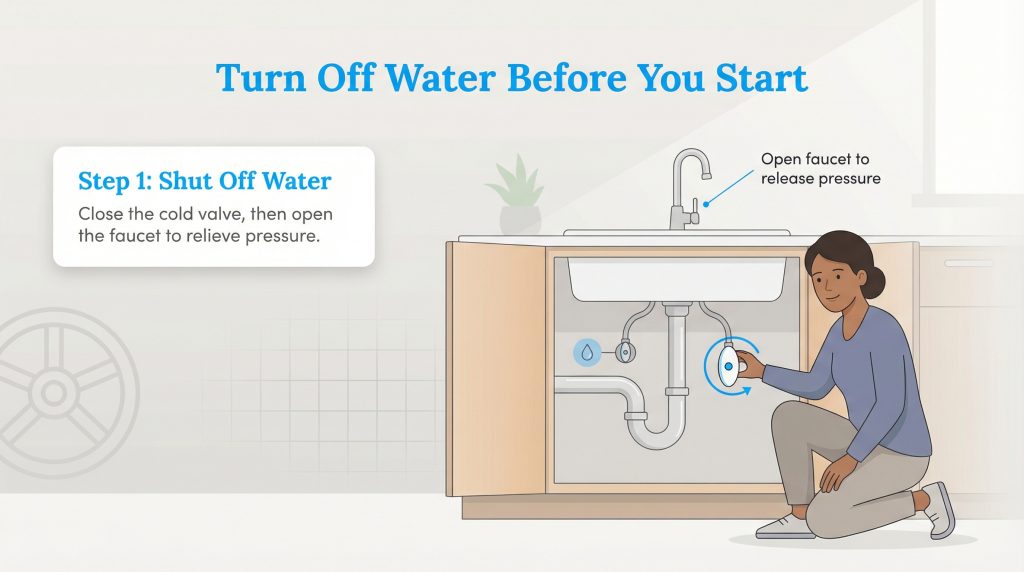
Safety comes first, and that means establishing absolute control over the water flow. To connect your water filter to the cold water line safely, you must completely disable the supply. Locate the oval-shaped shut-off valve on the cold water line. Turn the cold water shut-off valve clockwise (to the right) until it stops turning. Never force a stuck valve, as breaking the stem will cause an immediate flood. If it will not budge, shut off the main water supply to your house.
Once the valve is closed, turn on your kitchen’s cold water faucet. You will see a brief flow of water that quickly trickles to a stop. Leave the faucet open to ensure all remaining pressure is relieved from the line. This prevents trapped water from spraying out at you when you unscrew the connections under the sink.
2. Install the T-Adapter Feed Valve
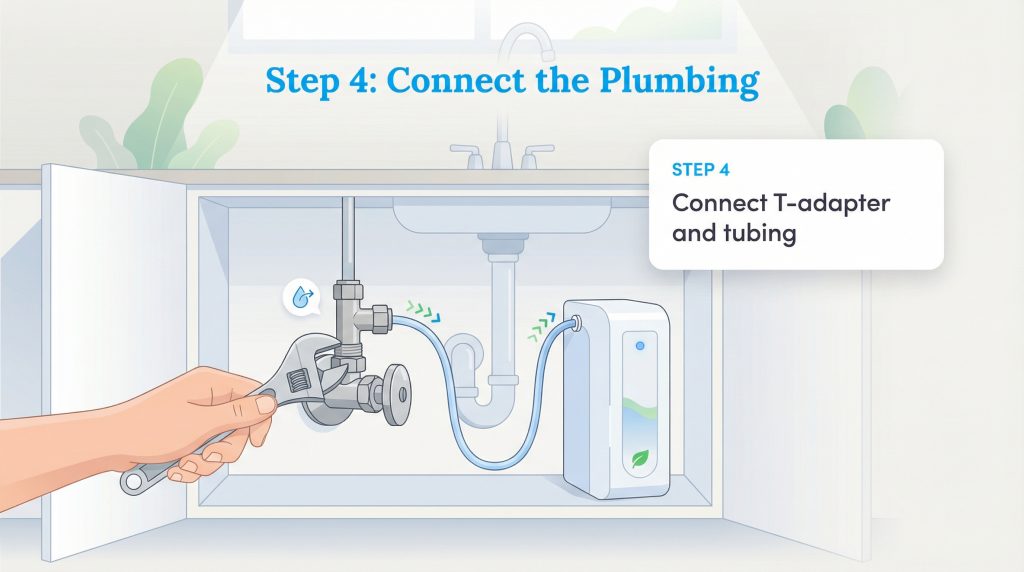
The T-adapter feed valve serves as a detour for your plumbing, directing the main flow back to your regular kitchen faucet while diverting a dedicated stream to your new filtration system. Place your bucket directly under the shut-off valve. Use your adjustable wrench to carefully disconnect the existing riser tube (the braided hose going up to your main kitchen faucet) from the wall valve.
Wrap all threaded metal connections with PTFE tape. Apply three tight wraps in a clockwise direction to fill the microscopic gaps in the metal threads. Thread the T-adapter onto the shut-off valve by hand to avoid cross-threading, then tighten it snugly with your wrench. Finally, reconnect the kitchen faucet’s riser tube to the top male threads of the newly installed T-adapter.
3. Mount the Under Sink Filter Housing
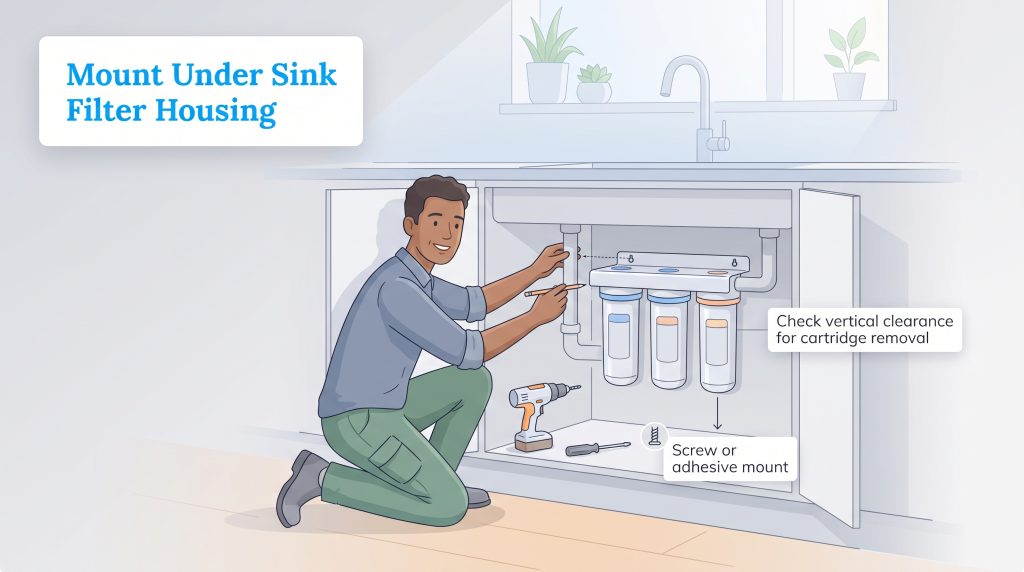
Where you place the main housing unit depends heavily on your cabinet layout. Hold the filter manifold against the cabinet wall and verify there is enough vertical clearance below it. You must leave room to pull the filter cartridges straight down during future replacements. If you mount the system too low, the cartridges will hit the floor before they unscrew.
Once you confirm the clearance, mark the screw holes with a pencil. Drill small pilot holes to prevent the wood from splitting, and secure the bracket using your screwdriver. For a renter-friendly setup, use heavy-duty, double-sided adhesive strips to secure the bracket, or simply allow the flat-based system to stand freely on the cabinet floor.
4. Install the Water Faucet
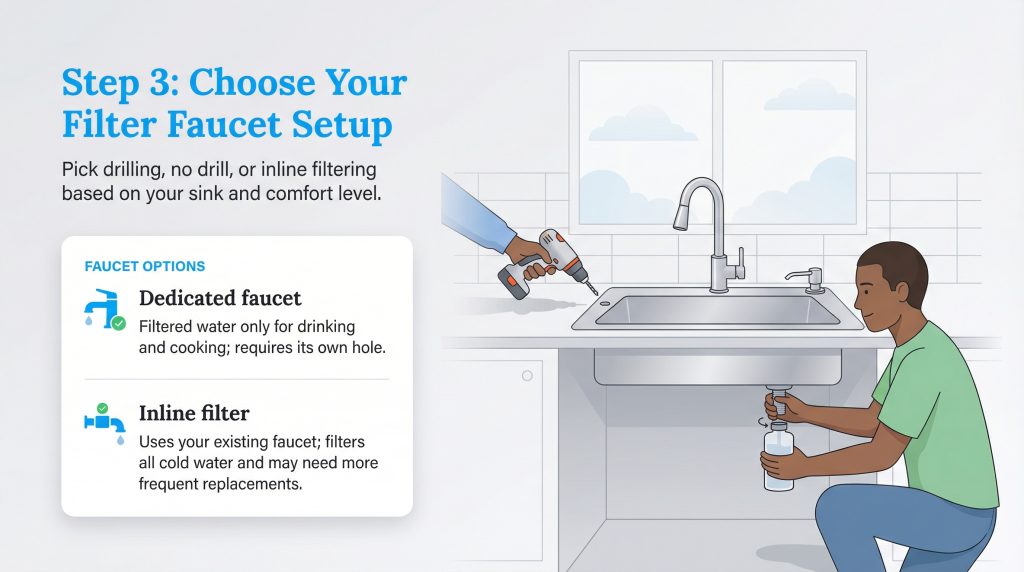
Installing a dedicated dispenser is often the most intimidating part of the project. If you have a standard stainless steel sink, you can safely drill a hole for the water filter faucet using a metal drill bit. If you are working with granite or quartz, use a diamond-tipped hole saw. Apply a small pool of water around the drill site to keep the bit cool. Drill slowly with steady pressure and wipe up shavings immediately.
For a no-drill hack, check if your sink has a built-in soap dispenser you rarely use. Unscrew the soap bottle from underneath, loosen the mounting nut, and pull the dispenser out from the top. You now have a perfectly sized hole for your new faucet without risking countertop damage. Once inserted, use a basin wrench to tighten the faucet nut securely from underneath the sink.
5. Connect the Tubing Using Push-Fit Plumbing Fittings
Most modern systems utilize push-fit plumbing fittings, which make routing the water lines incredibly user-friendly. However, they require precise execution to avoid long-term leaks. Take your plastic tubing and push it firmly into the open port on the T-adapter. You will feel it slide in, hit an internal O-ring, and seat into place. Give the tube a gentle tug backward to ensure the internal collet teeth have locked onto it securely.
Route the tubing from the adapter to the filter input, and from the filter output to your new faucet. When routing the lines, leave a gentle curve in the plastic tubing. Tubing stretched too tight places lateral stress on the push-to-connect fittings, which distorts the O-rings and causes slow leaks over time.
6. Flush the System and Test for Leaks

Before adding water, apply a very light layer of silicone-based O-ring lubricant around the seals of your NSF certified water filter cartridges. Twist the filter cartridges into the housing manifold, ensuring they align with the directional flow arrows. Now, turn your cold water supply valve counterclockwise slowly to restore the flow and gradually pressurize the system.
Open your new filter faucet. The carbon block filters inside the unit contain loose carbon fines from manufacturing, so the water will likely look gray or cloudy at first. Let the water run continuously for at least 10 minutes to flush out the dust. While the water runs, wipe a dry tissue around every single connection point. The tissue will instantly reveal microscopic moisture, ensuring your installation is entirely watertight.
Troubleshooting Common Installation Leaks
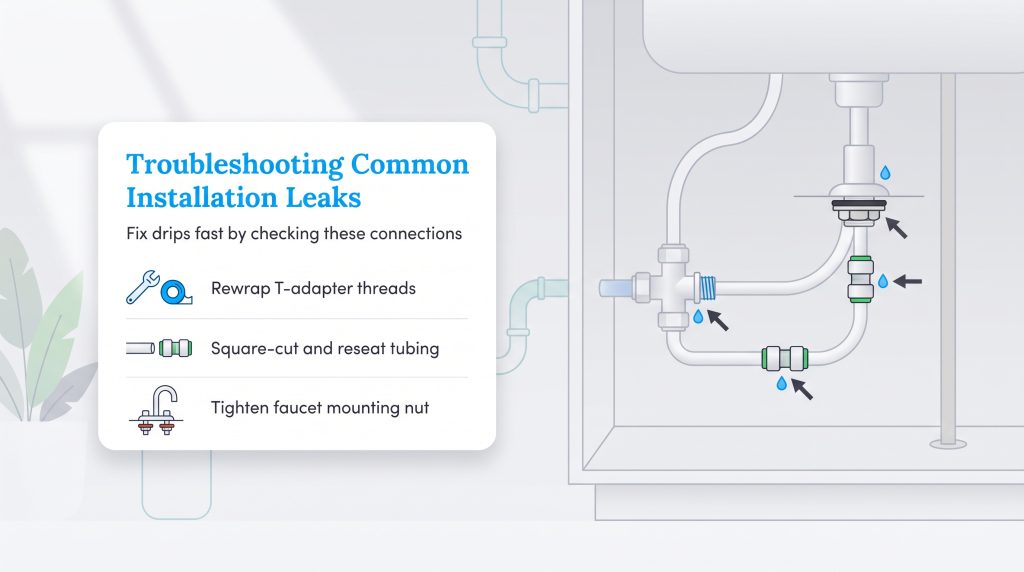
Even with careful preparation, a small drip can occasionally occur once the system is fully pressurized. Rather than panicking and uninstalling the entire unit, you can usually isolate and fix the problem in minutes. Use this troubleshooting matrix to identify and resolve the most common mid-installation hurdles.
| Symptom | Cause | Solution |
|---|---|---|
| Dripping at the T-adapter feed valve | Loose connection or insufficient PTFE tape | Turn off the water. Unscrew the adapter, apply three fresh layers of PTFE tape, and retighten snugly with a wrench. Do not overtighten. |
| Water weeping from push-fit plumbing fittings | Tubing is cut at an angle or not seated fully | Remove the tube by pressing in the collet ring. Cut the tip perfectly square with tube cutters, then push it back in until you feel it click past the O-ring. |
| Water pooling at the base of the new faucet | Loose mounting nut or missing rubber gasket | Use a basin wrench to tighten the under-sink mounting nut. Ensure the rubber gasket is positioned correctly between the faucet base and the countertop. |
Routine Under Sink Filter Replacement and Maintenance

Proper long-term maintenance is required to keep your water tasting fresh and your hardware reliable. Most under sink cartridges are rated to last anywhere from six months to a year, depending heavily on your household’s daily water usage and local municipal sediment levels. A highly effective habit is to use a permanent marker to write the exact date of installation directly on the front of the cartridge. This provides a clear visual reminder every time you open your cabinet doors.
Ignoring these timelines can lead to clogged filters, drastically reduced water pressure, and the potential breeding of bacteria inside exhausted filter media. When you perform an under sink filter replacement, check the manufacturer’s website before tossing the old cartridges in the trash. Many modern filtration companies offer dedicated recycling programs where you can mail back used filters, keeping heavy plastics and spent carbon out of local landfills.
Preparing for Your First Glass of Filtered Water
By learning how to tackle this plumbing upgrade, you have taken a significant step toward a healthier home and a much healthier planet. You are saving money that would have otherwise been spent on expensive bottled water while preventing countless single-use plastics from entering the global waste stream.
We encourage you to fill up a reusable bottle and enjoy the crisp, pure taste of your hard work. As you have seen throughout this guide, DIY projects are not nearly as intimidating as they seem when you break them down, use the right materials, and adhere to proven leak-prevention tactics. Enjoy your eco-conscious choice, and feel confident tackling your next household upgrade.
Frequently Asked Questions About Under Sink Water Filter Installation
What is the easiest DIY under sink water filter installation method?
The easiest method is an inline water filter setup. Because it connects directly to your existing cold water hose under the sink, it filters all cold water flowing through your primary kitchen faucet. This completely eliminates the need to drill a new hole in your countertop or sacrifice your soap dispenser for a secondary, dedicated drinking tap.
How do you reduce water pressure for filter systems to prevent leaks?
Most under sink water filtration systems operate safely between 40 and 80 PSI. If your home’s water pressure exceeds 80 PSI, the constant stress can blow out push-fit connections or crack plastic housings. To reduce water pressure for filter systems, install a screw-on pressure-limiting valve (PLV) directly onto the cold water line before the T-adapter. This regulates the incoming flow to a safe, steady PSI.
How tight should I make the T-adapter feed valve?
You should thread the adapter by hand until it is secure, then use a wrench to tighten it one additional quarter or half turn. Do not overtighten it. Applying excessive force with a wrench can crack the brass fittings, strip the delicate threads, or crush the internal rubber washers, all of which will guarantee an immediate leak.
What should I do if my cold water shutoff valve is corroded and won’t turn?
If your shutoff valve is heavily corroded, gritty, or seized, never use extreme force or a wrench to force it open or closed. Forcing a stuck valve can easily snap the internal stem, resulting in an immediate, high-pressure leak that could flood your kitchen. Instead, shut off the main water supply to your entire house. From there, you can replace the under-sink valve yourself or call a licensed plumber to install a new, modern quarter-turn valve before proceeding.
Does my under sink water filter need to be NSF certified?
While it is not a legal requirement for residential use, purchasing an NSF certified water filter is highly recommended. The National Sanitation Foundation rigorously tests water treatment systems to ensure they actually remove the specific contaminants the manufacturer claims to eliminate. Certification guarantees the materials used are safe for drinking water and will not leach harmful chemicals into your supply.
Can I install an under sink filter if I rent my home?
Yes, you absolutely can. Look for renter-friendly kits that utilize an existing soap dispenser hole for the faucet so you don’t have to drill into the countertop. Alternatively, choose inline filters that connect directly to your existing cold water line. Always keep the original plumbing parts in a safe place so you can restore the sink to its original state when you move out.
How often should I change the filter cartridges?
Most manufacturers recommend changing the filter cartridges every six to 12 months. However, this depends heavily on your local water quality and how much water your household uses. If you notice a drop in water pressure or a change in taste, it is likely time for a replacement sooner than the recommended interval. For more details on water quality standards, you can visit the EPA’s Ground Water and Drinking Water page.
About the Author

LaLeesha has a Masters degree in English and enjoys writing whenever she has the chance. She is passionate about gardening, reducing her carbon footprint, and protecting the environment. She also recently served as President of the Board for City Sprouts (a community garden).