Accurate Testing Is the Only Way to Ensure Your Family’s Drinking Water Is Free From Harmful Coliform and E. Coli Bacteria
Key Takeaways
- Contaminated water usually looks, smells, and tastes normal, making regular testing essential for homeowners with private wells.
- DIY test kits offer quick results for basic screening, while professional lab testing provides EPA-certified accuracy for health concerns.
- Immediate action is required if your water tests positive for bacteria, ranging from shock chlorination to installing UV disinfection systems.
There is nothing quite as unsettling as the thought of invisible contaminants lurking in the glass of water you just poured for your family. If you want to know how to test your water for bacteria, you are taking a vital step in proactive home maintenance. While public utilities are strictly monitored, nearly 43 million Americans rely on private wells that are entirely their own responsibility to maintain, meaning these households are uniquely vulnerable to undetected pathogens. In this step-by-step guide, we will cover exactly when you should check your water supply, the different types of harmful organisms to look out for, and how to accurately collect samples using convenient at-home kits or professional laboratories.
Why You Must Test Your Home’s Water Supply Annually

Bacteria are masters of disguise, frequently leaving no trace in the taste, smell, or appearance of your tap water. Because relying solely on your senses is a flawed strategy, establishing a consistent testing schedule is a crucial part of responsible homeownership — much like tracking your daily usage to save on your water bill. The Centers for Disease Control and Prevention (CDC) recommends checking your well annually to ensure you meet safe drinking water standards. Beyond your baseline annual check, you need to test well water for bacteria immediately if you encounter any of the following specific scenarios:
- Heavy rainfall or flooding: Intense storms can cause surface water to seep into your well cap or casing, dragging bacteria from nearby soil, agricultural runoff, or animal waste along with it.
- Unexplained gastrointestinal illness: If family members or frequent house guests suffer from recurring stomach issues, your home’s tap water is the first suspect you should rule out.
- Changes in taste, odor, or appearance: The sudden appearance of sediment, murky colors, or a harsh sulfur-like smell strongly suggests that the physical environment inside your well has shifted.
- Well repairs or construction: Whenever you open your home’s pipes, replace a well pump, or conduct construction near your wellhead, you risk introducing outside contaminants into a closed system.
Common Types of Bacteria Found in Drinking Water
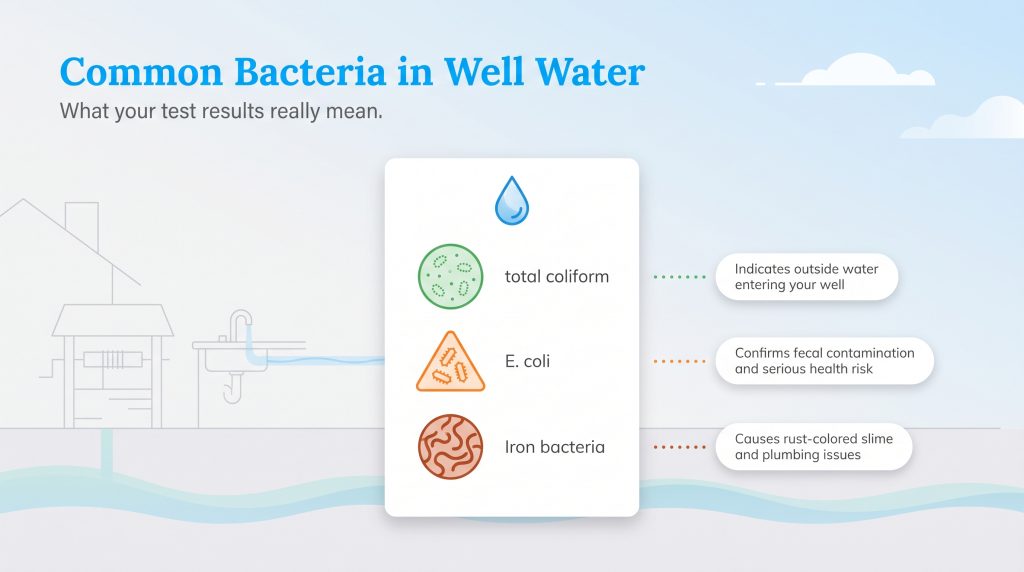
When analyzing your water quality, you will encounter scientific terminology that determines exactly how you handle a positive test result. A standard residential screening usually provides a simple presence or absence reading to let you know if microscopic organisms have breached your plumbing. Here are the three distinct categories of bacteria that laboratories and home kits look for:
- Total coliform bacteria: This broad family of organisms exists naturally in soil, surface water, and plant life, making it a reliable environmental indicator rather than an immediate poison. While usually harmless on their own, their presence proves that outside surface water is finding a way into your well system, meaning more dangerous pathogens could easily follow.
- E. coli in well water: Escherichia coli is a highly dangerous subgroup of coliform found exclusively in the feces of warm-blooded animals. If this specific strain appears in your test results, it confirms direct fecal contamination and creates a severe human health hazard that requires an immediate halt to drinking the water.
- Iron bacteria: These naturally occurring microorganisms combine iron and oxygen to form thick, rust-colored slime deposits inside your home’s pipes and well casing. Although they do not typically cause human illness, iron bacteria produce strong sulfur odors and cause significant plumbing blockages that severely damage expensive well pumps over time.
Using a DIY Home Water Test Kit
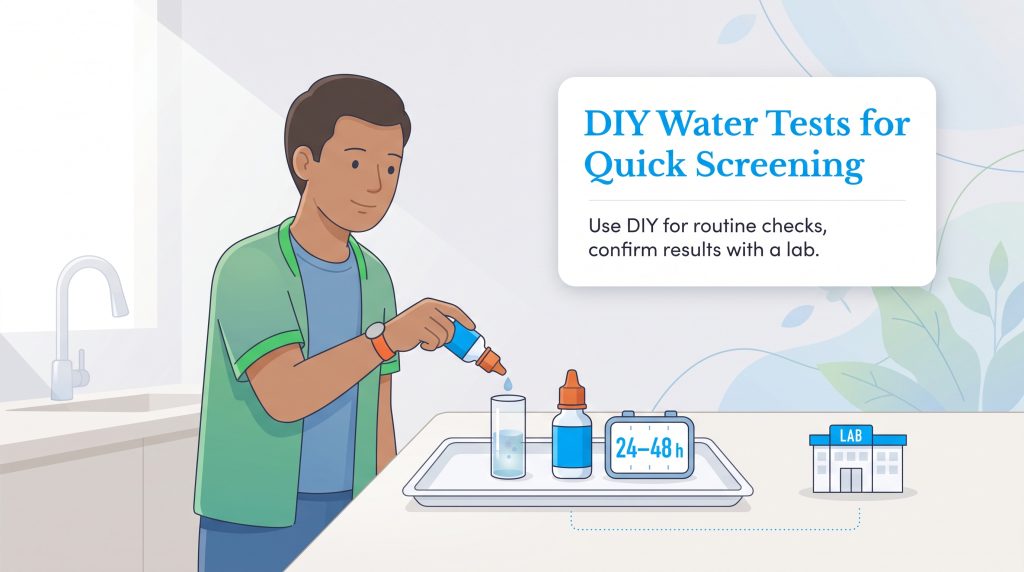
When you are learning how to test water quality at home for routine annual checks and rapid screening, a DIY home bacteria test kit is your most accessible first line of defense. These reliable kits are readily available at local hardware stores or online retailers and are designed specifically for everyday homeowners to use without specialized training.
Think of a DIY water test kit as a quick indicator designed to alert you to a potential problem. You simply collect your tap water sample, add the provided chemical testing agent, and incubate the vial at room temperature out of direct sunlight for 24 to 48 hours. While these convenient screens are excellent for securing basic peace of mind, remember that a negative home test only proves pathogens were undetectable at that exact moment. They do not diagnose the severity of an ongoing contamination issue.
Submitting a Sample to an EPA-Certified Laboratory

While home kits provide an affordable preliminary check, submitting a sample to an EPA-certified laboratory delivers the precise, legally recognized data required to treat complex contamination. You should always opt for a professional water testing lab if your initial DIY screen returns a positive result, if your family is actively experiencing water contamination symptoms, or if you need official documentation to close a real estate transaction.
To find a reliable testing facility, you can start by contacting your local health department, which frequently provides sterile collection bottles and subsidized lab services for residents. Alternatively, you can search the EPA’s official website for a directory of certified drinking water laboratories in your specific state. These professional panels utilize highly sensitive equipment to give you precise bacterial counts, identifying the exact severity of the contamination so you can confidently select the correct long-term filtration hardware.
| Testing Method | Cost | Turnaround Time | Accuracy Level | Best Use Case |
|---|---|---|---|---|
| DIY Water Test Kit | $15 — $30 | 24 to 48 hours | Moderate (Simple Pass/Fail) | Routine annual screening |
| EPA-Certified Laboratory | $30 — $100+ | 2 Days to 2 Weeks | High (Precise Bacterial Counts) | Official transactions and health scares |
How to Collect a Sterile Water Sample
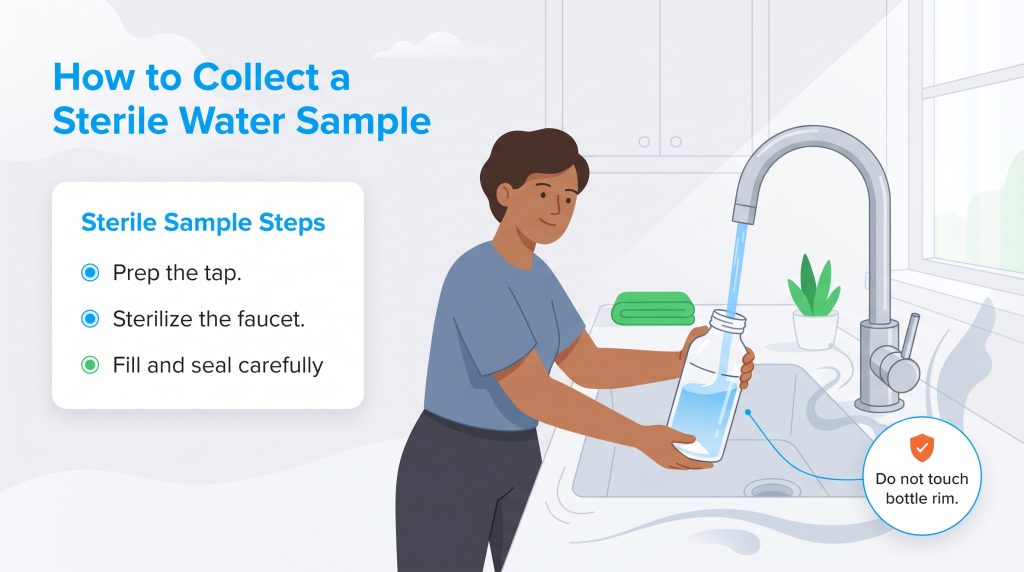
Whether you use a DIY kit or mail vials to an EPA-certified laboratory, the accuracy of your results relies entirely on your sampling technique. Water testing supplies are incredibly sensitive. A single stray fingerprint on the rim of the bottle or a cough across the room can introduce outside germs, ruining the sample and triggering an expensive false positive.
To guarantee your results reflect your actual groundwater rather than the everyday germs on your hands, you must meticulously follow these sterile collection steps:
- Prep the Tap: Select a standard indoor faucet, preferably in your kitchen or main bathroom. Avoid swivel faucets, leaky taps, or outdoor hoses. Carefully unscrew and remove the metal aerator screen from the tip of the faucet, as bacteria routinely collect and grow on these mesh filters.
- Sterilize the Faucet: Clean the exposed faucet rim thoroughly using a diluted bleach solution or rubbing alcohol. If you have a solid metal fixture, you can briefly “flame” the tip with a utility lighter for a few seconds to burn off any lingering surface bacteria.
- Flush the Cold Water Line: Turn on the cold water and let it run continuously for exactly five minutes. Do not use the hot water line. This extended flushing clears out stagnant water sitting in your indoor pipes so you can draw a fresh sample directly from the underground well.
- Handle the Sample Bottle Carefully: Wash your hands thoroughly with soap. Open the sterile container, ensuring your fingers never touch the inner rim of the bottle or the inside of the cap. You will likely notice a small amount of white powder inside the vial — do not rinse this out, as it is a required chemical preservative.
- Fill and Seal: Reduce the water flow to a gentle, pencil-thin stream to prevent splashing. Fill the bottle exactly to the indicated fill line without overflowing, then screw the cap on tightly.
Interpreting Your Test Results
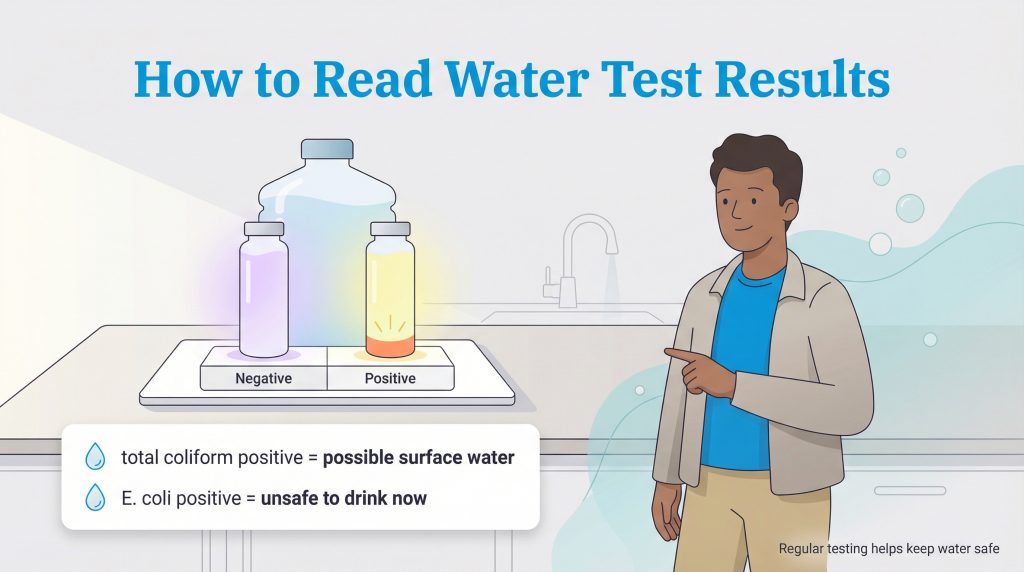
Once your sample is collected, your interpretation method depends entirely on the test format. DIY kits typically incubate at room temperature, relying on a distinct visual color change to verify contamination — for instance, a vial might turn from purple to yellow if harmful microorganisms are actively multiplying. Conversely, professional labs will mail you an official diagnostic report outlining precise bacterial counts and detailing exactly which pathogens have breached your plumbing.
What to Do If Your Water Tests Positive for Bacteria
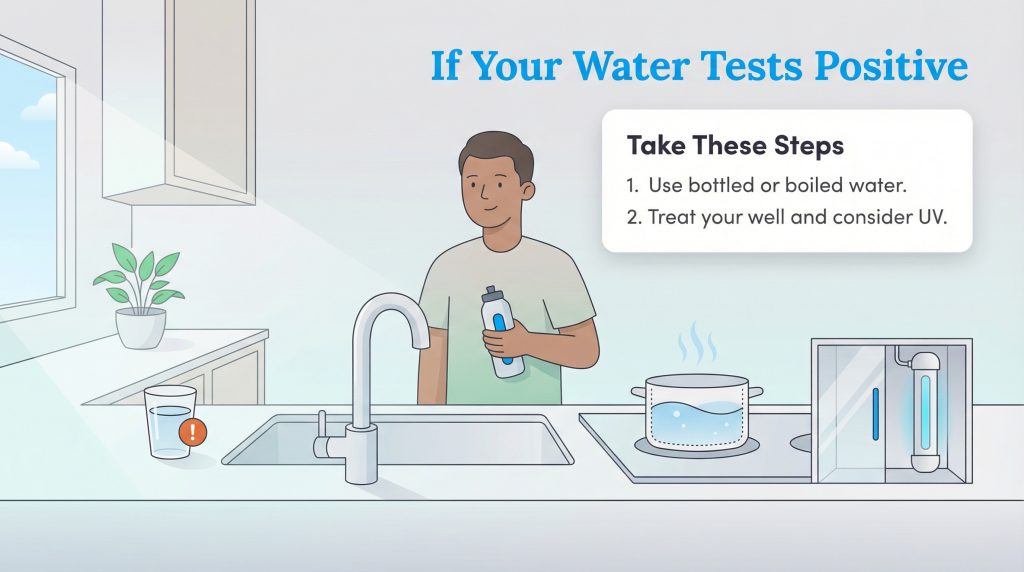
Receiving a positive test result can be deeply alarming, but it is a highly solvable home maintenance issue. Your immediate priority is preventing illness, which means taking decisive safety precautions before attempting to fix the well.
First, immediately switch your household to bottled water for all drinking, cooking, food preparation, and teeth brushing. If bottled water is unavailable, you must bring your tap water to a rolling boil for at least one full minute to kill active pathogens before ingestion.
Once you secure safe drinking water for the short term, you must aggressively address the source of the contamination. The standard first-line treatment for a compromised well is executing a shock chlorination flush. This DIY-friendly mitigation process involves circulating a highly concentrated bleach solution down into the well casing and throughout your home’s entire plumbing network to obliterate the bacterial bloom. Following the shock chlorination treatment, you must thoroughly flush the system and re-test the water after a few days to verify the bacteria are permanently gone.
If shock chlorination does not permanently resolve the issue, or if your well is frequently compromised by seasonal surface runoff, you need to upgrade your plumbing infrastructure. Installing a point-of-entry home water filtration system equipped with an ultraviolet (UV) purifier is widely considered the gold standard for long-term residential protection.
Taking Control of Your Home’s Water Quality
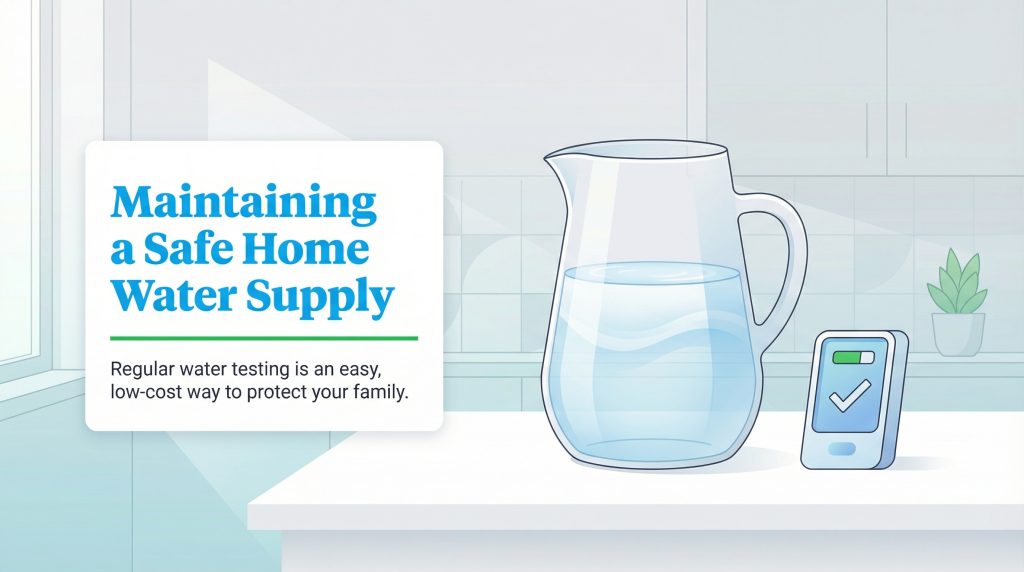
Ensuring your home enjoys a continuous flow of clean, potable water is an ongoing commitment rather than a one-and-done chore. Groundwater quality shifts constantly with the changing seasons, the gradual aging of your well casing, and heavy weather events in your local environment.
By establishing a strict annual maintenance calendar, you take decisive control of your family’s health and property value. We highly recommend setting a recurring yearly calendar reminder on your smartphone to test your well every spring. Furthermore, you should keep all past lab reports logged securely in a physical home maintenance binder. Tracking historical data allows you to quickly spot shifting trends in your water quality, ensuring you remain completely proactive and confident in the safety of your tap water.
Frequently Asked Questions About Testing Your Water for Bacteria
How much does it cost to test water for bacteria?
A basic DIY water test kit generally costs between $15 and $30. If you require a highly accurate analysis from an EPA-certified laboratory, expect to pay between $30 and $100 for a dedicated bacteria panel. Comprehensive tests that also check for heavy metals — such as when you need to test your water for lead — will cost significantly more.
How often should I test my well water for bacteria?
You should test your private well water for coliform bacteria at least once a year, ideally in the late spring. You also need to conduct immediate testing following major storm flooding, significant plumbing repairs, or if you notice distinct water contamination symptoms like changes in the taste, odor, or color of your tap water.
Can standard water filters remove bacteria from drinking water?
No, standard pitcher filters and basic refrigerator carbon filters are not designed to remove bacteria from drinking water. They only improve taste and reduce basic chemical impurities like chlorine. To effectively neutralize microorganisms, you must use a dedicated ultraviolet (UV) purification system, a reverse osmosis setup, or shock chlorination.
Are DIY home water test kits accurate for bacteria?
Yes, high-quality DIY test kits are accurate for initial screening purposes. They excel at providing a simple “presence or absence” indicator regarding bacterial contamination. However, they cannot give you specific bacterial counts and are highly prone to user error if the sample is not collected in a perfectly sterile manner.
Where can I find water testing for bacteria near me?
Start by contacting your local health department, as they often provide sterile collection bottles and subsidized lab services. You can also search the EPA’s official website for a directory of certified drinking water laboratories in your specific state.
What is the difference between coliform and E. coli?
Total coliform bacteria belong to a large family of mostly harmless organisms found naturally in soil and plant matter; their presence acts as an environmental indicator that surface water is breaching your well. E. coli is a dangerous subgroup found in the digestive tracts of warm-blooded animals, meaning its presence confirms hazardous fecal contamination in your drinking water.
Can I test my city water for bacteria?
Yes, you can test municipal city water, though finding bacteria is incredibly rare due to aggressive chemical treatments and continuous daily monitoring by public facilities. You generally only need to test a city supply if a main line breaks in your neighborhood or an official “boil water advisory” is publicly issued.
About the Author

LaLeesha has a Masters degree in English and enjoys writing whenever she has the chance. She is passionate about gardening, reducing her carbon footprint, and protecting the environment. She also recently served as President of the Board for City Sprouts (a community garden).