Upgrade Your Kitchen Tap For Cleaner, Better-Tasting Water Without Needing A Toolbox Or Professional Help
Key Takeaways
- Most faucet filters install in under five minutes using only your hands.
- Check your faucet style first, as pull-down sprayers are generally not compatible with standard water filters.
- If the unit leaks after installation, tightening the adapter or adding a rubber washer usually fixes the issue instantly.
Plumbing projects often feel intimidating, but learning how to install a faucet water filter is a refreshing exception that takes under five minutes and requires absolutely zero specialized tools. Whether you are a renter looking to improve your daily tap water without making permanent plumbing changes or a new homeowner seeking to cut down on plastic bottle waste, this upgrade is surprisingly simple. Regardless of whether you purchased a Brita, PUR, or another major brand, our step-by-step guide walks you through aerator removal, thread identification, and leak troubleshooting to get fresh, filtered water flowing right from your kitchen sink today.
Before You Begin: Identify Your Faucet Compatibility
Before opening the packaging, you must confirm that your current sink hardware can physically support the new device. Standard filtration units are explicitly designed to attach directly to the tip of a traditional aerator on a fixed spout. If your kitchen features a standard fixed spout with a removable mesh aerator at the tip, you are entirely ready to proceed. However, modern kitchens frequently incorporate complex hardware that lacks the necessary attachment points. Review the table below to identify compatible faucets before beginning your project.
| Compatible Faucets | Incompatible Faucets |
|---|---|
| Standard threaded fixed spouts | Pull-down or pull-out sprayers |
| Spouts with internal threads (using an adapter) | Handheld spray nozzles |
| Spouts with external threads (direct attachment) | Touchless or sensor-operated faucets |
| Basic round aerator tips | Custom, oval, or square-shaped spouts |
Tools And Materials Required
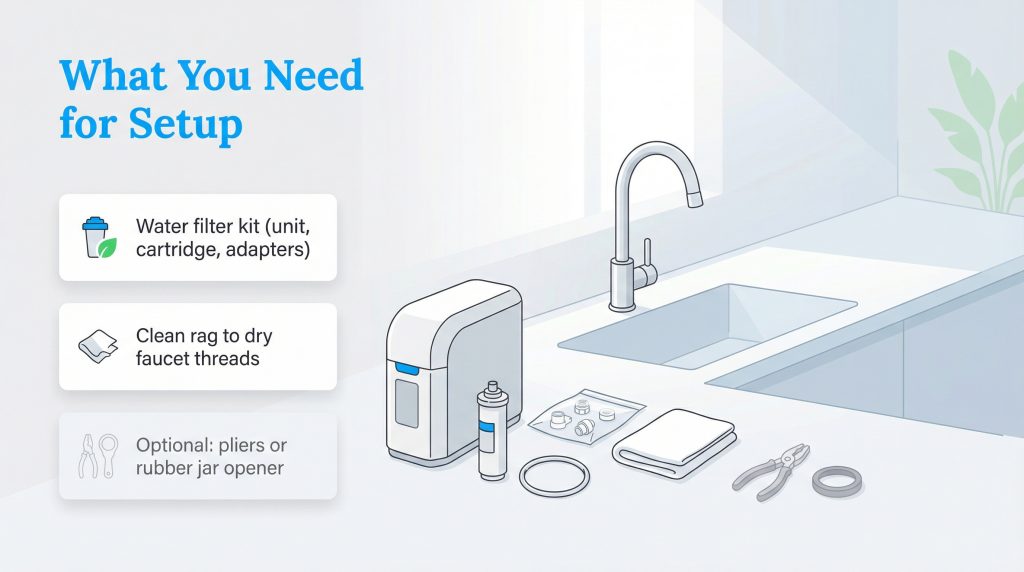
When preparing for this quick kitchen upgrade, you might be wondering if you need to raid your toolbox. The excellent news is that this is a “zero-tools” project for the vast majority of sinks. To capture a seamless installation experience, gather the following essentials before starting:
- The replacement filter unit: Your primary housing unit and the fresh carbon block.
- Included adapter assortment: Multiple plastic or metal rings provided by the manufacturer to fit various sink types.
- Rubber washers/O-rings: These are crucial for establishing a watertight seal between the adapter and the faucet base.
- A dry towel: Use this to completely dry the wet faucet threads so you can maintain a firm, slipping-free grip.
- Adjustable pliers (optional): You only need these if your old aerator is stuck tight due to hard water scale and refuses to twist off by hand.
1. Remove The Faucet Aerator
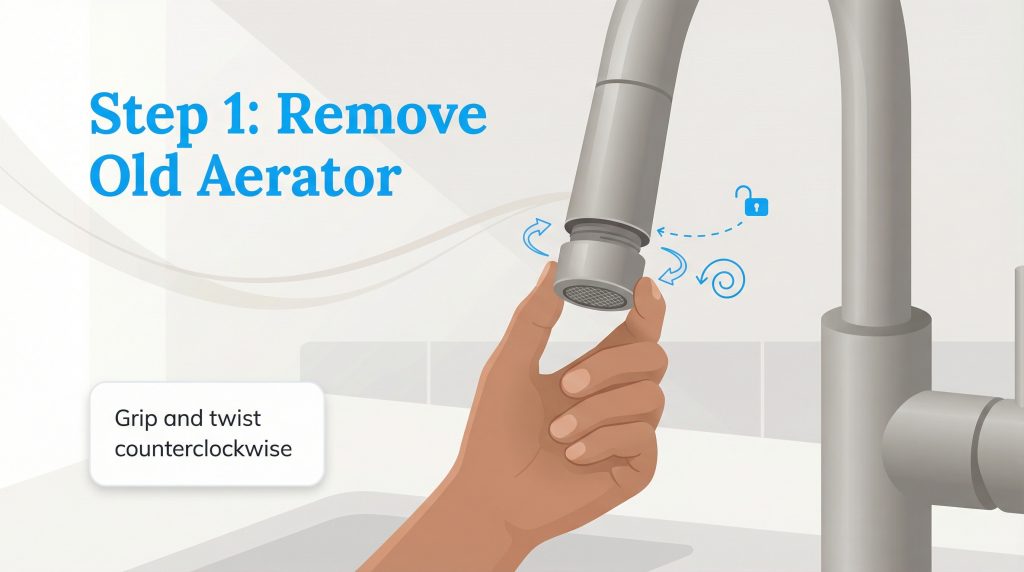
Your first mechanical action is to remove faucet aerator components from your sink. The aerator is the small, circular mesh tip located at the very end of the spout that mixes air into the water stream to prevent aggressive splashing. Inspect the tip closely, and you will see a distinct seam where it screws directly into the main faucet neck.
Grip the aerator firmly with your dry fingers and twist counterclockwise. If you are looking from the bottom up, remember the classic rule: “lefty-loosey.” Once you successfully unscrew it, place the old aerator and its rubber washer in a safe drawer. You will definitely need to reinstall it if you ever move out or decide to remove the filtration unit in the future.
2. Determine Internal Vs External Faucet Threads
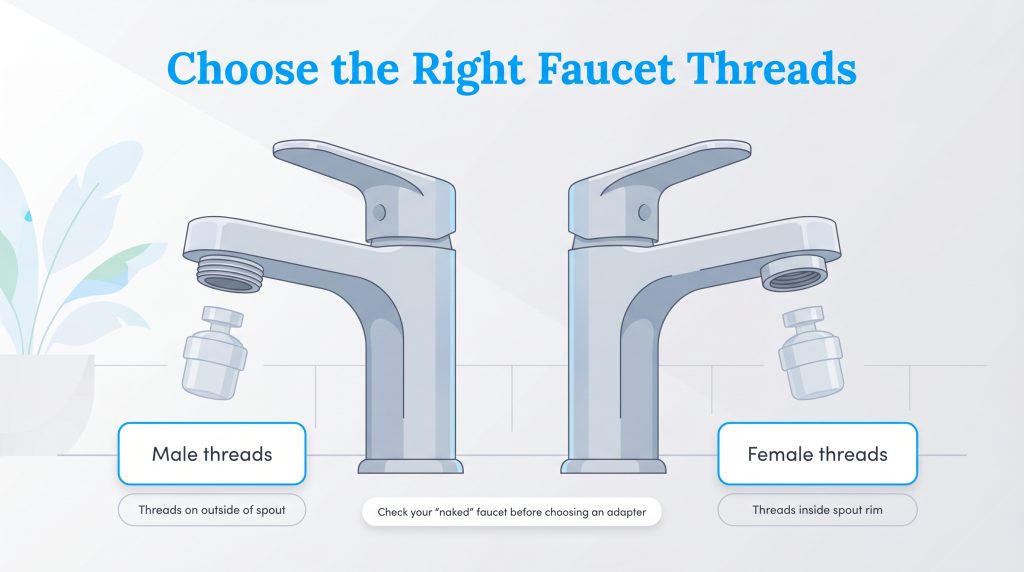
Selecting the right attachment relies entirely on understanding internal vs external faucet threads. This is the primary point of failure for many consumers, but a quick visual inspection easily solves the puzzle. Examine your naked faucet spout to determine the correct threading orientation before digging through your parts bag.
| External Threads (Male) | Internal Threads (Female) |
|---|---|
| The threading grooves are exposed on the outside of the faucet spout, much like a traditional screw. | The outside of the spout is completely smooth, and the threading grooves are hidden inside the rim cavity. |
| Most filter units can attach directly without an adapter, or they require a very thin, standard external ring. | You must select an included internal adapter ring that screws upward directly into the spout cavity. |
3. Select And Attach The Correct Adapter
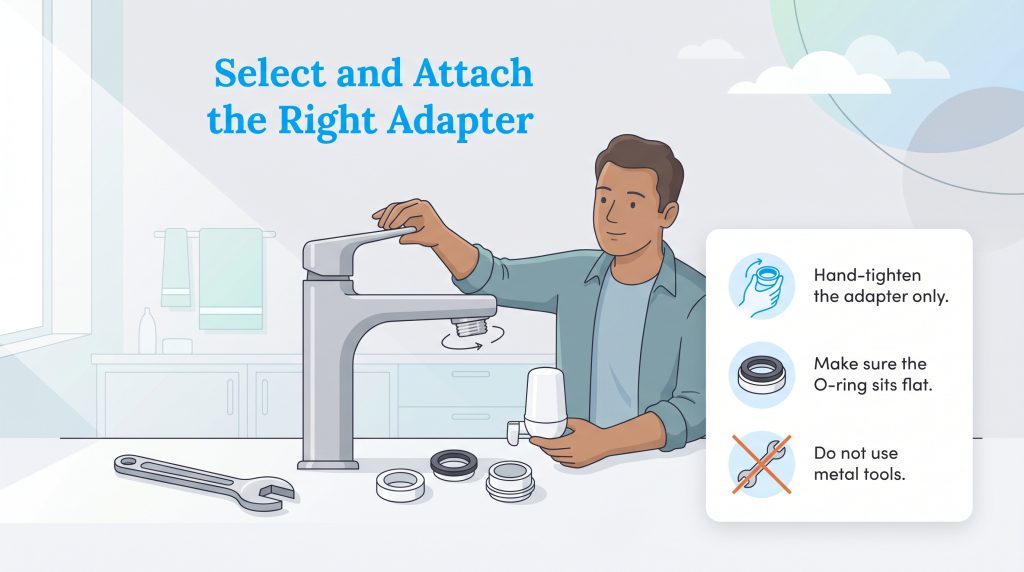
With your thread type identified, it is time to sort through your faucet water filter adapter types. Most basic adapter kits include three to four distinct plastic or metal rings designed to bridge the gap between your sink and the filter base. Test the provided adapters gently by hand. If the faucet filter won’t fit immediately, do not force it; simply try the next size up or down in your parts bag.
Choose the adapter that threads perfectly without forcing it, and always ensure the thick rubber O-ring washer is seated flat inside the top of the adapter. Twist the adapter clockwise by hand until it is flush with the faucet. Press firmly to ensure the rubber gasket creates a tight seal. Never use metal wrenches to tighten these pieces, as excessive pressure will almost certainly crack the delicate plastic components.
4. Mount The Faucet Water Filter Base
Once your adapter is fully secure, mounting the main filter housing unit takes just seconds. Take the primary base and align it carefully beneath the freshly installed adapter. Depending on your brand, you will either use a push-to-click mechanism or a twisting threaded collar to lock the unit securely into place.
Push the device straight up onto the adapter threads and listen closely for a distinct click, or twist the textured locking collar counterclockwise until it feels snug against the sink. Make sure the unit sits perfectly level; an uneven base will heavily compromise your water flow and potentially damage the internal cartridge chamber.
5. Insert And Flush The Filter Cartridge
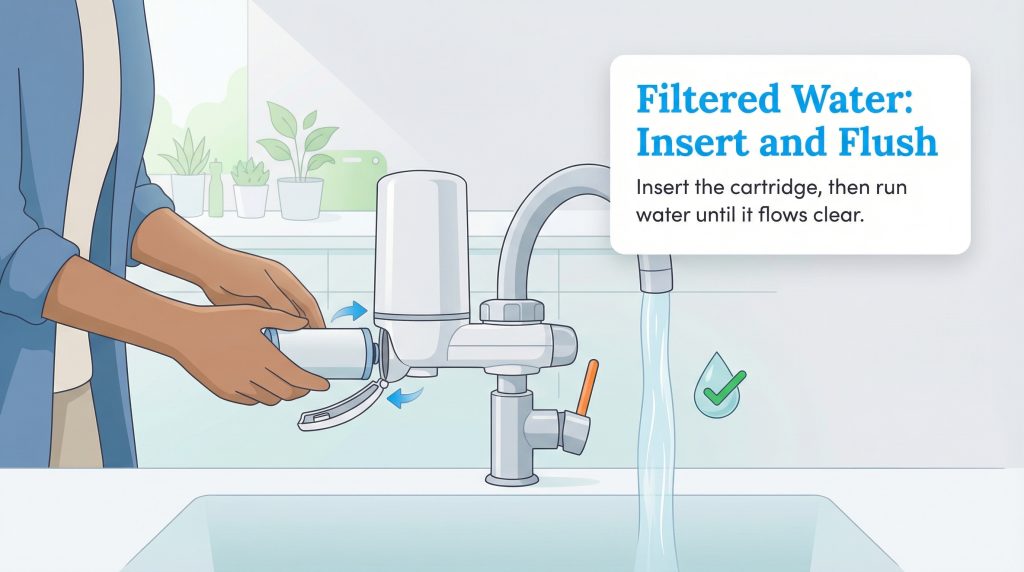
With the housing securely suspended from your spout, learning how to change faucet water filter cartridge components is your final mechanical step. Pop open the top lid or unthread the side cap of your main filter housing. Remove the best faucet water filter replacement cartridge from its sealed plastic wrapper and slide it downward into the empty chamber.
Match up the directional arrows printed on the label with the corresponding notches inside the plastic cavity. Press it down firmly until it seats completely, then snap the lid shut to lock it into position. Finally, you must conduct a safety flush. Turn the diverter valve switch on the side of the housing to the “filtered” position and turn on your cold water tap. Let the cold water run uninterrupted for exactly five minutes to clear out any harmless carbon dust. Once the stream runs crystal clear, your system is fully primed. If you are still evaluating options for pure drinking water, explore our reviews of the best water filters.
Troubleshooting: Faucet Filter Leaking At Connection
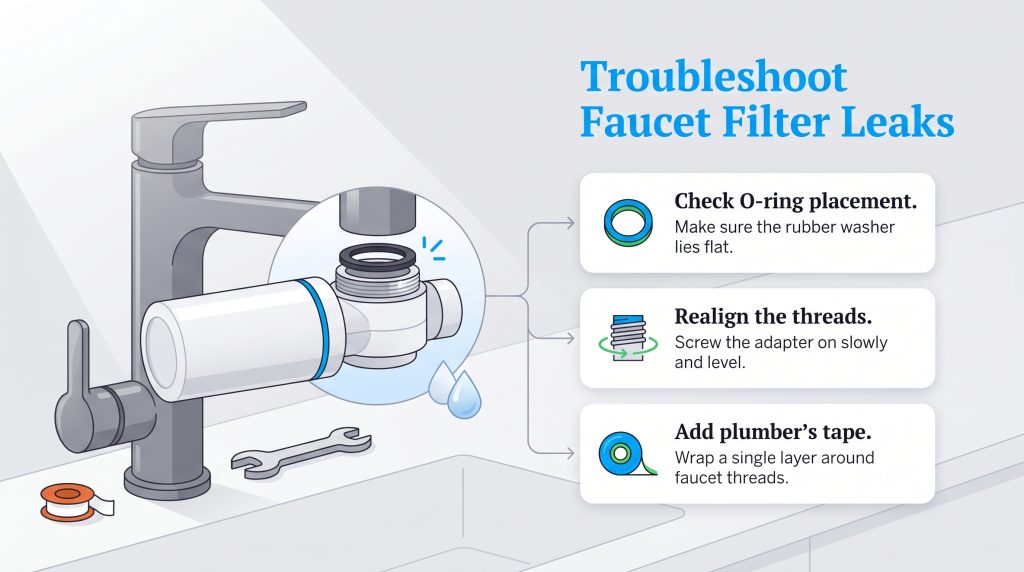
Dealing with a faucet filter leaking at connection points is frustrating, but resolving the drip usually requires only minor adjustments. If water sprays aggressively when you turn on the tap, run through this quick troubleshooting checklist:
- Verify the O-ring placement: The primary cause of immediate leaks is a missing or misaligned rubber washer. Unscrew the adapter and verify the O-ring sits perfectly flat inside the housing before reattaching.
- Realign the threads to fix cross-threading: If water sprays entirely sideways, your adapter is likely cross-threaded. Remove the plastic piece entirely and screw it back on slowly, keeping it perfectly level with the spout.
- Apply a single layer of plumber’s tape: If a persistent, minor drip remains around the metal threads of your sink, wrap a single layer of white Teflon plumber’s tape around the bare faucet threads before reattaching the adapter to create a watertight seal.
Brita Vs PUR Brand-Specific Installation Tips
While the basic plumbing principles remain identical across the market, different manufacturers utilize proprietary attachment styles. Understanding these unique mechanisms ensures your new device tracks water usage accurately and securely locks into place.
A standard Brita faucet filter installation requires a threaded collar-twist mechanism. After pressing the base onto the adapter, you must physically twist the outer collar to lock the unit in place. Be careful not to overtighten this collar, as the plastic threading can warp under extreme pressure. Once locked, running the water on the filtered setting automatically triggers the internal electronic indicator screen, flashing a green light to confirm the battery is active.
Learning how to install a PUR faucet water filter involves a distinct side-button clicking mechanism. Instead of twisting a collar, you simply press the two side release buttons on the housing simultaneously, slide the unit up onto the adapter, and release the buttons until you hear a sharp, audible click. The PUR system also utilizes an advanced LED filter life indicator that flashes green with every use, automatically shifting to yellow when it is time to order a replacement block.
Maximize Sustainability With A Faucet Filter
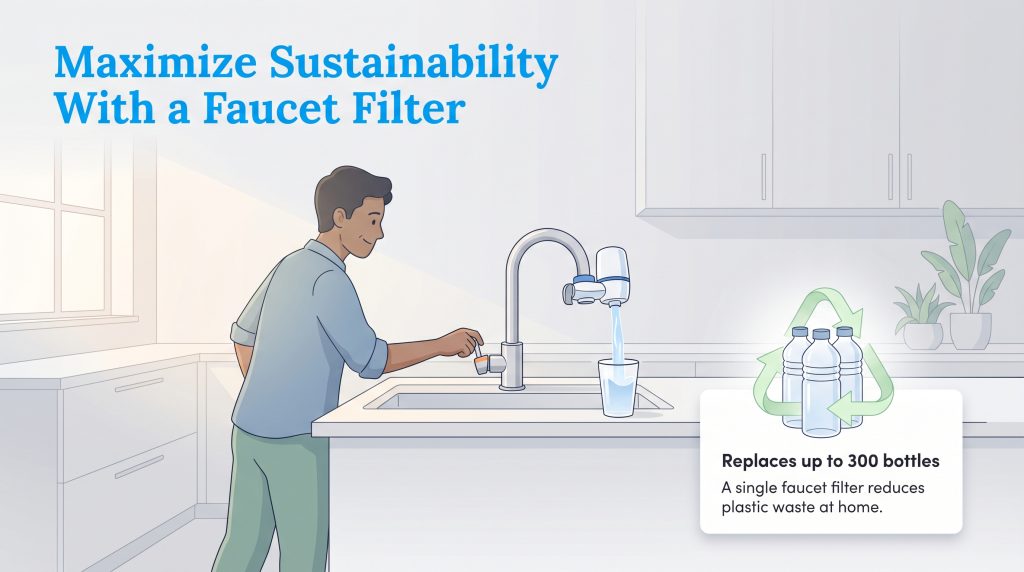
Attaching a filtration unit to your kitchen sink is one of the easiest ways to make your household significantly more sustainable. By cleaning your municipal tap water right at home, you drastically reduce your family’s reliance on single-use plastic bottles. Astonishingly, one standard filter cartridge can comfortably replace up to 300 standard 16.9-ounce water bottles before expiring.
Start Enjoying Fresh Filtered Water Today

This environmentally mindful choice saves you considerable money at the grocery store while simultaneously keeping a massive volume of plastic out of local landfills and vulnerable oceans. According to the EPA, plastics are a rapidly growing segment of municipal solid waste, and reducing usage at the source is the most powerful action consumers can take. You now have immediate access to cleaner, crisp-tasting hydration without the daily hassle of filling bulky pitchers. Just remember to establish a consistent replacement schedule — generally every two to three months — so your family can enjoy purified tap water all year long.
Frequently Asked Questions About Faucet Water Filters
Can you put a faucet water filter on a pull-down faucet?
How often do I need to change the faucet water filter cartridge?
Why is my water filter leaking from the top of the faucet?
Do I need a plumber to install a water filter on my sink?
Can I run hot water through my faucet filter?
Why is black water coming out of my newly installed faucet filter?
Why is my water flow so slow after installation?
Do faucet filters remove all contaminants?
About the Author

David has been an integral part of some of the biggest utility sites on the internet, including InMyArea.com, HighSpeedInternet.com, BroadbandNow.com, and U.S. News. He brings over 15 years of experience writing about, compiling and analyzing utility data.