Accurate testing is the only way to ensure your family’s drinking water is free from harmful coliform and E. coli bacteria.
Key Takeaways
- Contaminated water usually looks, smells, and tastes normal, making regular testing essential for homeowners with private wells.
- DIY test kits offer quick results for basic screening, while professional lab testing provides EPA-certified accuracy for health concerns.
- Immediate action is required if your water tests positive for bacteria, ranging from shock chlorination to installing UV disinfection systems.
There is nothing quite as unsettling as the thought of invisible contaminants lurking in the glass of water you just poured for your family. While the majority of the U.S. public water supply is treated and regulated, millions of homeowners rely on private wells that are entirely their own responsibility to maintain and monitor. If you are unsure about the safety of your water supply, you don’t have to wait for symptoms to appear to get answers. This guide will walk you through the critical decision between convenient home testing kits and certified professional lab analysis to ensure your water supply is safe, clean, and healthy.
Signs You Need to Test Your Water for Bacteria
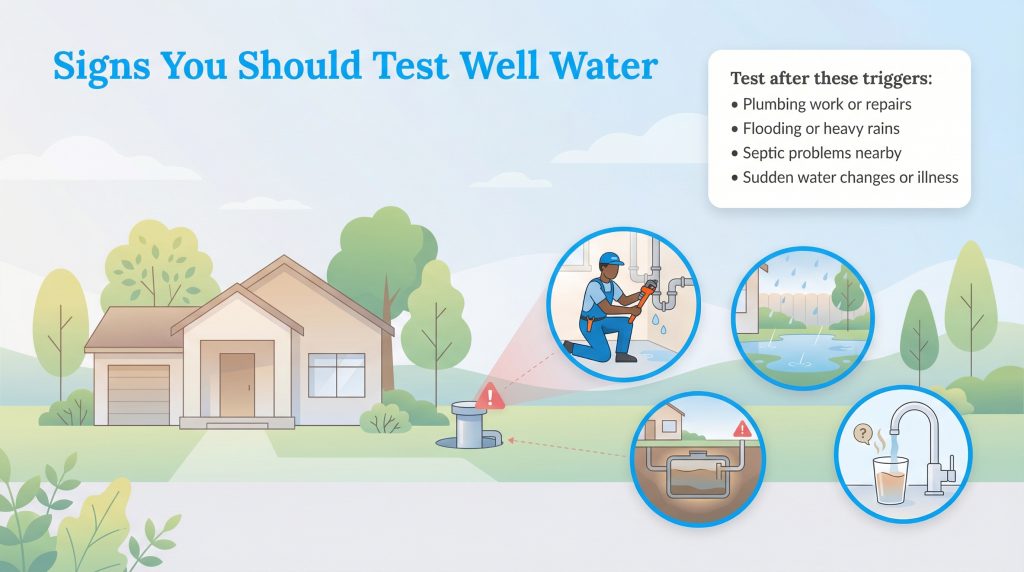
Bacteria are masters of disguise. Harmful pathogens like E. coli often leave no trace in the taste, smell, or appearance of your water, which is why relying on your senses isn’t enough. However, certain environmental changes or events can act as warning signs of bacteria in well water, signaling that contamination might have occurred.
If you experience any of the following triggers, you should schedule a test immediately:
- Recent plumbing work: Whenever you open up your home’s pipes or replace a well pump, you risk introducing outside contaminants into a closed system.
- Flooding or heavy rains: Intense storms can cause surface runoff to seep into your well cap or casing, bringing bacteria from soil or animal waste with it.
- Septic system malfunction: If your septic tank or drain field leaks, it can easily contaminate nearby groundwater sources.
- Change in water quality: While bacteria are often invisible, the sudden appearance of sediment, odd colors, or sulfur smells suggests the well environment has changed.
- Illness: If family members or guests suffer from recurring gastrointestinal issues, your water is the first suspect you should rule out.
When and How Often Should You Test Well Water?
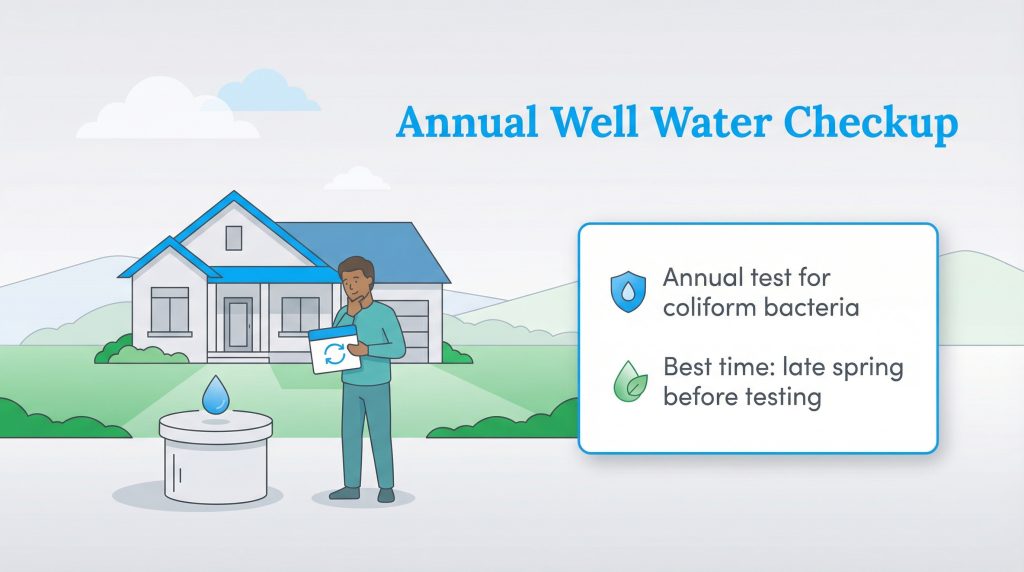
Establishing a consistent well water testing schedule is part of responsible homeownership. Much like changing your HVAC filters to save on your electric bill or checking your smoke detectors, water testing ensures your home’s vital systems are protecting you rather than harming you. For most private wells, we recommend testing for total coliform bacteria at least once a year. The Centers for Disease Control and Prevention (CDC) reinforces this annual guideline, noting that coliform bacteria presence is a key indicator of sanitary quality.
Beyond the annual check-up, timing matters. The best time to test is generally late spring. This is often when snowmelt and seasonal rains create the highest levels of runoff, pushing surface contaminants toward your groundwater. Additionally, if you are a new homeowner, testing should be a non-negotiable part of your move-in process. Never assume the previous owner maintained the well perfectly; establishing your own baseline for water quality ensures you aren’t inheriting a hidden health hazard.
DIY Kits vs. Professional Lab Testing: Which Is Right for You?
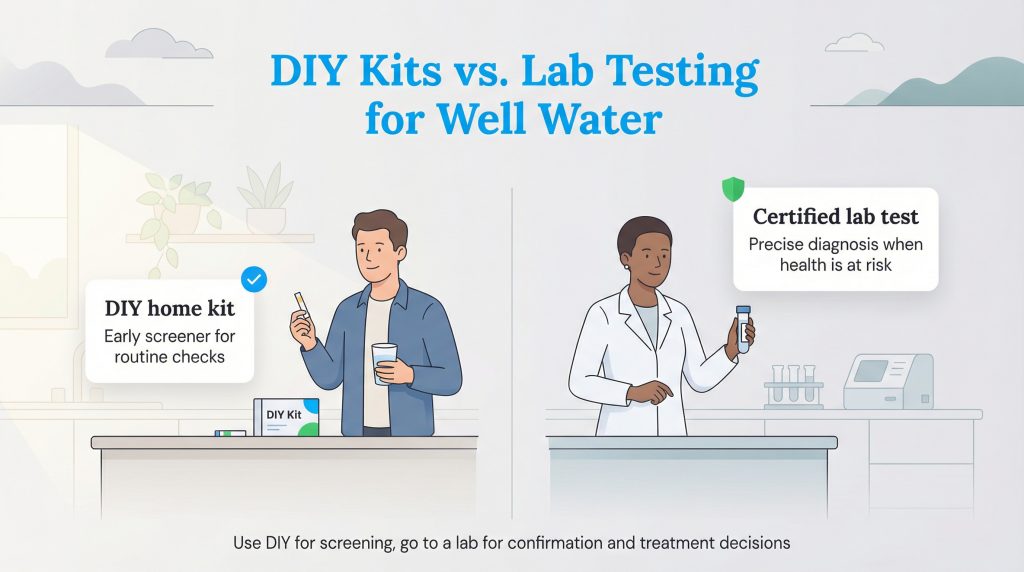
When you decide how to test well water for bacteria, you face a choice: use a DIY home bacteria test kit or send a sample to a professional water testing lab. Home kits are widely available at hardware stores and online, offering convenience and speed. Professional labs, however, offer certification and precision. Think of a DIY kit as a “screener” that tells you if there is a problem, while a lab test provides the official diagnosis.
Here is how the two options compare to help you decide between a home water test kit for bacteria and a certified lab service:
| Feature | DIY Home Kit | Professional Lab |
|---|---|---|
| Cost | $15–$30 | $30–$100 (Bacteria Only) |
| Speed | 48 hours | 2 Days–2 Weeks |
| Accuracy | Good (Pass/Fail) | High (Specific Counts) |
| Best For | Annual check-ups | Real estate transactions or health scares |
If you are just doing a routine annual check, a high-quality DIY kit is often sufficient. However, if that kit comes back positive, or if you are testing because someone in the house is already sick, you should skip the hardware store and go straight to a certified lab. They can identify the specific strain of bacteria and the severity of the contamination, which is critical for choosing the right treatment.
How to Use a Home Water Test Kit for Bacteria
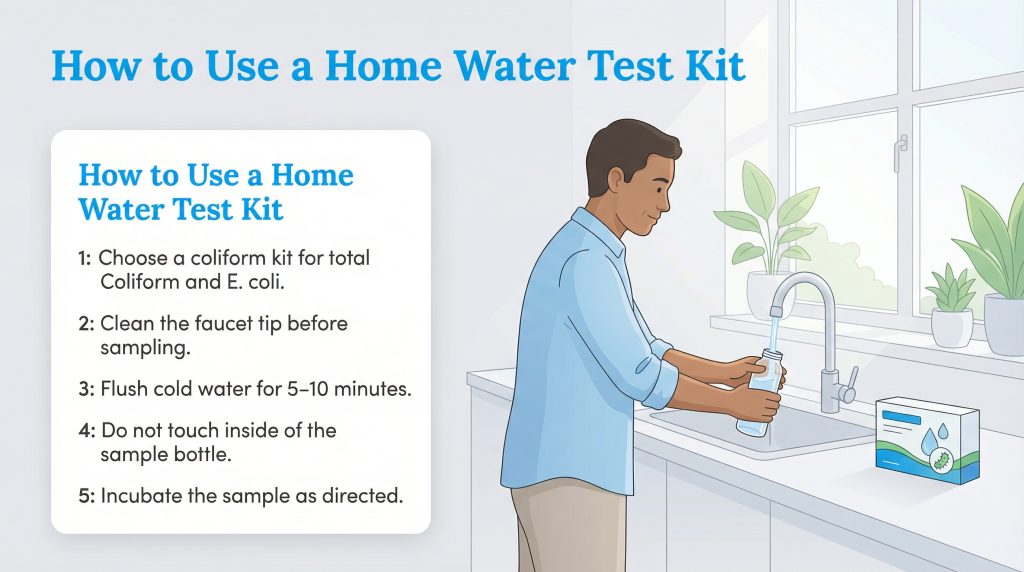
If you choose the DIY route, precision is key. A DIY water bacteria test kit is sensitive; a single stray fingerprint or sneeze can ruin the sample and give you a false positive. Follow these steps carefully to ensure your results reflect the water in your well, not the germs on your hands.
- Choosing the Kit: Purchase a coliform bacteria test kit that specifically checks for both Total Coliform and E. coli. This dual-testing capability is vital for understanding the severity of any contamination.
- Prep the Tap: Remove the aerator screen from your faucet, as bacteria often grow on the mesh. Clean the faucet opening thoroughly with bleach or rubbing alcohol. If you have a metal faucet, you can briefly “flame” the tip with a lighter to kill any surface bacteria.
- Flush the System: Turn on the cold water and let it run for 5 to 10 minutes. This clears out water sitting in your pipes and ensures you are sampling fresh water directly from the well.
- Collect the Sample: This is the most crucial step. Carefully open the sample bottle without touching the inside of the bottle or the inside of the cap. Do not rinse out the powder inside; it is a preservative or reactor necessary for the test. Fill the bottle to the fill line and cap it immediately.
- Incubation: Follow the instructions regarding storage. Most tests require the sample to sit at room temperature, away from direct sunlight, for 24 to 48 hours to allow any bacteria present to grow and react with the testing agent.
How to Read Water Test Results
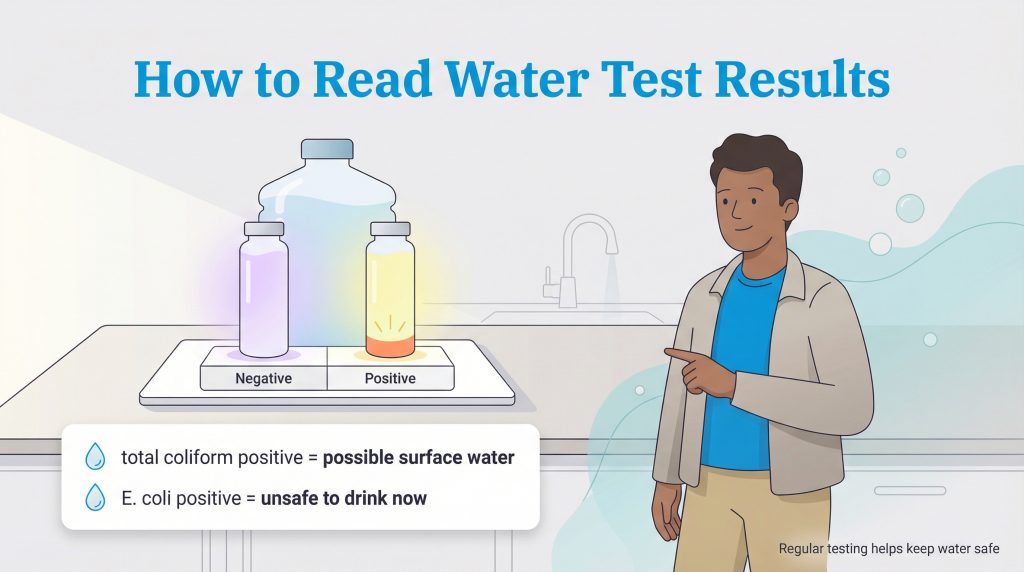
Learning how to read water test results is usually straightforward with modern kits, but understanding the terminology is important. Most DIY tests are “Presence/Absence” tests, meaning they give you a simple yes or no answer rather than a count of how much bacteria is there.
You will generally encounter two main categories of results:
- Total Coliform Positive: This indicates environmental contamination from sources like soil or vegetation. While not always immediately dangerous, it is a warning sign that surface water is getting into your well, suggesting a crack in the casing or a loose cap.
- Fecal Coliform / E. Coli Positive: This is a dangerous result. It indicates contamination from human or animal waste. If you see this result, the water is unsafe to drink, and you must take immediate action.
Visually, most DIY kits rely on a color change. For example, a sample might turn from purple to yellow if bacteria are present. Remember that a negative result means no detectable bacteria were found at that time, but it doesn’t guarantee the water will remain safe forever. Regular monitoring is your best defense.
What to Do If Your Water Tests Positive
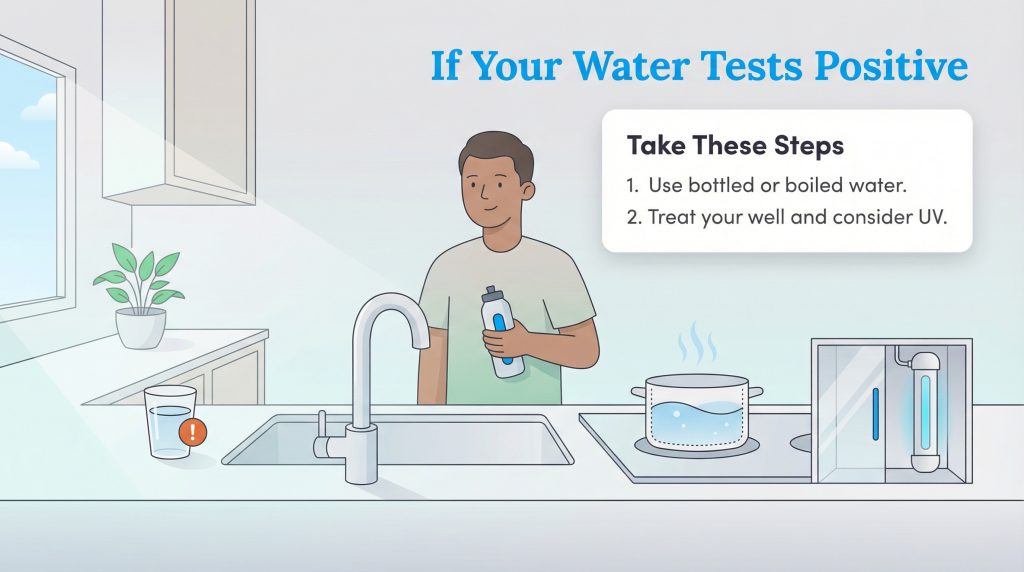
A positive test result can be alarming, but it is a solvable problem. Do not panic, but do take safety precautions immediately to protect your household.
First, switch to bottled water for drinking, cooking, and brushing teeth. Alternatively, bring your water to a rolling boil for at least one minute to kill pathogens. Once your immediate needs are met, you need to treat the well. The most common short-term fix is shock chlorination, a process where a high concentration of bleach is circulated through the well and plumbing system to kill bacterial blooms.
For a more permanent solution, consider installing a home water treatment system. While chemical injectors exist, many homeowners prefer UV disinfection systems. These units pass water through ultraviolet light, neutralizing bacteria without adding chemicals.
Eco Edge: UV purification systems are a chemical-free way to treat bacteria, keeping your water safe without adding chlorine or altering the taste, an excellent step toward sustainable living.
Maintaining a Safe Water Supply for Your Home
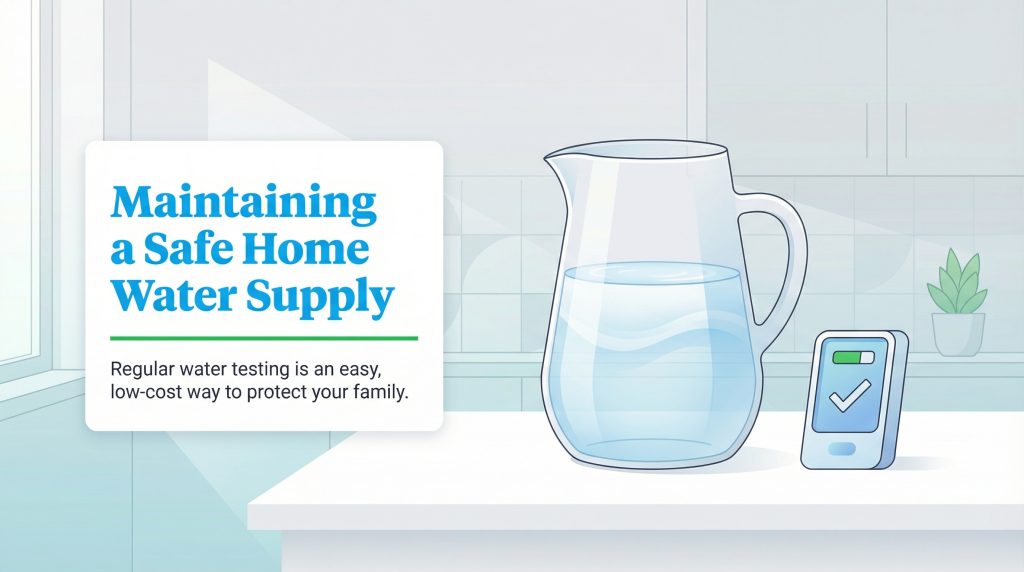
Ensuring your home has clean water is an ongoing commitment, not a one-time task. Water quality changes with the seasons, the age of your well, and the environment around you. By sticking to a regular testing schedule, you are buying peace of mind for a very small price. At UtilitiesForMyHome.com, we believe that testing is easy, affordable, and the most effective way to keep your family healthy and your home sustainable.
FAQs About Testing Your Water for Bacteria
Where can I find water testing for bacteria near me?
Are DIY water bacteria test kits accurate?
What is the difference between Coliform and E. coli?
Can I test my city water for bacteria?
How much does a professional water bacteria test cost?
About the Author

LaLeesha has a Masters degree in English and enjoys writing whenever she has the chance. She is passionate about gardening, reducing her carbon footprint, and protecting the environment.