Save money and reduce plastic waste with this simple DIY project for homeowners and renters.
Key Takeaways
- Identify your cold water line under the sink before starting to ensure you attach the adapter to the correct pipe.
- Choose a method that fits your home by deciding between drilling a new hole for a faucet or utilizing an existing soap dispenser opening.
- Flush the system for several minutes after installation to remove loose carbon particles and ensure the water is clear and safe to drink.
Plumbing projects often feel intimidating, but installing an under sink water filter is actually one of the most manageable upgrades you can make in your kitchen. Whether you own your home or rent an apartment, adding a filtration system is a straightforward way to improve your daily hydration while significantly cutting down on single-use plastic bottles. This DIY under sink water filter installation guide walks you through the process step-by-step, covering both permanent installation methods and clever, renter-friendly hacks so you can enjoy crisp, clean water directly from your tap without the stress.
Preparing for Installation: What You Need to Know
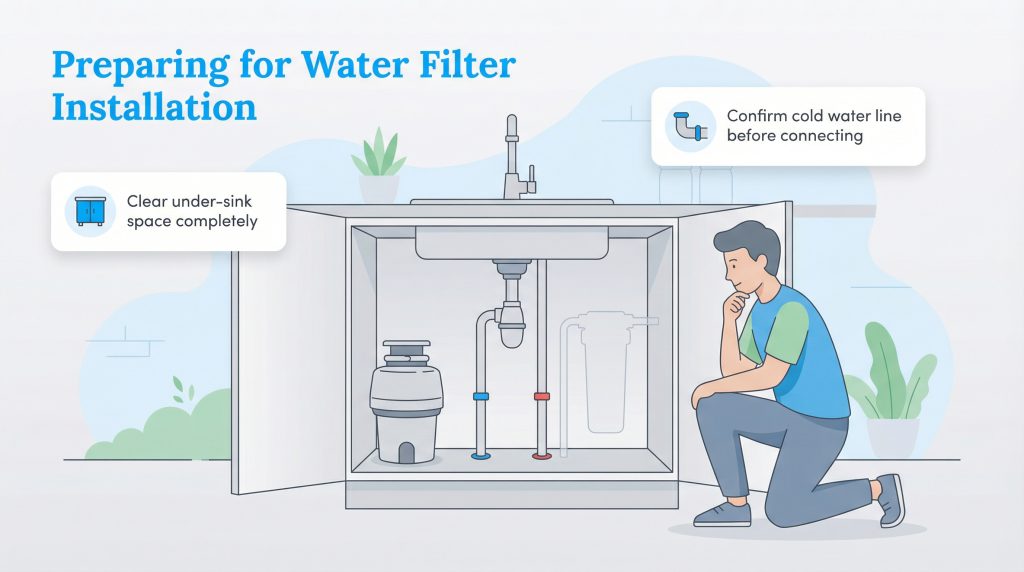
A little prep up front makes everything easier when it comes to home improvement tasks. Before you even touch a wrench, you need to clear out the area under your sink completely. This space often becomes a catch-all for cleaning supplies and miscellaneous items, but you will need ample room to maneuver your hands and tools comfortably. Once the space is clear, take a moment to assess the layout. If you have a garbage disposal, ensure there is enough physical clearance for the filter housing unit to mount on the side wall or stand on the floor without obstructing the disposal’s vibration or movement.
Next, you must correctly identify your cold water line. In most standard setups, the cold water supply line is on the right side, while the hot water line is on the left. However, plumbing can vary, so it is always smart to double-check. Turn on the hot water at the faucet and feel the pipes underneath; the one that heats up is your hot line. The pipe that remains cool is the one you will be working with. Connecting your filter to the wrong line can damage the system, so this verification step is critical for a successful water filtration setup.
Tools and Materials Checklist for Under Sink Water Filter Installation
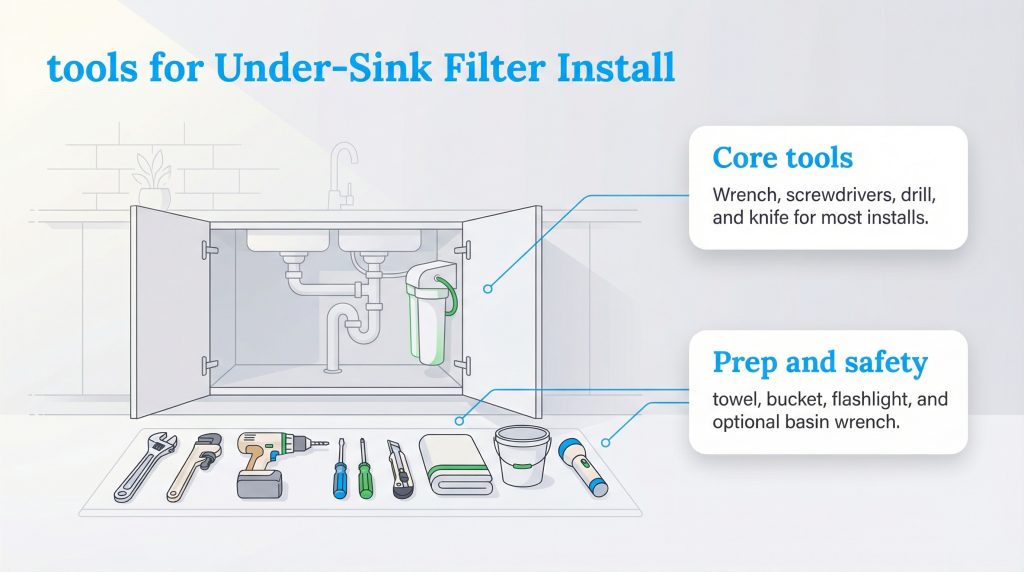
While most water filter kits come with the necessary tubing, a faucet, and a specific T-adapter, the tools required to get the job done are usually up to you. Gathering everything beforehand ensures you won’t have to stop halfway through the process to hunt for a screwdriver. Here is the standard toolkit you will need:
- Adjustable wrench: Essential for loosening and tightening compression nuts.
- Basin wrench: Optional, but incredibly helpful for reaching tight spaces behind the sink basin.
- Drill and drill bits: Required only if you plan to drill a new hole in your countertop or cabinet wall.
- Phillips and flathead screwdrivers: For mounting brackets and miscellaneous screws.
- Utility knife: Sharp enough to make clean, square cuts on plastic tubing.
- Towel and a bucket: To catch residual water when you disconnect pipes.
- Flashlight: It can get dark under the sink, and good visibility helps prevent mistakes.
Step 1: Shut Off the Water and Relieve Pressure
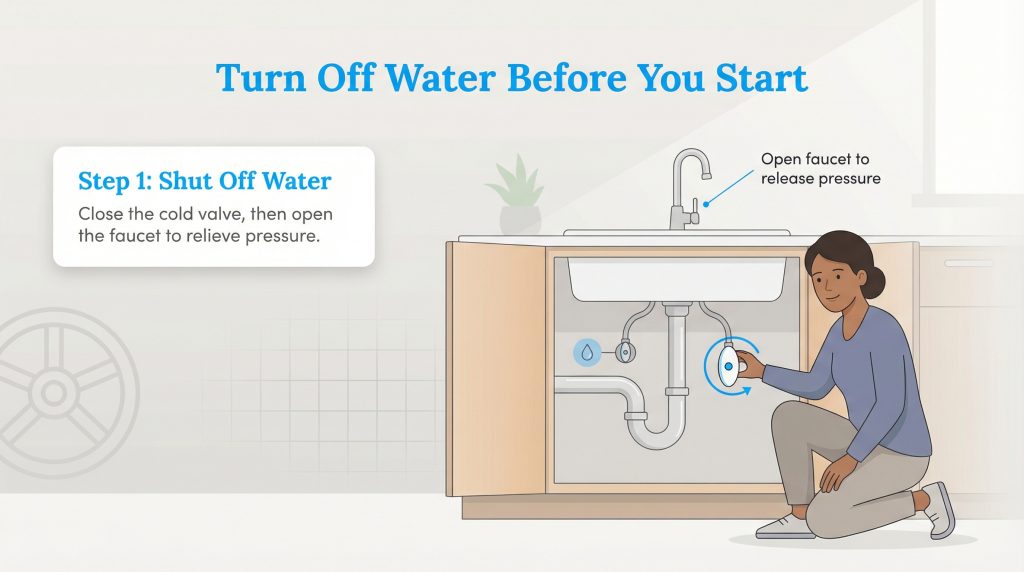
Safety comes first, and in plumbing, that means controlling the water flow. Locate the oval-shaped shut-off valve on the cold water line you identified earlier. Turn it clockwise (to the right) until it stops turning. If your home is older and the valve feels seized or stuck, do not force it, as this could break the valve stem. In that case, you may need to shut off the main water supply to the entire house for a short period.
Once the valve is closed, go back up to your kitchen sink and turn on the cold water faucet. You will see a brief flow of water that quickly trickles to a stop. Leave the faucet open for a moment to ensure all remaining pressure is relieved from the line. This simple step prevents water from spraying out at you when you unscrew the connections under the sink.
Step 2: Mount the Filter System
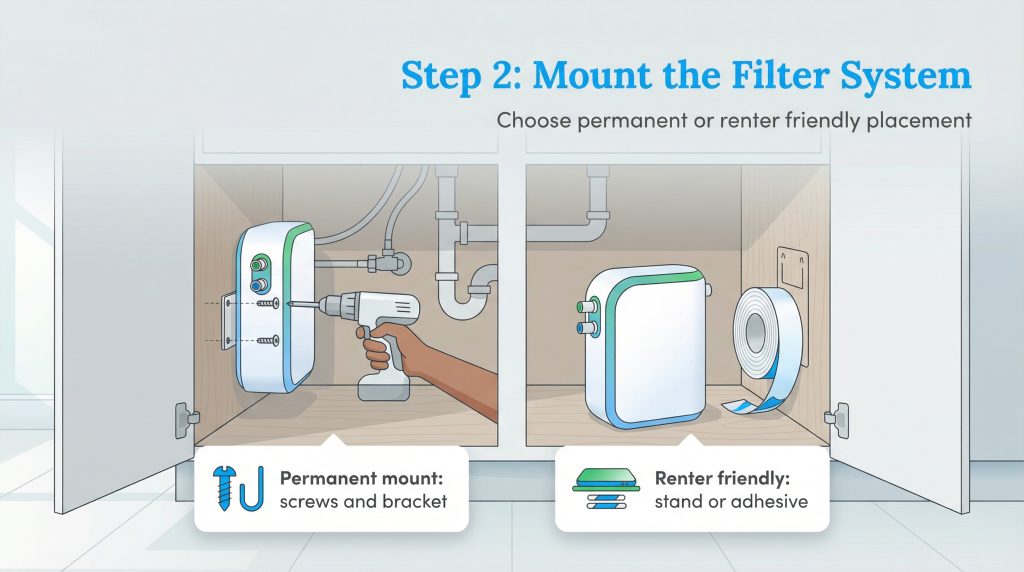
Now it is time to position the filter housing. Where you place it depends largely on whether you own your home or are renting. For homeowners looking for a permanent solution, mounting the unit to the side of the cabinet is ideal. Hold the unit in place, mark the screw holes with a pencil, and drill small pilot holes to prevent the wood from splitting. Screw the mounting bracket in firmly so the unit stays elevated and leaves you storage space on the cabinet floor.
If you are looking for a renter friendly under sink water filter setup, you might not want to drill holes in the cabinet. Many modern systems are designed with a flat base to stand freely on the cabinet floor. Alternatively, because many filter heads are lightweight, you can often use heavy-duty, double-sided adhesive strips to secure the bracket to the cabinet wall. This method keeps the unit stable during filter changes but allows you to remove it without a trace when you move out. This flexibility makes under sink water filter installation accessible for almost any living situation.
Step 3: Install the Dispenser Faucet
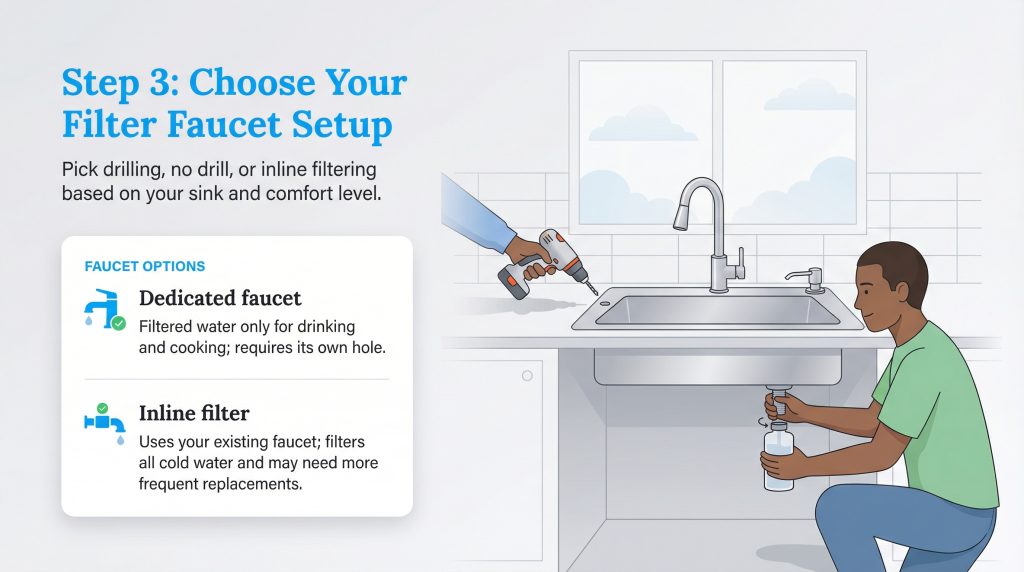
The dedicated faucet is often the most intimidating part of the installation for beginners. Depending on your sink configuration and willingness to modify the countertop, you have two distinct paths to choose from.
Option A: Drilling a New Hole
If you own your home and have a standard stainless steel sink or a countertop you are comfortable modifying, you can drill a dedicated hole for the filter faucet. You will need a specific drill bit for the material you are working with. Use a standard metal bit for stainless steel sinks, but if you have granite, marble, or quartz countertops, you must use a diamond-tipped hole saw bit to avoid cracking the stone. Always wear safety glasses to protect your eyes from debris, and be sure to wipe up metal shavings immediately, as they can rust and stain your sink surface overnight.
Option B: The No-Drill Soap Dispenser Hack
For a less invasive approach, check to see if your sink has a built-in soap dispenser or a side sprayer that you rarely use. These accessories usually occupy a standard-sized hole that is usually compatible with a water filter faucet, making it a perfect solution for a no drilling under sink filter setup. Unscrew the soap bottle from underneath, loosen the mounting nut, and pull the dispenser out from the top. You now have a ready-made hole for your new faucet without any drilling. This is a massive value-add for renters or anyone who wants to preserve their countertop’s integrity.
Choosing Between A Dedicated Faucet And Inline Filter
If neither drilling nor removing a soap dispenser appeals to you, you might consider an inline filter. Here is a quick comparison to help you decide:
- Dedicated Faucet: Provides filtered water only when you need it (drinking/cooking), extending the life of your filter. Requires a separate hole or modification.
- Inline Filter: Connects directly to your existing cold water line, filtering all cold water coming out of your main tap. No drilling required, but filter cartridges may need more frequent replacement since you use them for washing hands and dishes too.
Step 4: Connect the Plumbing
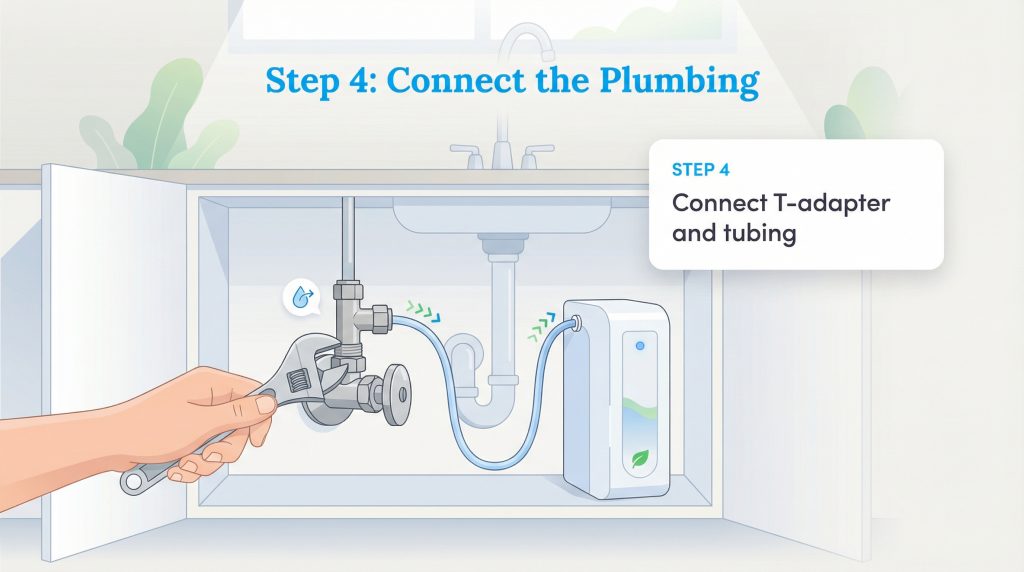
With the unit mounted and the faucet installed, you are ready to connect the plumbing. Think of the T-adapter (also known as a feed valve) as a detour sign for your water. It directs the main flow back to your regular kitchen faucet while diverting a small stream to your new filter.
Installing the Feed Valve Adapter
Place your bucket under the cold water shut-off valve. Use your adjustable wrench to disconnect the existing riser tube (the hose going up to your kitchen faucet) from the shut-off valve. A small amount of water will drain out—this is normal. Thread the T-adapter onto the shut-off valve and tighten it snugly. Then, reconnect the kitchen faucet’s riser tube to the top male threads of the T-adapter.
If you see multiple lines connected to your cold water supply—such as a line for a dishwasher or refrigerator ice maker—don’t panic. You can simply install the T-adapter between the shut-off valve and the existing splitter. If the setup looks overly complex or corroded, consult your installation manual or consider calling a professional to avoid accidental leaks.
Connecting the Tubing
Most modern filters use “Push-to-Connect” fittings, which are incredibly user-friendly. To connect water filter to cold water line, take one end of your plastic tubing and push it firmly into the open port on the T-adapter. You should feel it slide in, hit a stopping point, and then “click” or seat into place. Give the tube a gentle tug back to ensure the internal teeth have grabbed it. Repeat this process to connect the tubing from the adapter to the filter input, and from the filter output to your new faucet.
Step 5: Flush and Test the System

You might be eager to taste your new water, but patience is key here. The carbon filters inside the unit often contain loose carbon dust from the manufacturing process. If you drink immediately, the water might look cloudy or contain harmless black specks. To clear this out, turn your cold water supply valve back on slowly. You will hear water rushing into the system.
Open the new filter faucet and let the water run for at least 5 to 10 minutes, or whatever duration the manufacturer specifies. This flushes out the fines and activates the filter media. While the water is running, take a dry tissue and wipe it around every connection point you made. If the tissue comes away dry, your seal is perfect. If you spot a wet mark, shut the water off and tighten that connection slightly before testing again.
Maintaining Your New Water Filter

To keep your water tasting fresh and clean, you need to stay on top of filter replacements. Most cartridges are rated for six months to a year, depending on your household’s water usage. A great habit is to use a permanent marker to write the date of installation directly on the filter cartridge. This way, every time you open the cabinet for cleaning supplies, you have a visual reminder of when it’s time for a change.
When it comes time to dispose of old filters, check the manufacturer’s website. Many companies now offer recycling programs where you can mail back used cartridges, keeping plastic waste out of landfills. Following these sustainability practices aligns perfectly with the eco-friendly goals of reducing single-use plastics.
Enjoy Clean and Sustainable Hydration Right From Your Tap
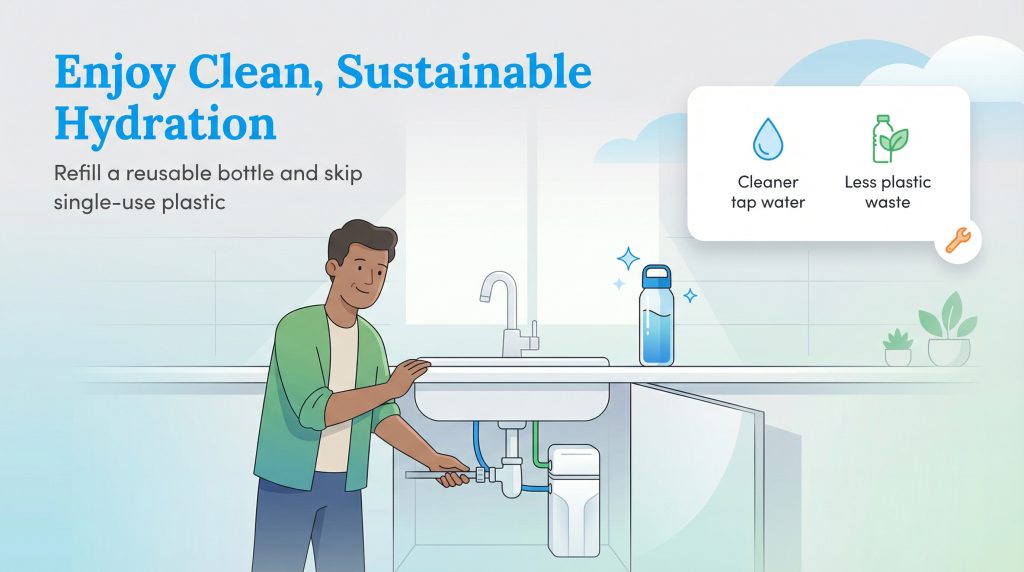
By installing your own under sink water filter, you have taken a significant step toward a healthier home and a healthier planet. You are now saving money that would have been spent on bottled water and preventing countless plastic bottles from entering the waste stream. We encourage you to fill up a reusable bottle immediately and enjoy the crisp taste of your hard work. As you can see, plumbing tasks aren’t nearly as scary as they seem when you break them down into manageable steps.
FAQs About Under Sink Water Filter Installation
Do I need a plumber to install an under sink water filter?
Can I install an under sink filter if I rent my home?
How do I tap into the cold water line for the filter?
What if my under sink water filter is leaking?
How long does it take to install an under sink water filter?
How often should I change the filter cartridges?
About the Author

LaLeesha has a Masters degree in English and enjoys writing whenever she has the chance. She is passionate about gardening, reducing her carbon footprint, and protecting the environment.