Proper placement and manual configuration are the secrets to eliminating dead zones effectively.
Key Takeaways
- Place your extender halfway between your router and the dead zone for the best performance.
- Use the manual browser setup if the automatic WPS button fails to connect your device.
- Check your signal strength with a speed test app to verify the extender is actually working.
We have all experienced the frustration of walking into a specific room and watching our Wi-Fi bars drop to zero, interrupting streams and video calls instantly. While buying a Wi-Fi extender is a cost-effective solution to fix these dead zones, the setup process can sometimes feel more complicated than it needs to be. In this Wi-Fi extender setup guide, we will walk you through finding the perfect location, connecting your device, and optimizing it to ensure you get the speed you pay for without unnecessary headaches. Whether you are trying to push a signal to a backyard patio or an upstairs bedroom, getting your new booster up and running requires just a few strategic steps essential for setting up internet in any home.
Finding the Perfect Spot: The “Halfway Rule”
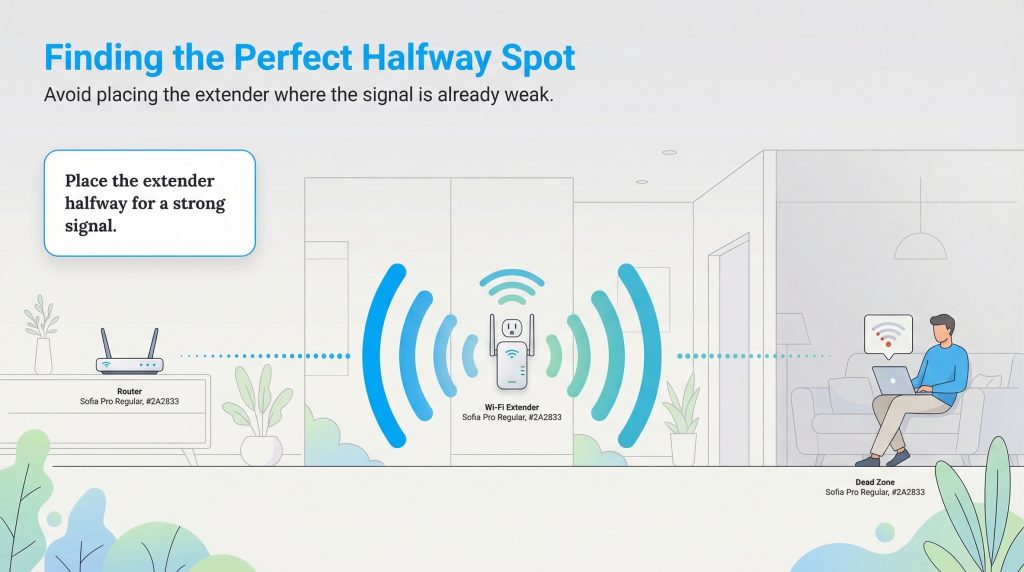
The most common mistake people make during installation is placing the Wi-Fi extender directly in the dead zone where the signal is already weak. An extender works like a relay runner; it needs to receive a strong signal from the main router to pass it along effectively. If you place the device in a room that already has poor connectivity, it will only boost a weak, unstable signal, resulting in frustratingly slow speeds.
To get the best results, you should place your extender halfway between your main router and the area where you need coverage. This location allows the device to catch a strong signal from the source and broadcast it firmly into the dead zone. You might need to experiment with a few different power outlets in a hallway or open living area to find the sweet spot that bridges the gap perfectly. If you are still struggling with coverage issues after finding the right spot, you may need to look into other ways to boost your Wi-Fi signal before upgrading your hardware.
Method 1: The Quick Setup (Using WPS)
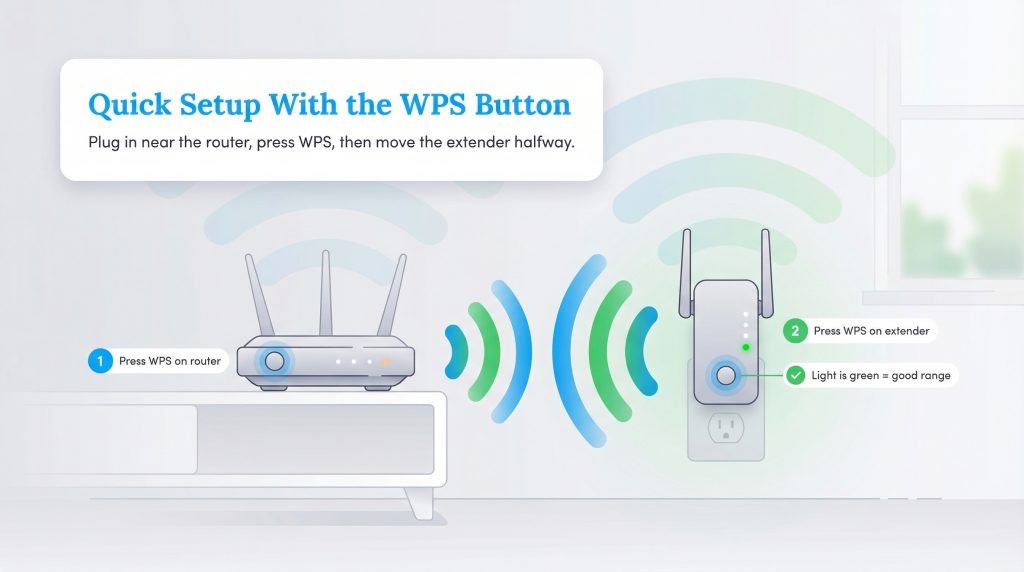
The easiest way to connect your new device is by using the Wi-Fi Protected Setup (WPS) button found on most modern routers. To start, plug your extender into a power outlet near your router, not in its final location, so the two devices can easily communicate during the pairing process. Press the WPS button on your main router, and then within two minutes, press the WPS button on your extender. You will typically see the lights on the extender blink before turning solid, indicating a successful connection.
Once the devices are paired, you can unplug the extender and move it to the halfway spot you identified earlier. The extender will remember the configuration settings, so you won’t need to pair it again. After you plug it into the new outlet, wait for the signal indicator light to turn green or white, confirming that it is still within good range of the router.
Method 2: Manual Wi-Fi Extender Setup (No WPS? No Problem)
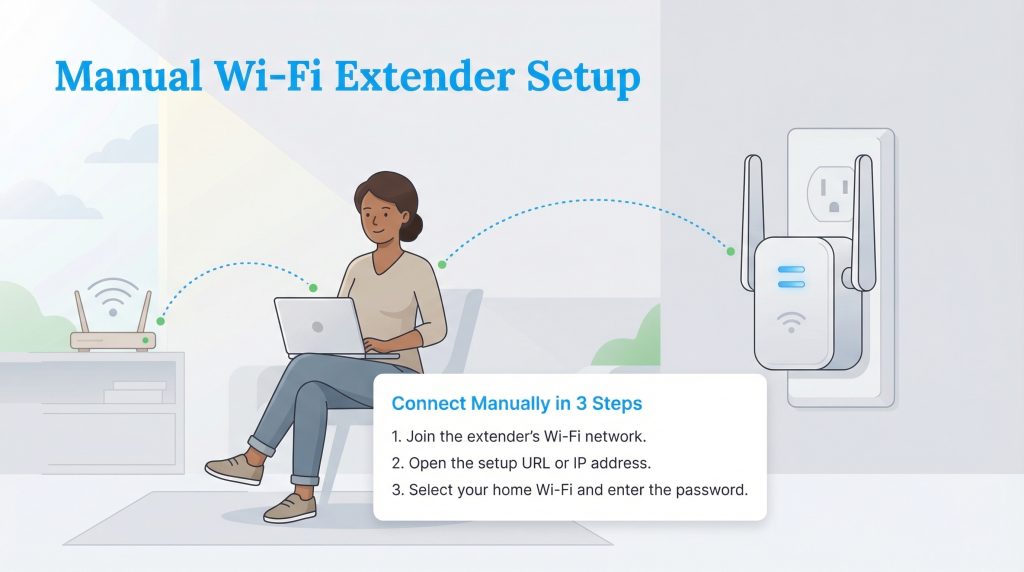
If your router does not have a WPS button, or if the quick setup method failed, you will need to configure the device manually using a web browser. This method is usually more reliable and also lets you tweak more settings if you want to. Start by plugging in the extender and waiting for it to boot up. On your phone or laptop, open your Wi-Fi settings and look for a new network name that matches your extender’s brand, often ending in “_EXT” or something similar (e.g., NETGEAR_EXT). Connect to this network; your device may warn you that there is no internet access, which is normal.
Once connected to the extender’s default network, open a web browser and type in the manufacturer’s default login URL or IP address. This will take you to a setup wizard that scans for available Wi-Fi networks. Select your home network from the list, enter your current Wi-Fi password, and follow the prompts to finalize the connection. If you are unsure which URL to use, refer to the table below or check the sticker on the back of your device. If the URL does not work, you can also try entering a common IP address like 192.168.0.1 or 192.168.1.1 in your browser’s address bar, then follow your extender’s instructions.
| Brand | Common Login URL |
|---|---|
| Netgear | mywifiext.net |
| TP-Link | tplinkrepeater.net |
| Linksys | extender.linksys.com |
| ASUS | repeater.asus.com |
For more specific instructions related to your model, you can visit the official Netgear Support or TP-Link Support pages to download the manual for your specific hardware.
Troubleshooting the Lights: What Do They Mean?

Wi-Fi extenders communicate their status through LED lights, and decoding them is key to troubleshooting connectivity issues. While every manufacturer uses slightly different color schemes, there are universal standards that can help you understand what your device is doing. If you are confused by a blinking light or a sudden color change, checking the signal indicator is usually the first step to fixing the problem.
| Light Status | What It Usually Means |
|---|---|
| Solid Green/White | Your extender has a strong connection to the router and is ready to use. |
| Amber/Orange | The extender is connected, but it is either too close or too far from the router. Try moving it closer to the main unit. |
| Red | There is no connection to the router. You are likely out of range or entered the wrong password. |
| Blinking | The device is booting up, resetting, or actively trying to pair via WPS. |
If your extender indicates a connection but you still have no internet access, there are a few extra steps you can take. First, confirm your main router has internet by testing it directly. Next, double-check that you entered the correct password for the extender and ensure it is connected to the right frequency band (2.4 GHz vs. 5 GHz). Finally, if you recently changed your main Wi-Fi password, you will need to re-run the setup wizard to update the extender’s credentials.
Connecting Your Devices and Verifying Speed
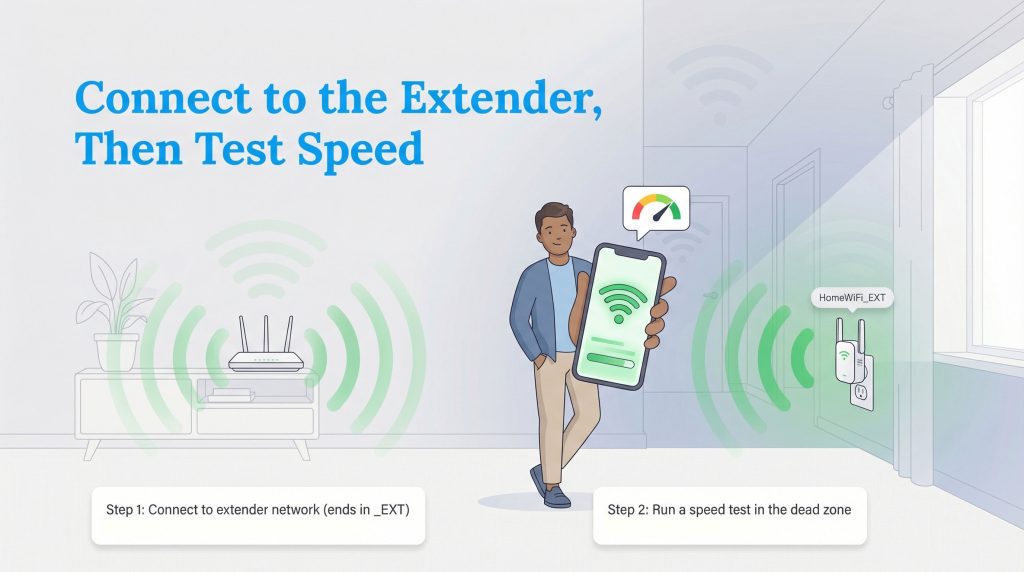
A common misconception is that your phone or laptop will automatically switch to the extender’s stronger signal once setup is complete. Unless you have a specific “OneMesh” system or similar technology, you often need to manually go into your Wi-Fi settings and connect to the new network, which usually ends in “_EXT.” If you forget this step, your device will cling to the weak signal from the main router, and you won’t see any performance improvement.
After connecting, it is crucial to verify that the system is working correctly. Run a test using Ookla Speedtest while standing in the dead zone. You should see a significant improvement in stability and speed compared to before. If the speeds are still dragging, try moving the extender slightly closer to the router to improve the signal it receives.
Sustainability Corner: Extenders vs. Mesh Systems
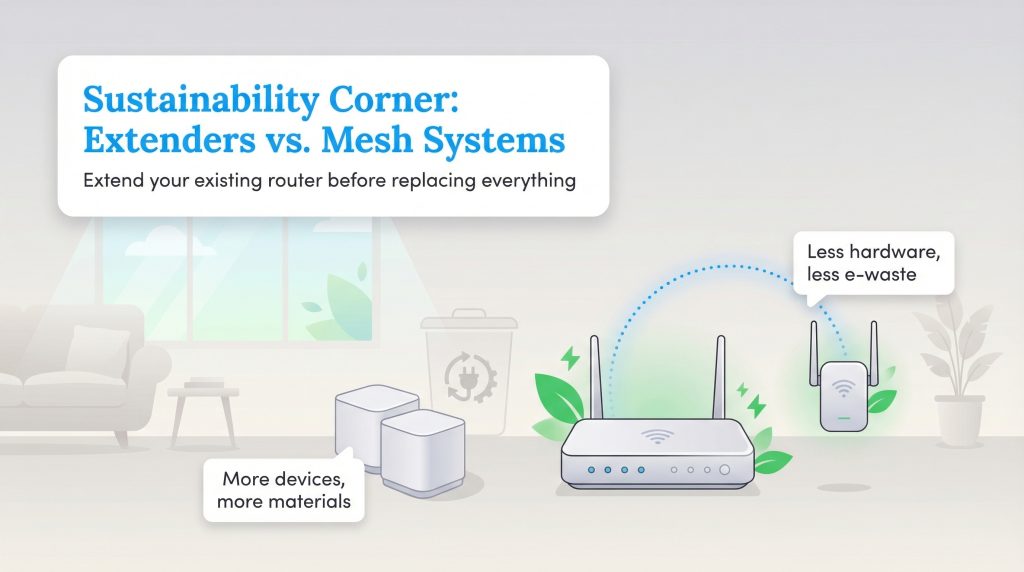
When facing connectivity issues, many consumers are tempted to throw out their old router and buy an expensive, multi-unit Mesh Wi-Fi system. While Mesh systems are powerful, they generate a significant amount of electronic waste by rendering perfectly functional hardware obsolete. Unless you have a very large home that requires multiple access points, adding an extender is often more sustainable than replacing your entire router setup. Opting for a simple Wi-Fi extender allows you to keep your current router in use for years longer, adhering to the “reduce and reuse” principles of sustainable living.
By extending the life of your existing networking gear, you keep plastic and circuit boards out of landfills. Extenders usually use less power than a full mesh system, so they’re often a more energy-saving choice for small to medium-sized homes that just need a little boost in one corner.
Enjoying Your Expanded Coverage Area
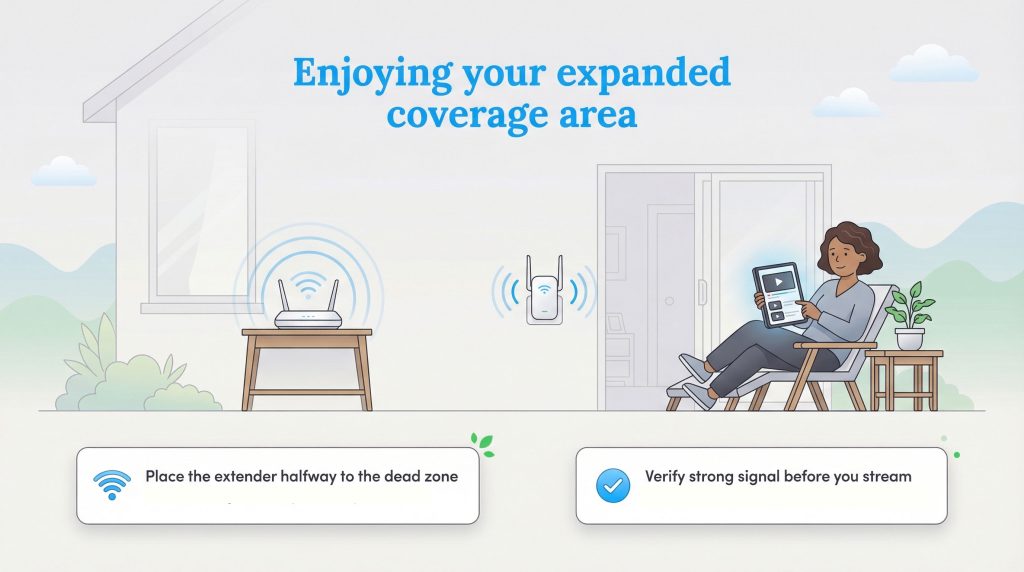
Setting up a Wi-Fi extender does not have to be a technical nightmare if you follow the right steps regarding placement and configuration. By positioning the device halfway between your router and the dead zone and taking the time to verify your connection, you can eliminate buffering and dropped calls for good. Enjoy streaming movies on the patio or taking video calls from the spare room, knowing you have optimized your home network efficiently and sustainably.
FAQs About Wi-Fi Extenders
What is the difference between a Wi-Fi extender, booster, and repeater?
Do I need the same brand of extender as my router?
Why is my Wi-Fi extender slow?
Can I chain multiple extenders together?
How do I reset my extender if I move?
About the Author

LaLeesha has a Masters degree in English and enjoys writing whenever she has the chance. She is passionate about gardening, reducing her carbon footprint, and protecting the environment.