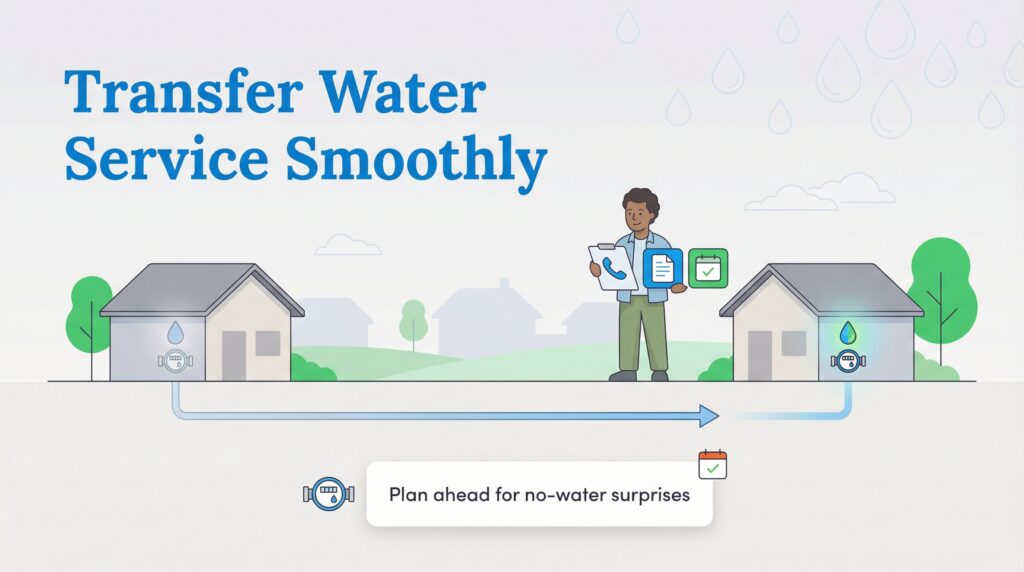
Plan ahead to prevent service interruptions and ensure you have running water the moment you step into your new home.
Key Takeaways
- Contact your current and future water providers at least two weeks before your move to schedule service changes.
- Gather essential documents early, as water departments often require proof of ownership, a lease agreement, or a photo ID to open an account.
- Always request a final meter reading at your old address to ensure you aren’t billed for water usage after you leave.
Moving to a new home involves an endless list of logistical tasks, but few are as crucial as ensuring your essential utilities are flowing the moment you walk through the front door. While people eagerly schedule their high-speed internet or electric installations, transferring water service is a task that frequently slips through the cracks until you find yourself standing in a new kitchen with a completely dry faucet. Because local municipalities operate with varying business hours, specific document requirements, and strict administrative rules, you must know how to transfer water service to a new address well before the moving truck arrives. We understand how chaotic relocation can be, so we have created this comprehensive, chronological guide to walk you through every phase of the process. By following these strategic steps, you can avoid frustrating shutoffs and rest assured that a hot, relaxing shower will be waiting for you after a long day of hauling heavy boxes.
The Water Utility Transfer Timeline
Transferring municipal utilities requires a bit more foresight than setting up standard subscription services. Unlike major telecommunications companies that can seamlessly flip a digital switch on a Sunday afternoon, local water departments typically operate during strict weekday business hours. Because of these municipal constraints, establishing a concrete timeline is the absolute best way to avoid stepping into a home with no running water. Here is a chronological checklist to keep your utility transition completely on track:
- 3 to 4 Weeks Out (Identify your provider): Begin researching the specific municipal district or private company that services your new address. Use this time to gather required identification documents, verify your lease or purchase agreements, and understand the local connection fees.
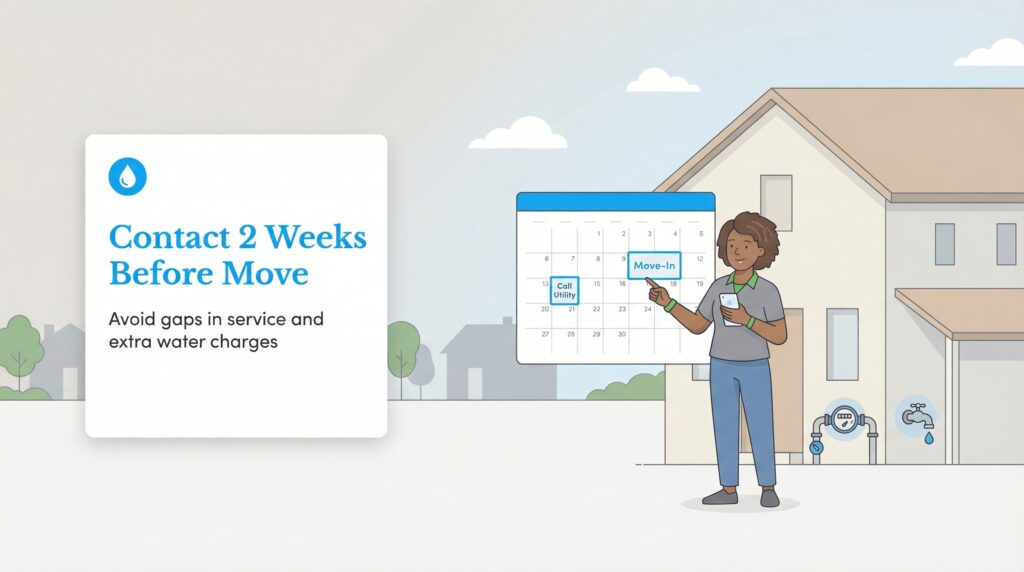
- 2 Weeks Out (Schedule start and stop dates): We strongly recommend contacting your current and future water providers at least 14 days before your move-in date. This gives the local government ample time to process your application and guarantees they can dispatch a field technician to your property for physical meter readings on the correct dates.
- Moving Day (Verify running water and check for leaks): The moment you arrive with your boxes, immediately check the kitchen and bathroom faucets to ensure the water is flowing clearly. Take five minutes to inspect the base of toilets and underneath sinks for any active leaks that may have sprung during the vacancy period.
This timeline applies equally whether you are moving across the country or just down the street. Small delays in your planning can easily leave you high and dry over a long holiday weekend, so mark these milestones on your moving calendar today.
How to Find Your Local Water Provider
One of the most confusing aspects of relocating to an unfamiliar neighborhood is simply figuring out who controls the local infrastructure. Unlike electricity or internet services, where you might have several private companies aggressively competing for your business, water service is almost universally tied to a specific city, county, or municipal utility district (MUD). This means you generally do not get to “shop around” for lower rates, but you do need to accurately identify the correct governing entity to service your property.
Here are four reliable ways to quickly identify your new water provider:
- Check your lease or closing disclosure: If you are aiming to setup water service new house, look directly at your finalized real estate documents. Landlords and title companies frequently list the required municipal utility contacts right in the paperwork.
- Ask the experts: Your real estate agent, landlord, or property manager will know exactly which utility company services the specific neighborhood.
- Check the property listing: If you purchased the home, the Multiple Listing Service (MLS) sheet usually details the local utility providers under the specialized “Utilities” section.
- Visit the city website: Most municipal websites feature a dedicated public utilities page. You can use the search tool at USA.gov/local-governments to locate the official site for your new city or county government.
For more general information on how municipal services function and what you should expect during a transition, you can explore our comprehensive water service hub.
Documents You Need to Start Water Service
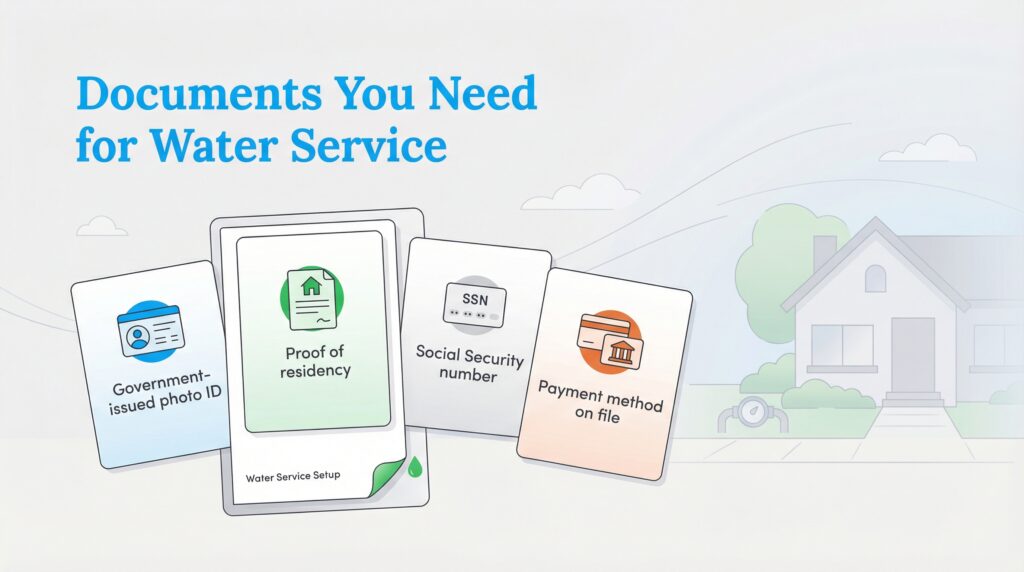
Water departments are notoriously strict regarding their documentation requirements compared to private utility companies. Because unpaid municipal water bills can occasionally result in a harsh tax lien placed against the physical property itself, city clerks must diligently verify your identity and your legal right to occupy the residence. To protect themselves from liability, they demand precise paperwork before activating any valves.
Gathering these materials beforehand will speed up the application process significantly. Be prepared to provide the following items to establish your account:
| Document Type | Description |
| Government-Issued Photo ID | A valid, unexpired driver’s license, federal passport, or state identification card is standard to verify your primary identity. |
| Proof of Residency | You must present a signed lease agreement if renting, or the official closing disclosure if purchasing. This acts as your mandatory proof of residency for water service. |
| Social Security Number | Many regional utilities require this information to perform a soft credit check or firmly establish your financial responsibility for the account. |
| Payment Method | Prepare a valid credit card, debit card, or checking account routing details to pay the upfront connection fee or required security deposit. |
Step-by-Step: The Water Transfer Process
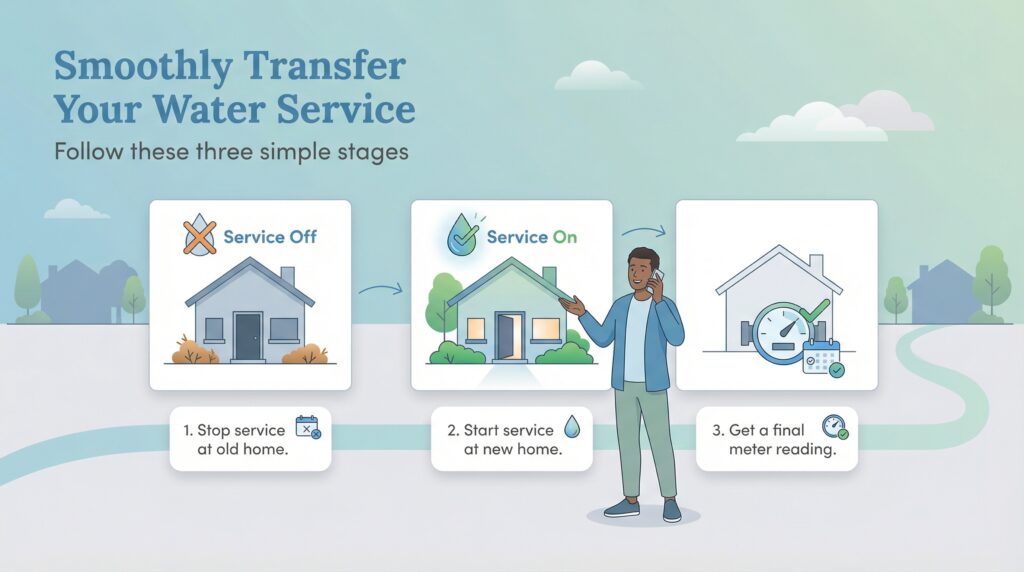
Once you have your documents digitized and you know precisely who to call, the physical administrative procedure becomes much less intimidating. For those wondering exactly how to transfer water utilities without any hiccups, we have broken the core process down into three highly manageable, chronological stages to keep your moving logistics perfectly aligned.
1. Stop Service at Your Old Address
The very first step is to arrange the cancellation of utility services at your current home. Call your existing municipal provider and specify the exact date you want the service to officially end, which is typically the morning after your scheduled move-out day. It is crucial to explicitly provide them with a new forwarding address for your final physical bill. If you neglect this simple step, the final invoice may get lost in the mail, accrue aggressive late penalties, and eventually be sent to a collections agency — severely damaging your personal credit score over a minor oversight.
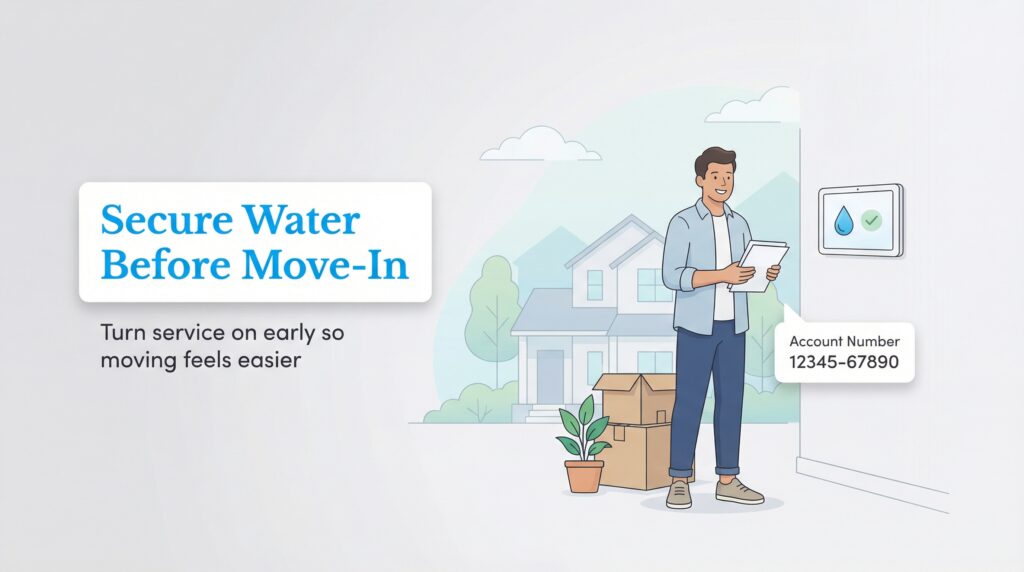
2. Start Service at Your New Address
Next, contact your incoming provider to register your brand-new account. It is highly recommended to schedule the service start date for the day before you physically move into the property. This 24-hour buffer ensures that if the city encounters any localized mechanical issues, you have enough time to resolve them before unpacking boxes in a dry house. If there is a short overlap of a few days between your old and new homes, keep both respective services active so you have reliable water for deep cleaning at both properties.
3. Schedule the Final Meter Reading
Do not skip this critical mechanical step before you hand over your old keys. You must demand a final water meter reading before moving to legally establish exactly how much water you consumed up until the exact moment you vacated the premises. Without this localized cutoff metric, you run the enormous risk of being financially penalized for the heavy water usage of the incoming tenant or the new homeowner. Securing this reading guarantees a perfectly accurate, prorated water bill move out, closing your previous account cleanly without any lingering financial disputes.
Water Service for Renters vs. Homeowners
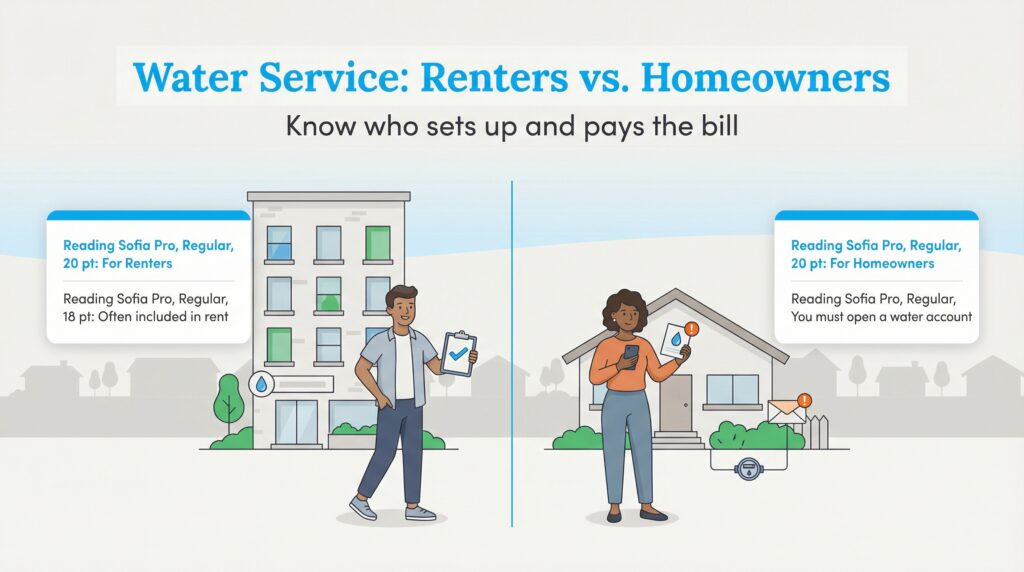
The administrative responsibilities for managing utility connections differ dramatically depending on whether you are leasing an apartment or purchasing a single-family house. Understanding these subtle legal differences helps you handle municipal bills correctly during a property turnover.
- For Renters: In many large multi-family apartment complexes, master-metered water is frequently included directly into the monthly rent, meaning you will never need to set up an individual account with the city. However, if you are relocating into a single-family rental home, you will likely encounter a landlord tenant water bill transfer. The property owner will typically require you to transfer the utilities entirely into your own name before handing over the front door keys. Landlords should always remember to formally revert utility services back into their own name during tenant turnovers to avoid accidental, damaging shutoffs in the interim.
- For Homeowners: When you purchase a property, the assumption of utility responsibility falls entirely on your shoulders the moment the ink dries. While title companies handle the financial prorations of outstanding bills at the closing table, this does not magically open a new city profile on your behalf. You must still proactively contact the local water department to register as the new legal owner and prevent the service from being abruptly disconnected.
How HOAs and Title Companies Handle Water Transfers
When you purchase real estate, the closing process often intersects with your local municipal utilities in unexpected ways. Fortunately, professional title companies generally handle the complex logistics required to transfer water bill to new owner during the final closing table procedures. Because unpaid municipal water bills stay legally attached to the physical property rather than the individual person, the title agency will systematically pull the seller’s final water balance and pay it off directly from the escrow funds. This diligent backend process ensures that you inherit a completely clean slate without the previous owner’s past-due utility debt holding up your account creation.
However, if you are purchasing a property situated within a managed community, you must also investigate the neighborhood association’s specific bylaws. Buyers should always verify with their real estate agent if their monthly Homeowner Association (HOA) dues already cover the master-metered water and sewer bill. In many modern townhome communities and condo developments, the overarching association manages the entire exterior water infrastructure, meaning you will not need to establish an individualized account with the city at all. Always cross-reference your official closing documents to confirm who precisely holds the billing responsibility before making unnecessary phone calls.
Fees, Deposits, and Billing Surprises
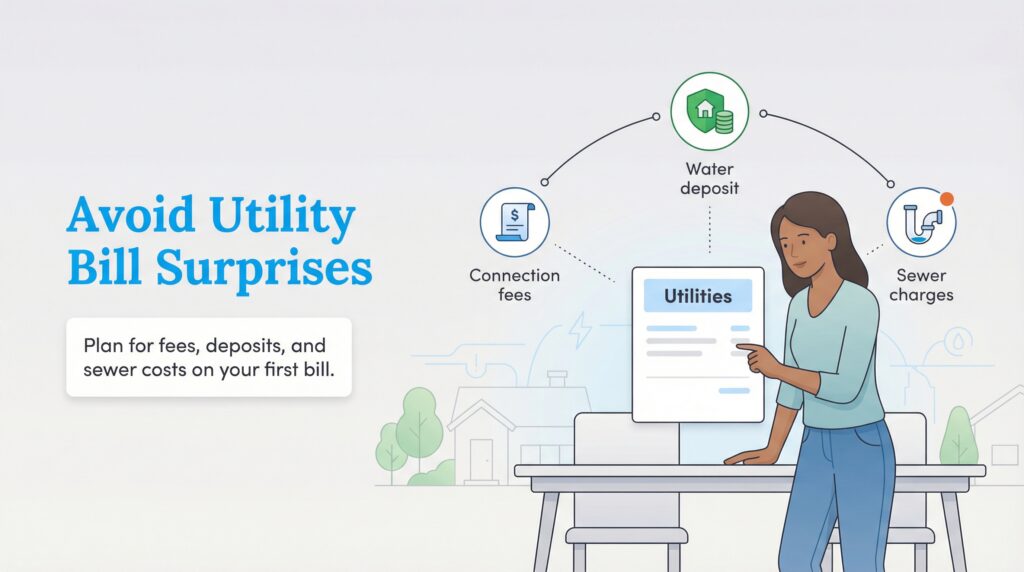
Thoroughly budgeting for a major relocation should always account for the hidden administrative costs directly associated with municipal connections. In almost every jurisdiction, you will encounter a standard water utility transfer fee that generally ranges between $20 and $50. This is a strict, one-time administrative surcharge tacked onto your very first statement to cover the clerical labor of establishing your new public profile. Additionally, if you are a brand-new customer to the specific county or simply possess a limited credit history, you may need to pay an upfront “average water bill deposit.” This deposit typically ranges from $50 to $150, although some districts may charge significantly more for large homes with high expected usage. Thankfully, this deposit is generally refundable after a full year of consistent, on-time payments.
When establishing your new account, it is also critical to explicitly request that the clerk transfer water and sewer service together. These two distinct municipal utilities are overwhelmingly bundled by local governments, and the underlying sewer rate is frequently calculated based directly on your incoming water consumption. Understanding these interconnected rates upfront prevents extreme “sticker shock” when your first comprehensive bill finally arrives in the mail.
Moving In: Your First Day Water Checklist
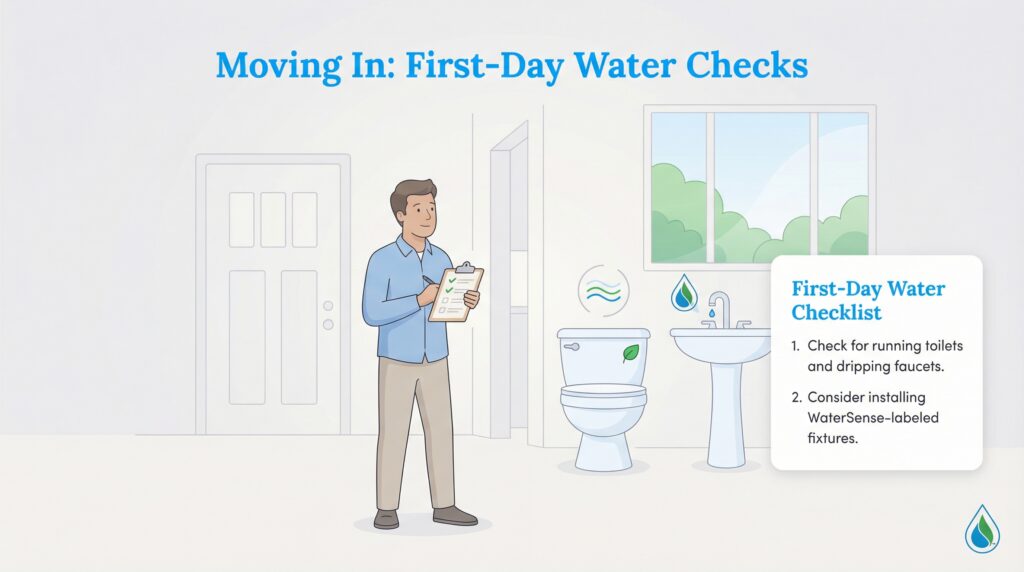
Once you arrive at your new residence, take a brief moment to visually inspect the interior plumbing before you start unpacking your kitchenware. This is the absolute perfect time to spot mechanical issues that could cost you hundreds of dollars in wasted utilities. Check carefully for “phantom leaks”, such as toilets that run continuously after flushing or bathroom faucets that drip aggressively. Even a seemingly small drip can waste dozens of gallons of water per day, driving up your municipal bill unnecessarily. You should also take the time to locate the home’s primary main water shutoff valve, so you know exactly how to halt the flow of water in the event of a sudden pipe burst.
From an environmentally mindful and budget-friendly perspective, moving in presents the perfect opportunity to audit your overall household consumption and upgrade outdated fixtures. Consider installing official ENERGY STAR or WaterSense-labeled products to drastically reduce consumption without sacrificing daily performance. These upgrades don’t just protect the environment — they can also consistently trim your monthly invoice, especially if your localized sewer charges are directly based on water use. You can find more valuable resources on pinpointing and fixing silent leaks during the EPA WaterSense Fix a Leak Week events or directly on their main website.
Preparing for Your First Water Bill
Successfully navigating the physical administrative hurdles of a utility transition does not entirely end the moment your faucets start running clear. To truly complete the relocation process, you must meticulously review your initial municipal invoice the very moment it arrives in the mail. Look closely at the itemized columns to ensure the city accurately applied your one-time administrative fees and verify that there are absolutely no overlapping stop water service moving crossover charges from the previous resident’s tenure. Cross-referencing the starting meter read printed on this initial bill against the photograph you wisely took on moving day will instantly highlight any glaring clerical discrepancies.
Once you thoroughly verify that the baseline connection charges are completely accurate, take five minutes to log into the municipality’s online payment portal and set up an automated payment schedule. Establishing auto-pay guarantees that you will never miss a local due date, actively protecting your personal credit score and ensuring your essential household services remain entirely uninterrupted as you happily settle into your wonderful new home.
Frequently Asked Questions About Transferring Water Service
Can I transfer water service online?
How much does it cost to transfer water service?
Do I need to be home when they turn the water on?
What happens if I forget to cancel my old water service?
Does the water company also transfer sewer service?
Can a title company transfer water utilities when selling a house?
How do I handle a prorated water bill when moving out?
Do I need a new security deposit if I transfer water service within the same city?
About the Author

Claudio is a sustainability-focused writer with a background in Anthropology and Psychology from NC State University. He has spent over 15 years working in writing, interpretation, and translation, driven by a deep interest in how human culture shapes the environment. Today, he shares his curiosity with readers by writing about sustainable living solutions and the connection between everyday choices and environmental impact.